Happy Back to School! Hope you’ve had a wonderful time slowing down, celebrating, and soaking up summertime under the sun and stars!
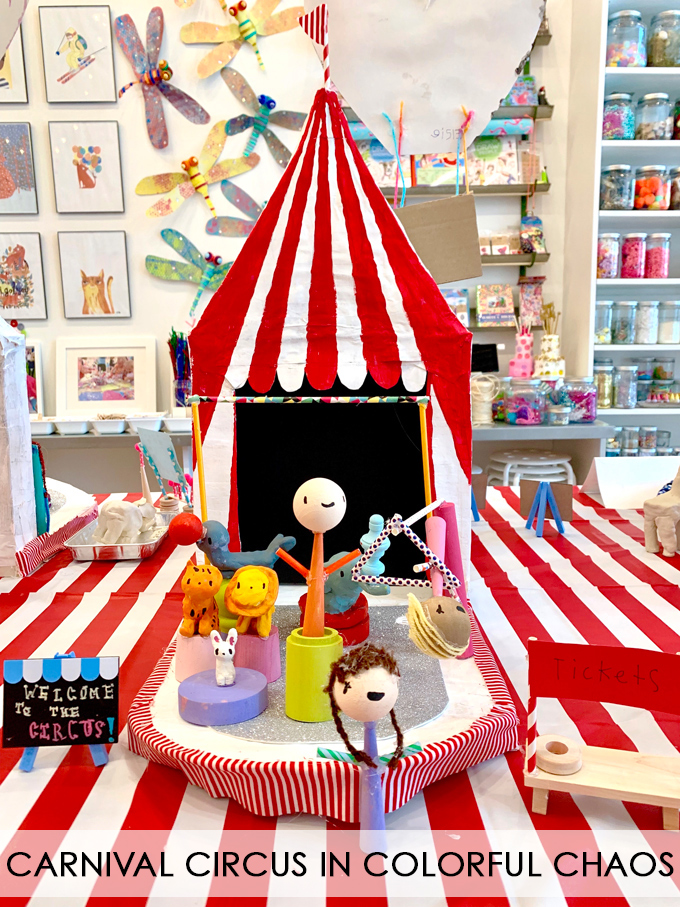
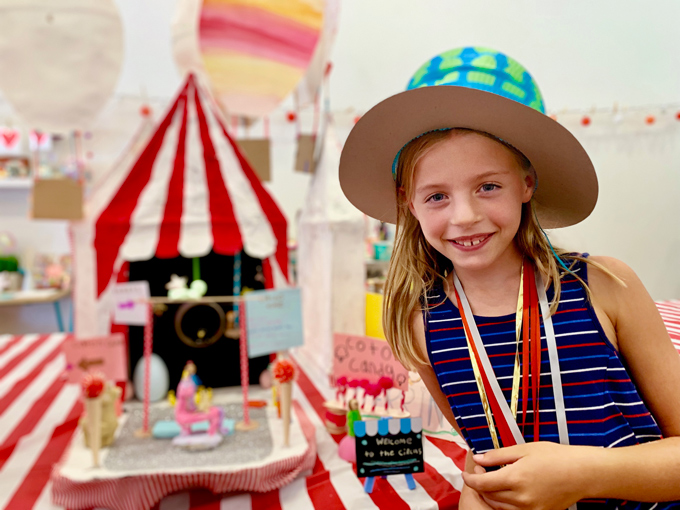
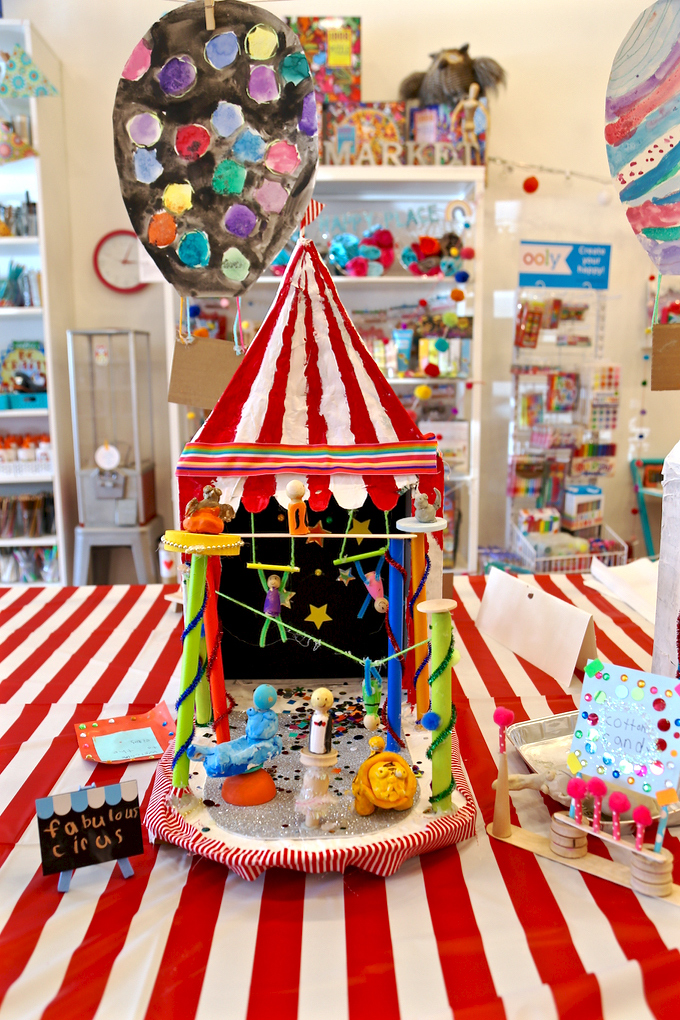
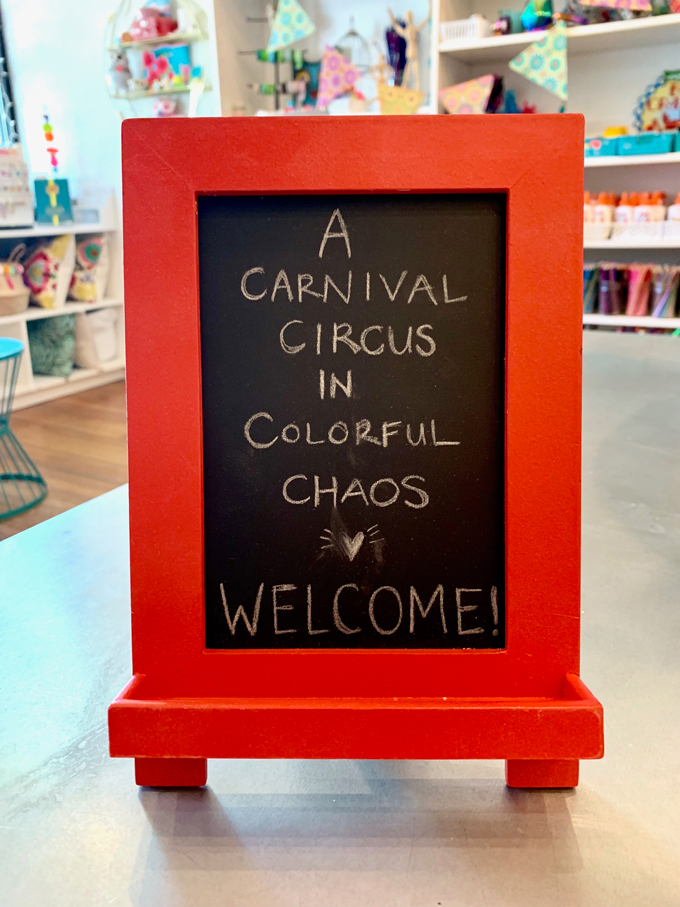
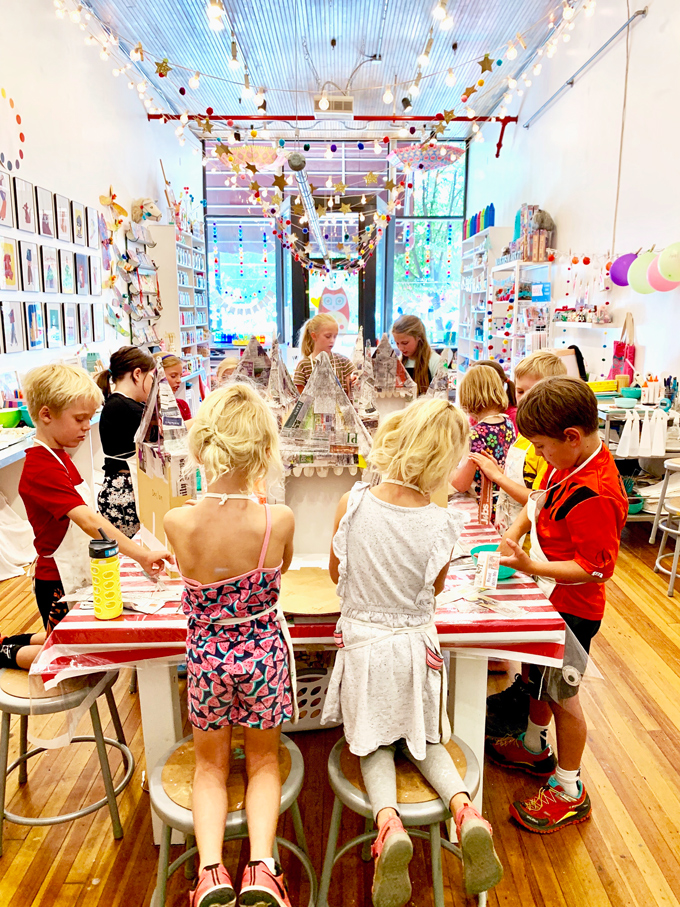
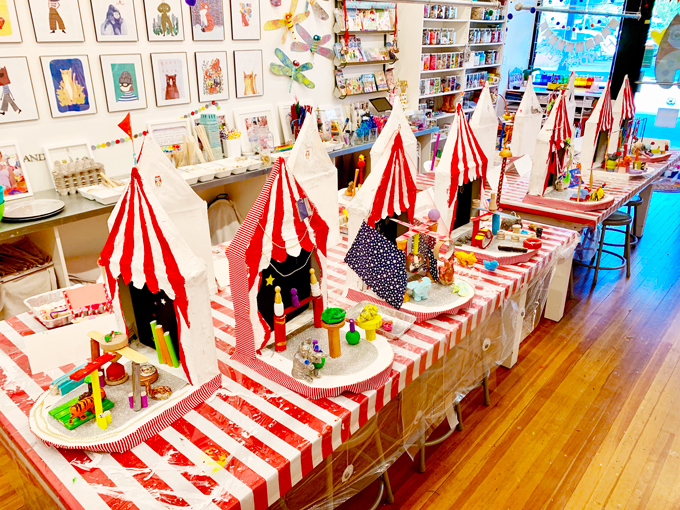
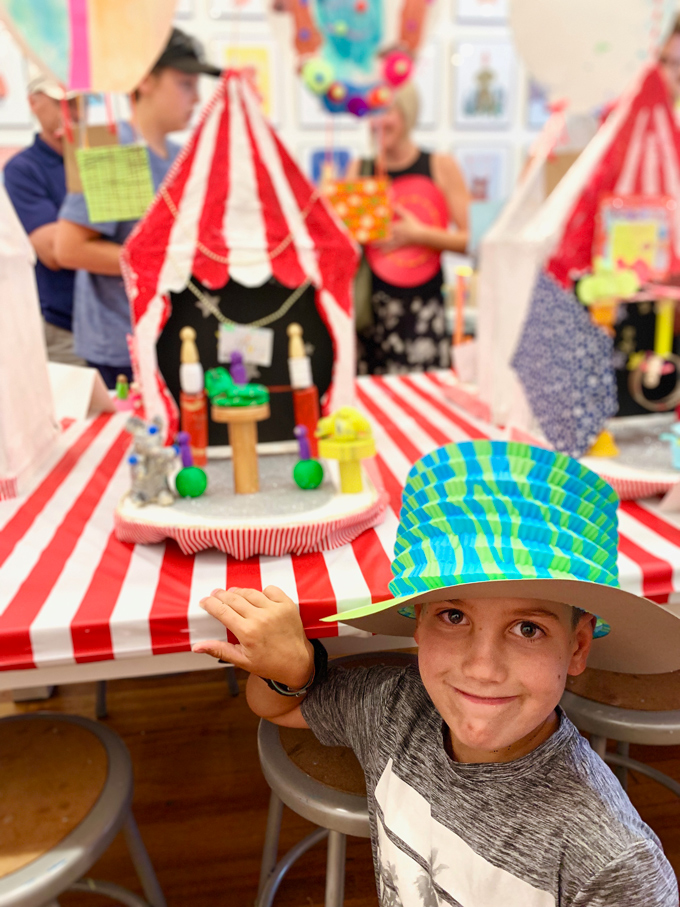
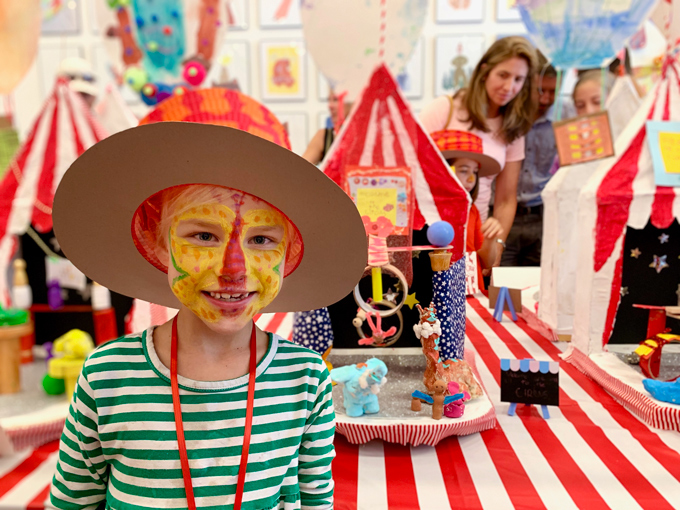
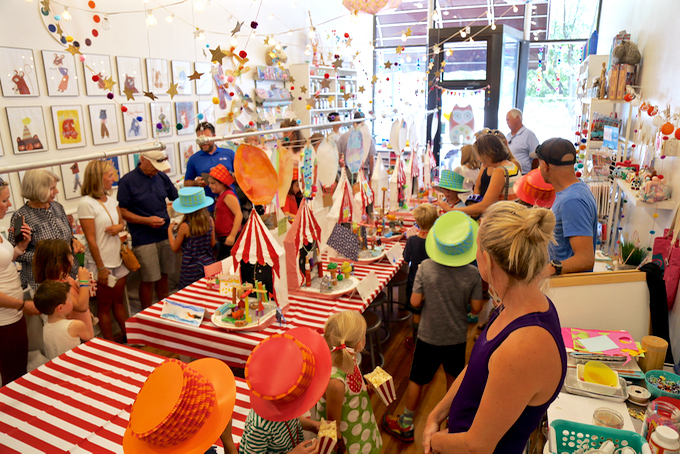
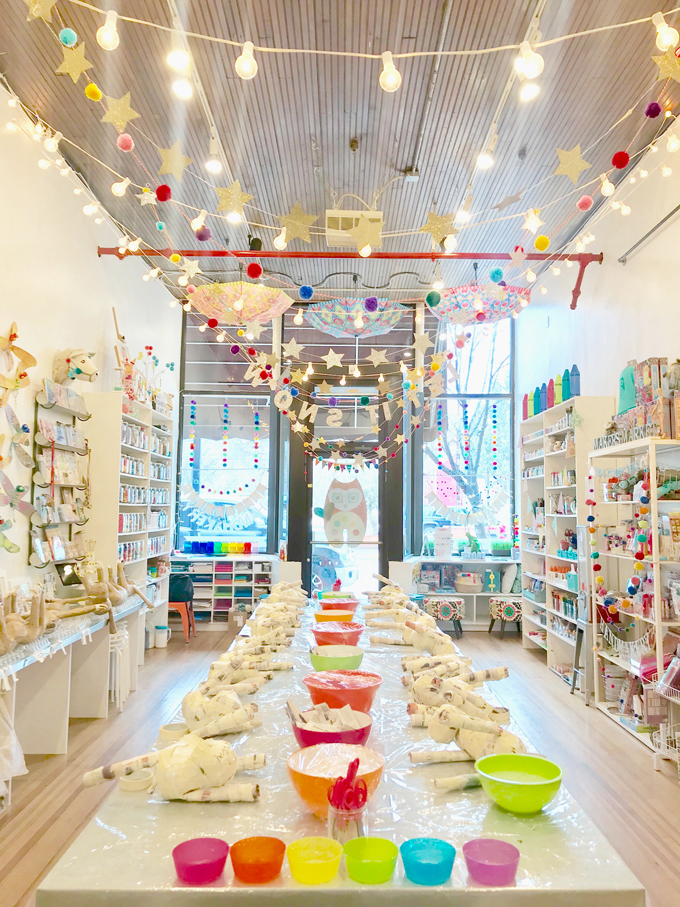
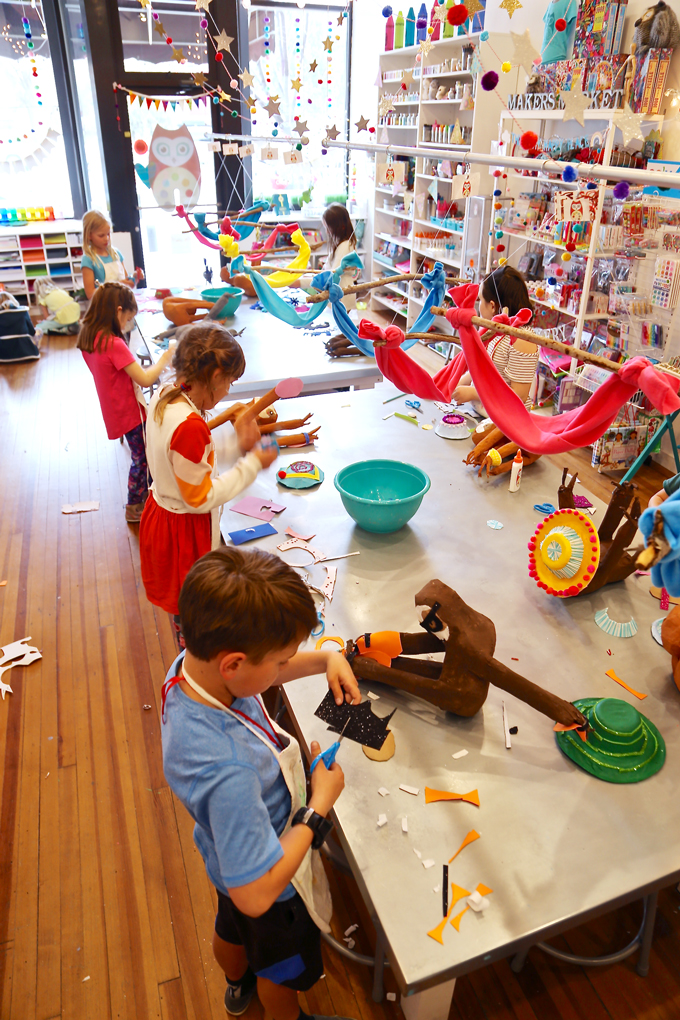
Our studio artists recently showcased ~ A CARNIVAL CIRCUS IN COLORFUL CHAOS! This was our final + full-week workshop of the splendid summer! It was F-U-N and completely filled with construction, creativity, children, color, creatures, cheer, childhood and of course, a teeny-tiny bit of chaos! Take a peek at this delightful process combining circus + carnival + celebration + childhood + construction + collaboration + community + color! We were inspired by Up Warsaw’s beautiful + handmade furniture and wooden circus tents @upwarsaw on Instagram! Be sure to tag @handmakery on Instagram if you give this process-art project a GO! Take a peek below!
Early online enrollment is highly encouraged as seating is limited! Start a new school year making + creating + connecting in a colorful community focused on a creative + collaborative childhood!
Glues – white glue, cool temp glue gun + glue and hot glue gun + glue {adult use}
Paper straws
Pipe cleaners
String + yarn + wire
Wood parts and pieces {assortment}
Wooden peg dolls
Poster board
Sparkle foam
Fabric
Paper and markers for signs + flags + garland
Embellishments- sticker stars, pom poms, and more!
A SIMPLE PROCESS FOR ~ CARNIVAL CIRCUS IN COLORFUL CHAOS:
BUILD + CONSTRUCT
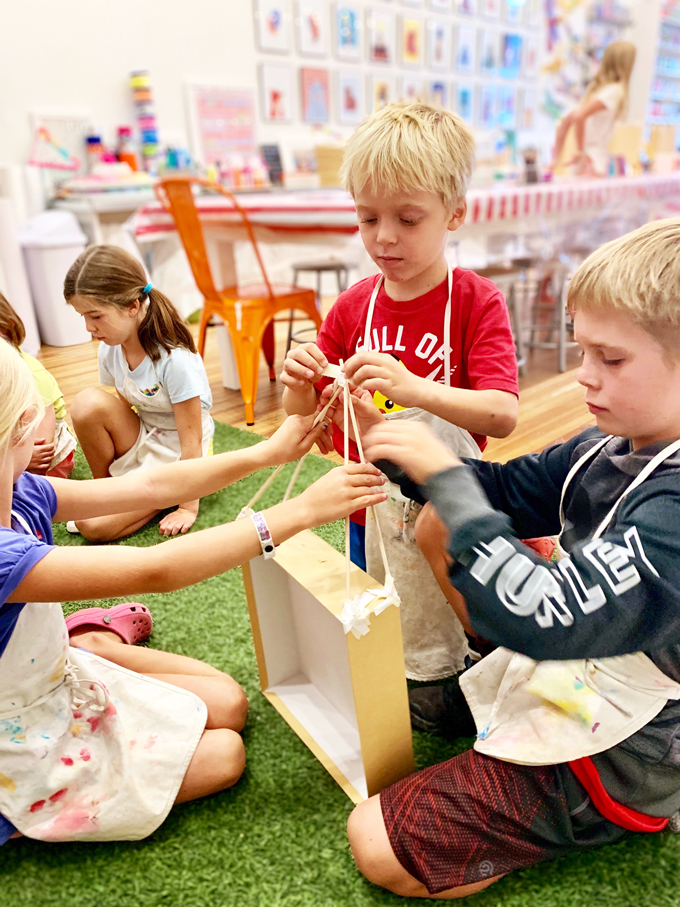
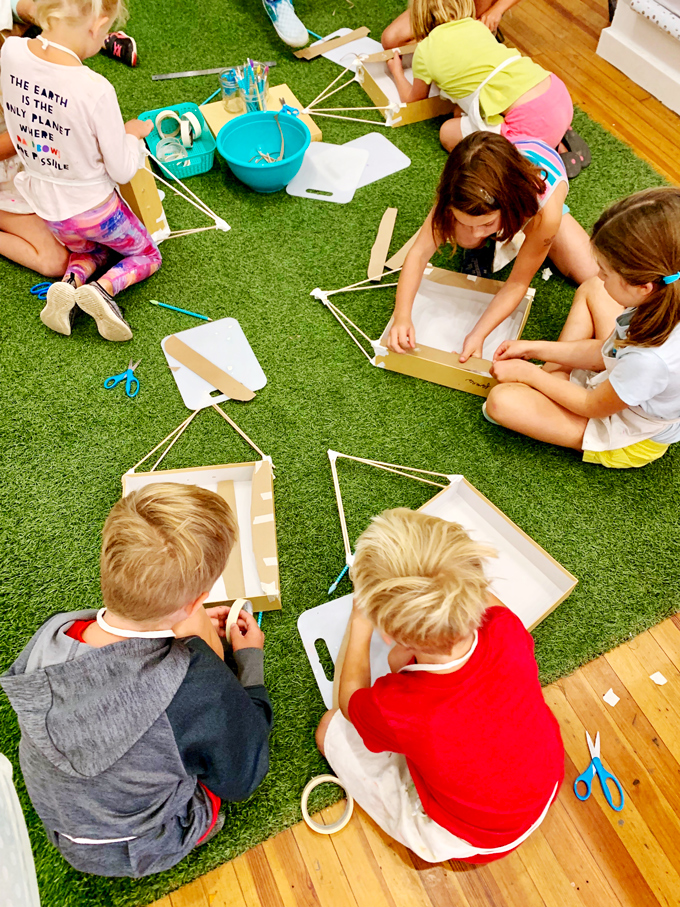
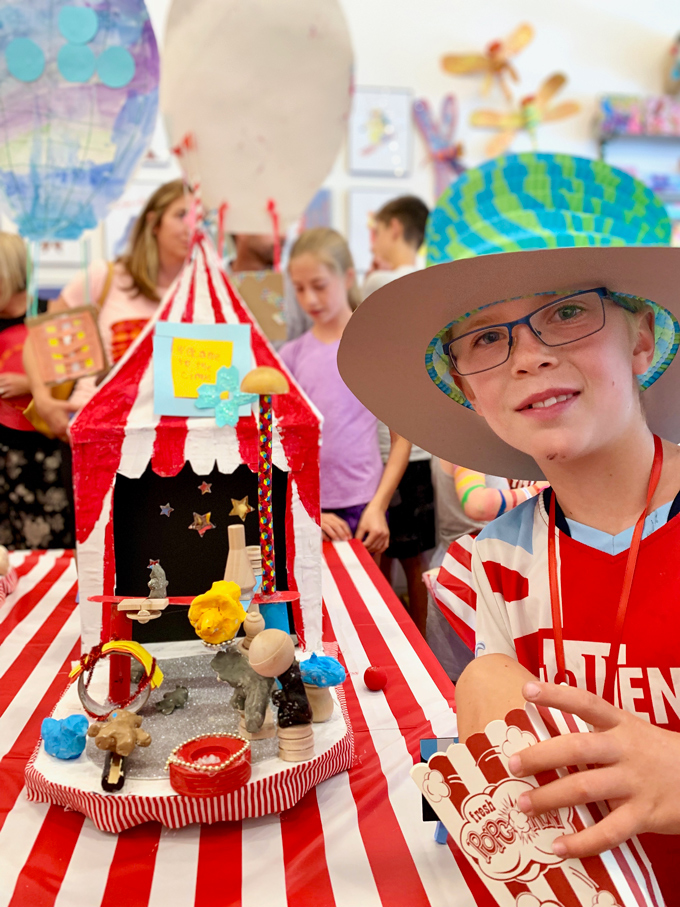
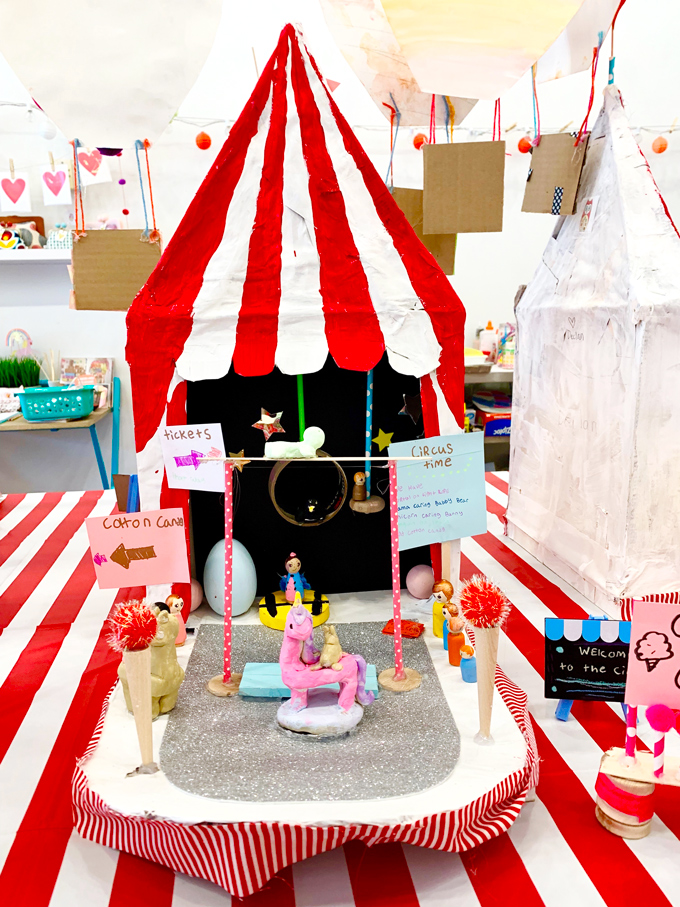
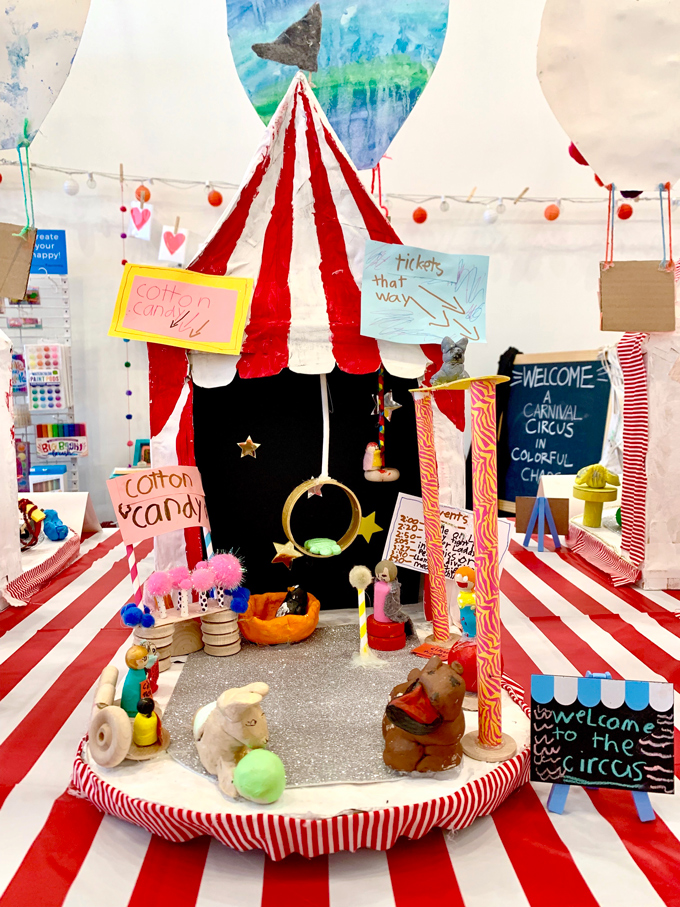
ONE Construct in pairs using 4 – 12″ dowels, masking tape, duct tape, and a 12 x 12″ heavy-weight box with a separate lid, to create an initial structure for the circus tent. All four tent poles should angle towards the center, to connect together at the center point of the tent.
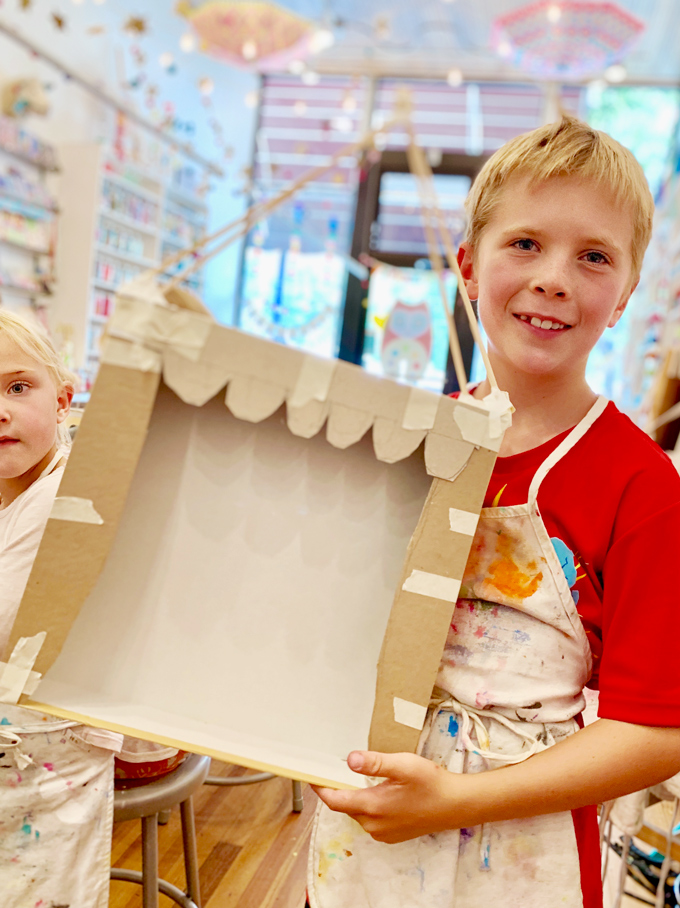
TWO Use light-weight cardboard, ex. cereal boxes, to draw, cut, and create the curtain elements on the upper front and front sides of the tent. The top curtain can be sketched scalloped and cut. Tape all three cardboard pieces onto the box so they’re secure and frame the stage.
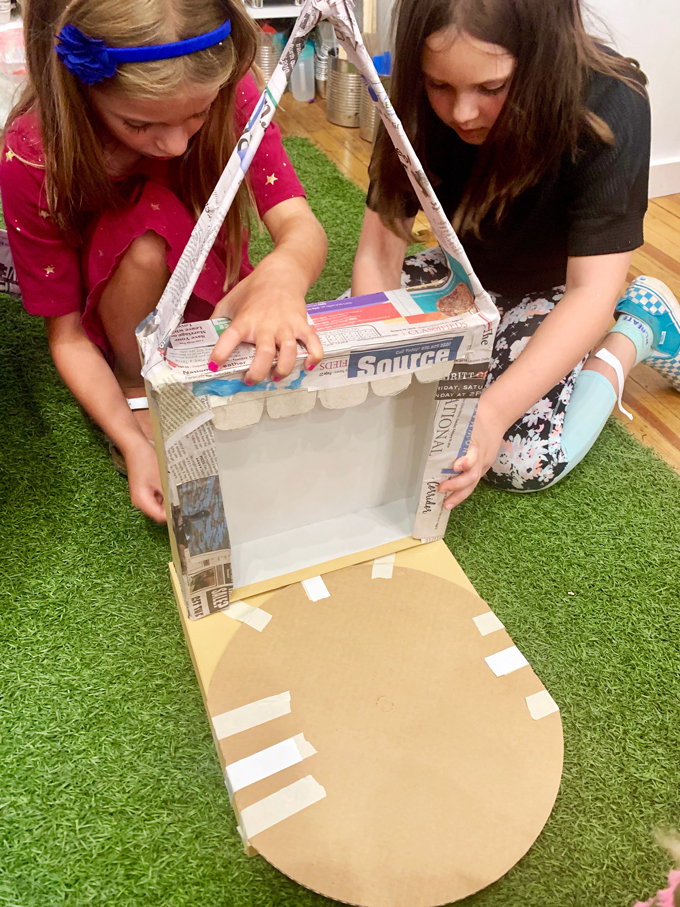
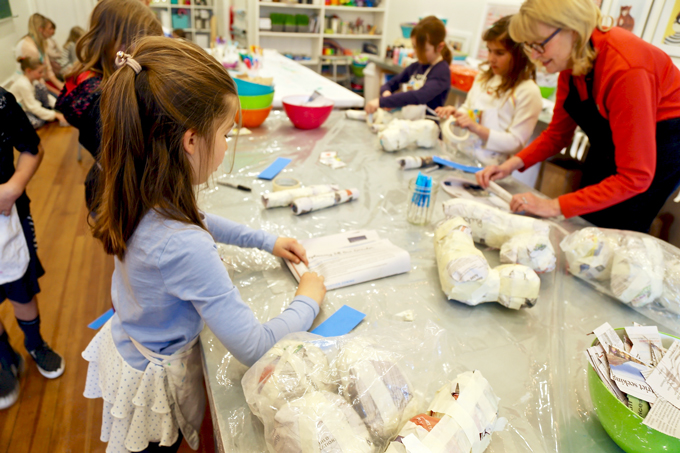
THREE Coat the above structure with newspaper and paper-mâché mixture. Dry overnight.
FOUR Use the box lid as the circus stage. Place the dry circus tent onto the stage. Line up the back of stage and box lid so they’re flush. Tape in place using duct tape strips. Add a round cardboard cutout on top and center on the stage. Mark where the circle overlaps the box sides with a pencil. Cut this overlap so the stage sides are squared off and the front only rounds.
FIVE Paper-mâché connection points so the tent and stage become strong and one unit. Paper-mâché all four sides of the upper tent so the dowels are enclosed. Dry overnight.
PAINT + EMBELLISH
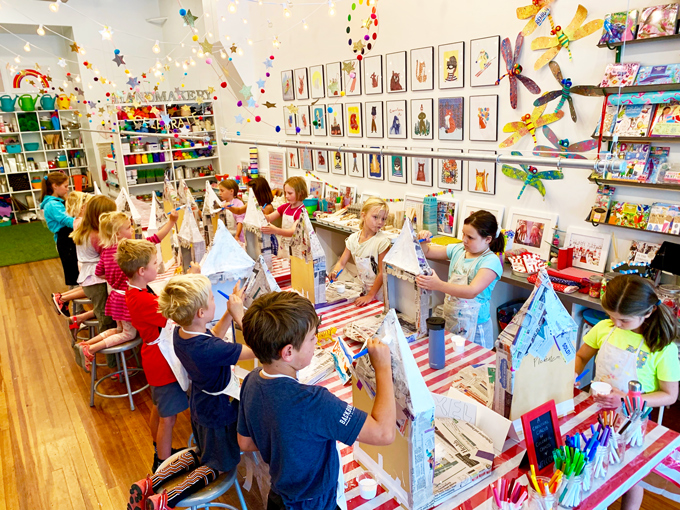
SIX Paint the entire dry tent and stage unit white using acrylic paint to get a solid covering on top of the newspaper. Dry overnight. Use a ruler to draw pencil lines from the center tip of the tent down to each curtain scallop. This will create the red and white divisions for the tent stripes. Mark the red stripes with a light “x” so children know which sections to paint red and which sections to keep white. Use red acrylic paint with a small brush for tent stripes. Encourage young artists to take their time and travel slow to get crisp + clean lines.
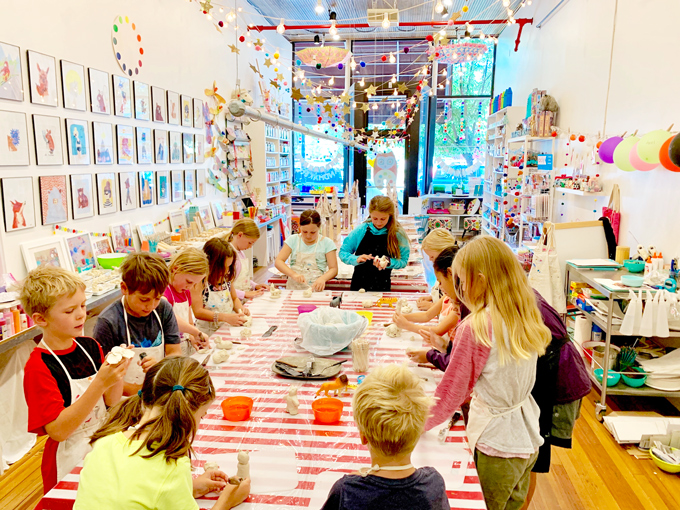
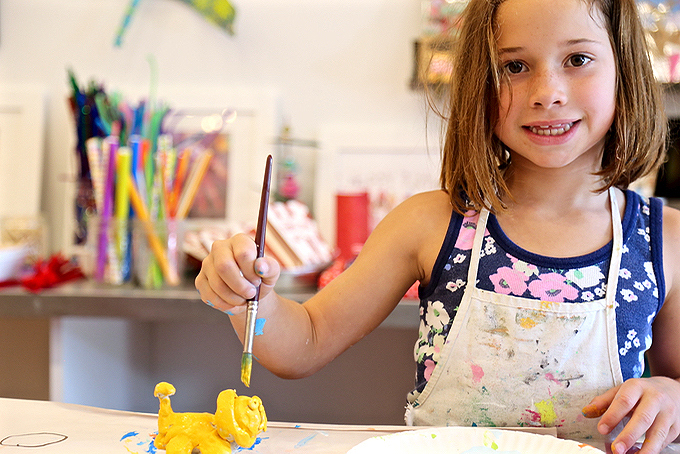
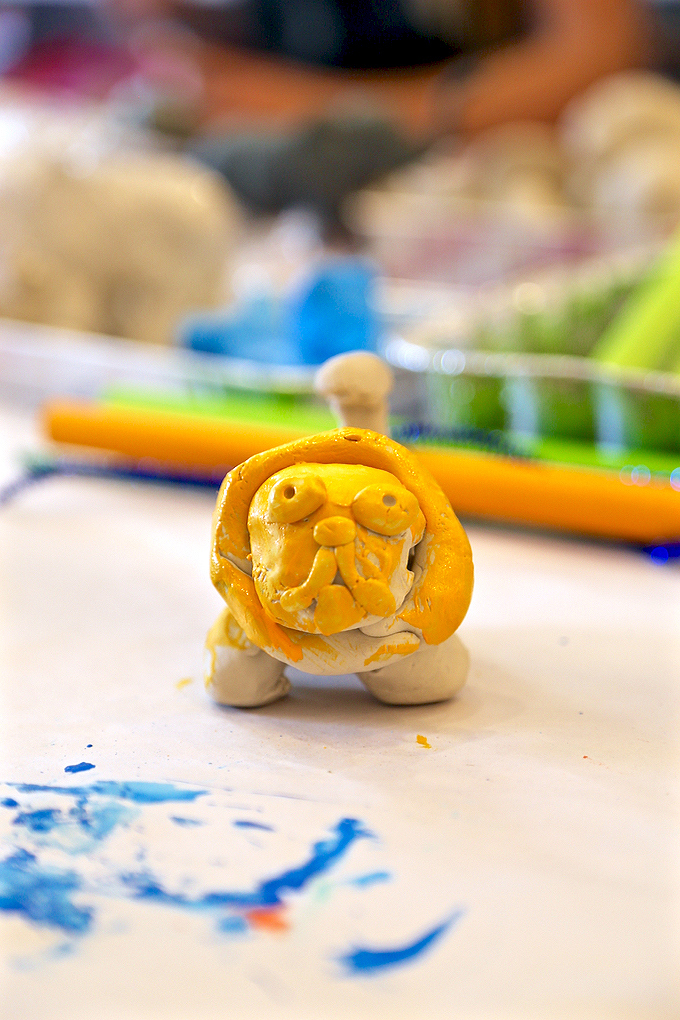
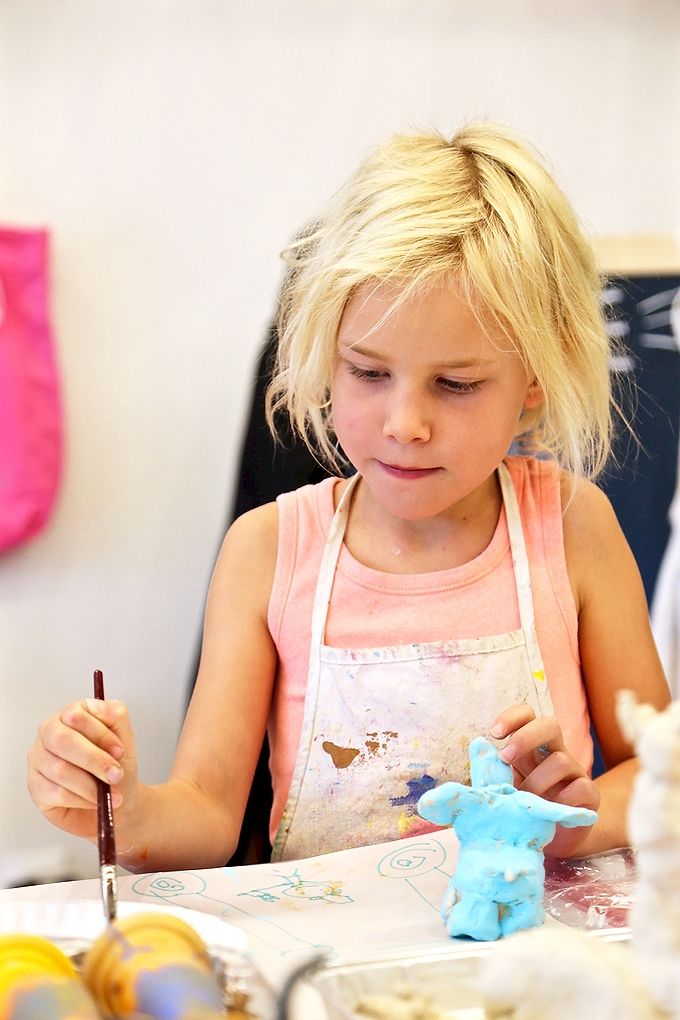
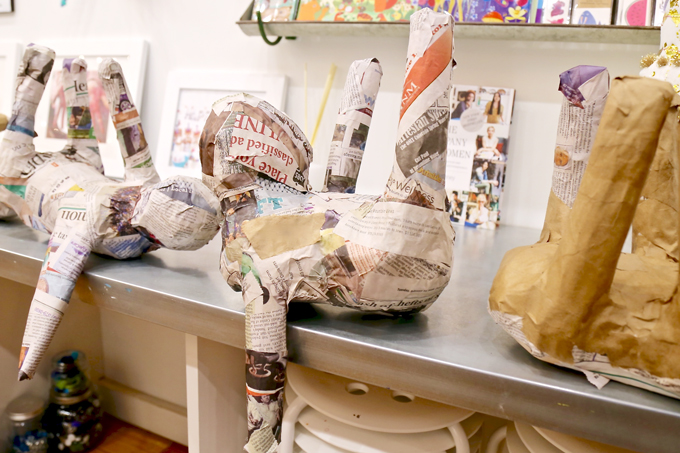
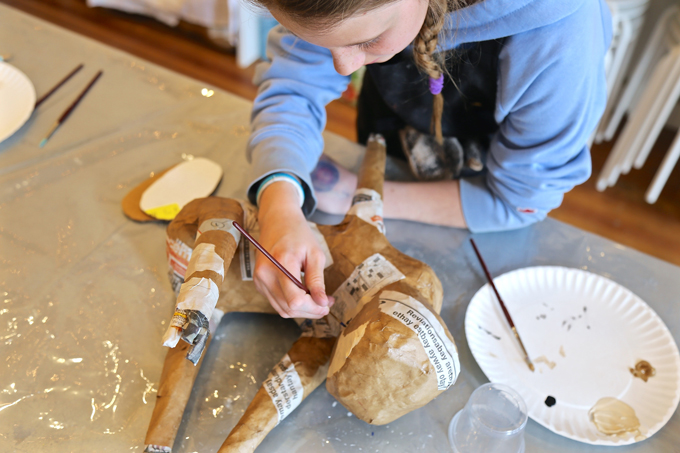
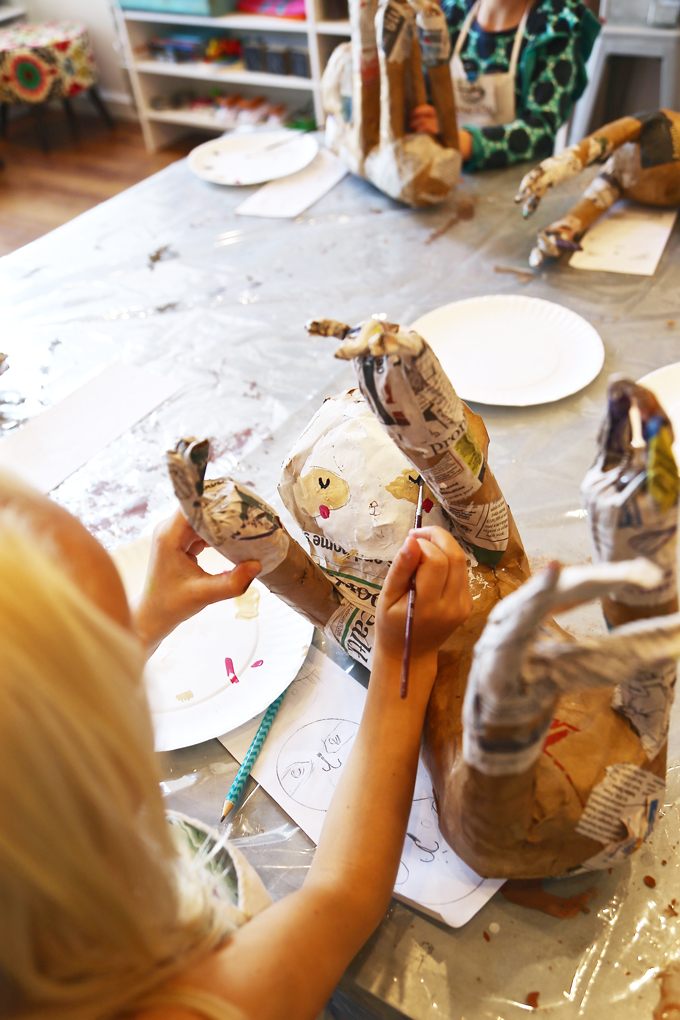
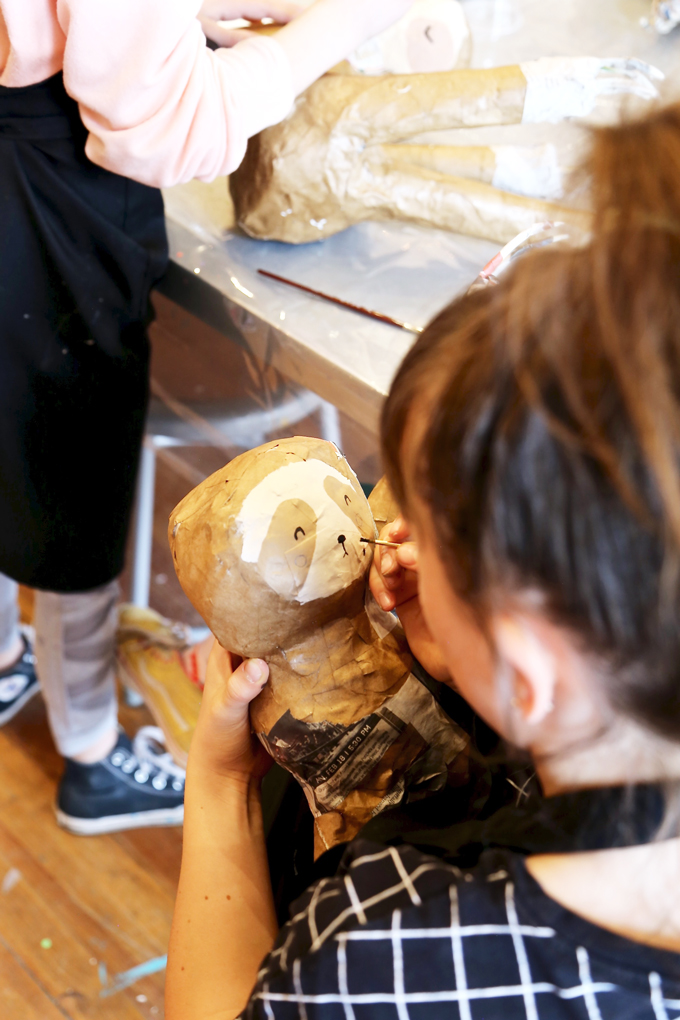
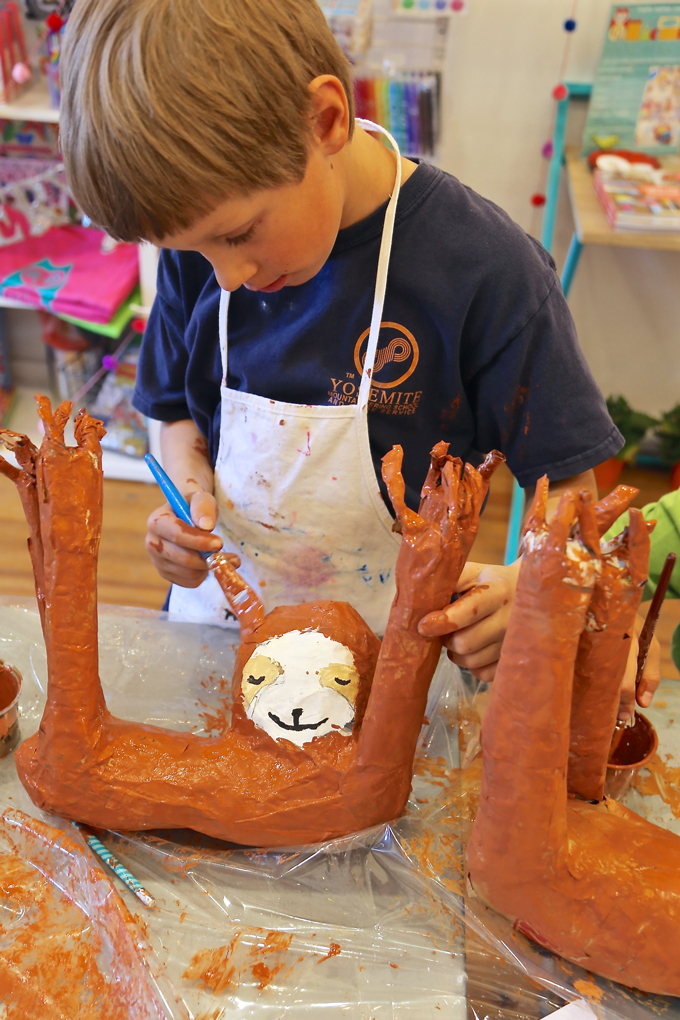
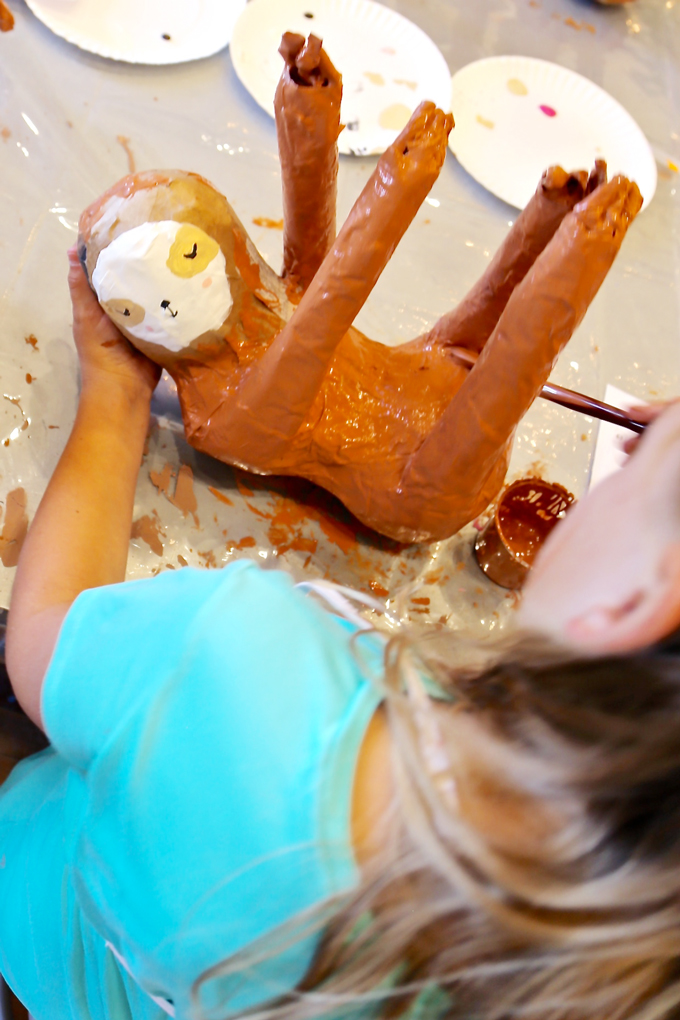
SEVEN Move into dreaming up, sketching, and constructing both carnival and circus creatures using clay. We used an airdry clay to create 3D figures. Dry figures before painting using acrylic paint. Children painted their animals solid before moving into smaller details.
EIGHT Once your circus tent is fully painted and dry, move into stage construction. We precut silver sparkle foam for the stage base and hot glued this piece on top of the spark-tacular stage. Cut a piece of black poster board to bend and set into the stage background. Tape in place. Sticker stars can be added to the black poster board for sparkle + shine + a little stage magic! Children used cool temp glue guns to create their stage structures using patterned paper straws, painted wood pieces, yarn, string, fabric, and more! Precut strips of striped fabric were attached by artists using cool glue around the stage for added color, texture, and stage-like appeal!
NINE Painted people (aka wooden peg dolls) and creatures were added to the stage to complete the ~ CARNIVAL CIRCUS IN COLORFUL CHAOS! Artist amazed and awed as they created tightropes, trapezes, lyras, acrobats, magicians, imaginary animals, and more! These ringmasters also made the most detailed signs to sell tickets, announce the event schedules, direct guests to tasty cotton candy, popcorn, and candy stands! The imagination and creativity of these artists… truly over-the-top bright + beaming + brilliant!
TEN We added face paint, carnival hats, and popcorn to enhance the full-circus experience for our community art show celebration!
Celebrate childhood + creativity + color + community by creating and collaborating!
My artful friend, Bar Rucci, created an incredible DIY ~ Circus Tents Made By Kids (photo above) on her lovely ~ Art Bar Blog and over on Handmade Charlotte for another fantastic way to bring a circus experience into any creative environment! You’ll definitely want to take a peek at this project and ALL her gorgeous goodness by following her @artbarblog on Instagram or visiting her on Art Bar Blog!
Tag us @handmakery with your creations on Instagram! Follow our blog for more inspiring process-based art projects! As always, thank you for following our artful adventure on Main Street in the heART of the Carbondale Creative District! Send us a note anytime! We’d love to hear what you’re thinking, dreaming, and envisioning! Much love and happiness creating in this creative + colorful world, filled with collaboration + connection + community + arts & crafting! Happy School Year! Ami
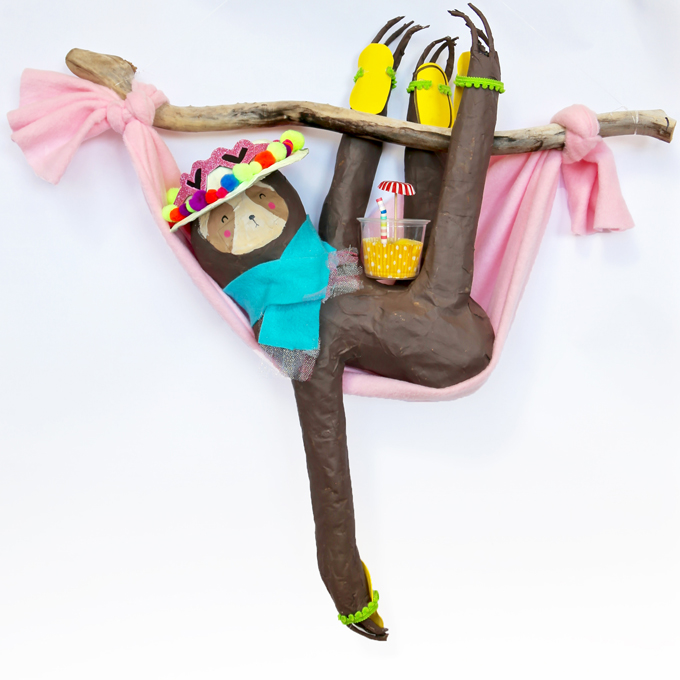
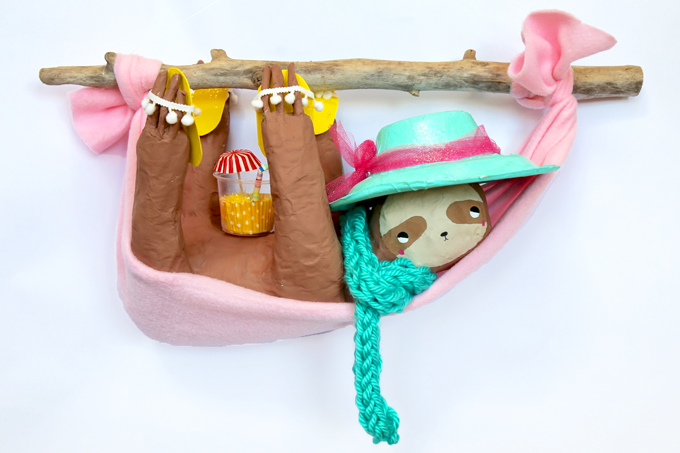
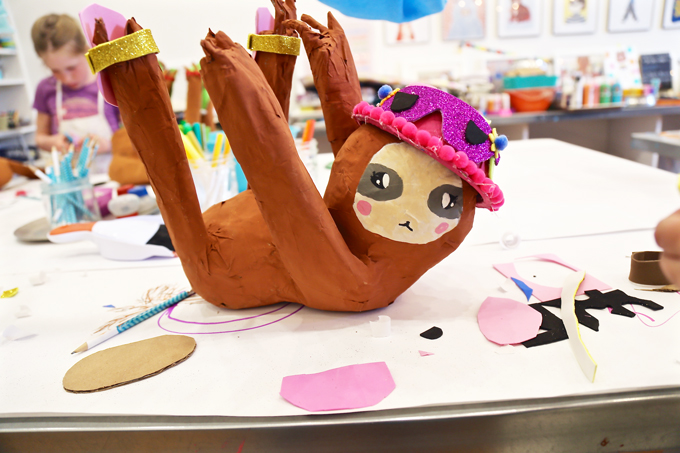
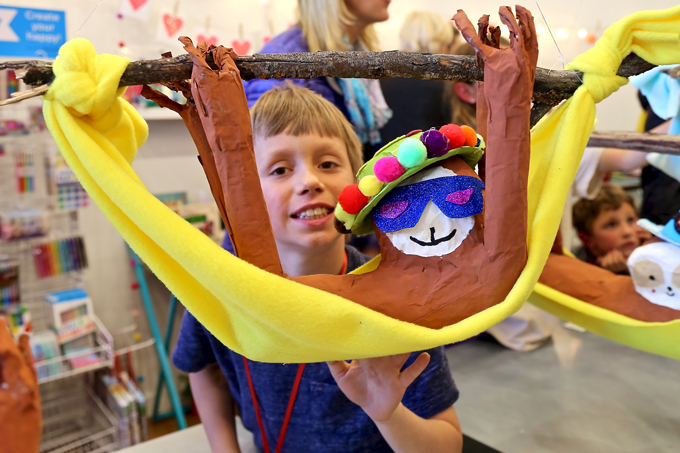
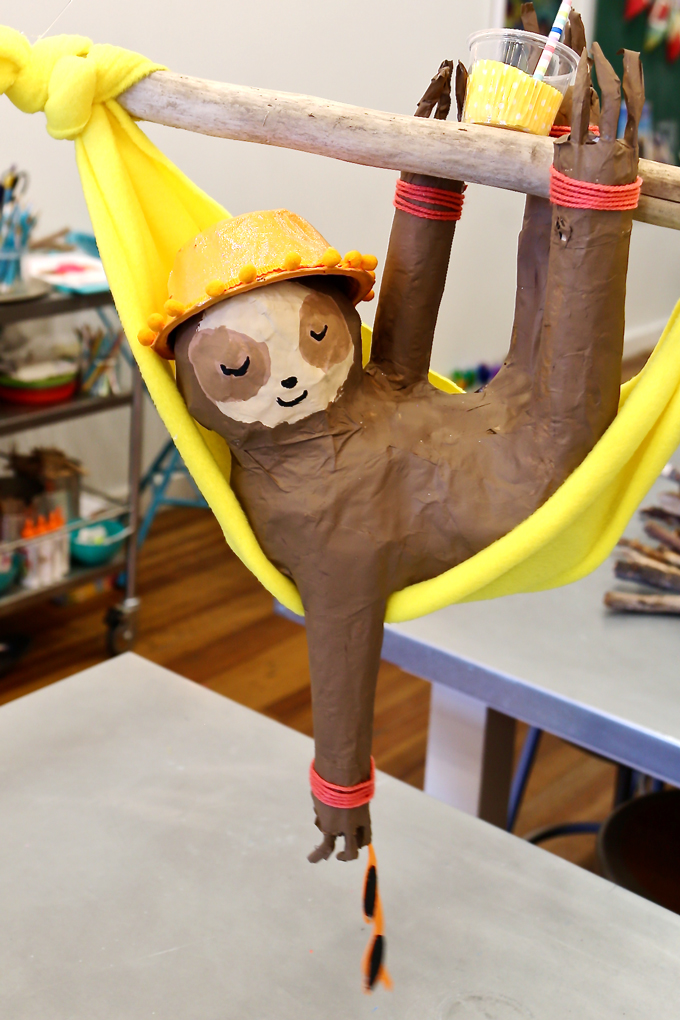
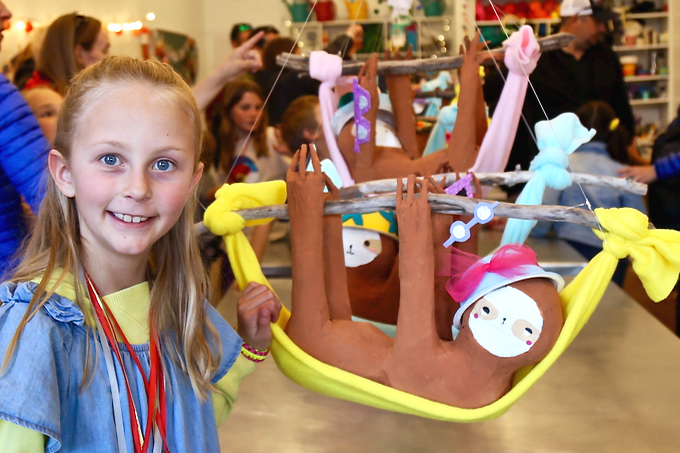
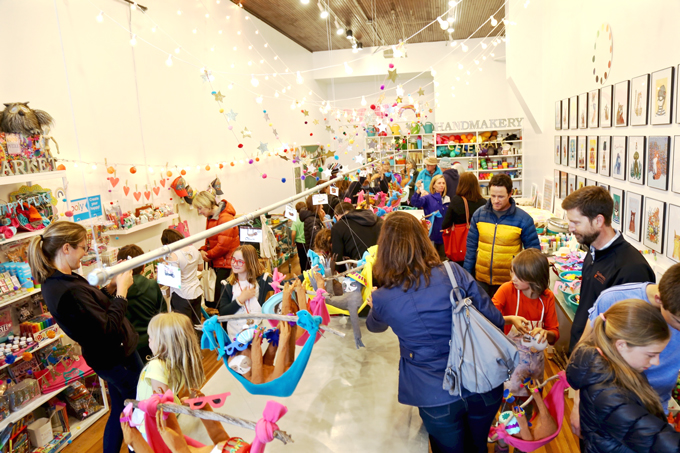
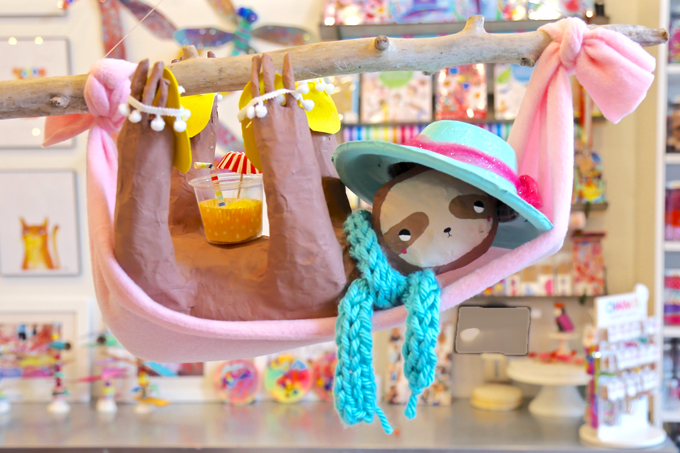
Hello there! Excited to give you a little springtime inspiration in your day! Our artists recently showcased their ~ SCULPTURAL SPRINGTIME SLOTHS in a sling, sporting stylish sandals + sunhats + sunglasses + scarves, while sipping & sun-basking in the sunshine in our early spring + six-week + school-year art workshops for ages 5 & up! We have a feeling these creatures will “slowly” steal your heart! Sharing a list of sweet-n-simple, go-to-supplies, to get your very own sloth started using several upcycled material you might already have on hand! Be sure to tag @handmakery on Instagram if you give this project a GO! Take a peek below!
SUPPLIES FOR ~ SCULPTURAL SPRINGTIME SLOTHS:
Newspaper {upcycled}
Paper bags {upcycled}
Tape- masking + duct tape
Scissors
Paper-mâché mixture + bowl
Paint + pallet + brush
Driftwood
Fabric- fleece
Fishing line
Embellishments for sandals, hats & sunglasses
A SIMPLE PROCESS FOR ~ SCULPTURAL SPRINGTIME SLOTHS:
Did you know sloths are the most trending animal of the year? Would you believe the sloth has replaced the unicorn!?! Indeed, it’s true! Read about their debut as “the most trending creature” of this year. Would you also believe a baby sloth was just born, right here in Colorado!?! If you’re looking for some amazing + simple sloth facts for kids, to go along with this DIY, take a look. Artists loved learning all about these cozy and trending creatures! We even hosted a sloth birthday party right in our very own sweet studio!
A sweet + sisterly + sloth-selfie sent in by one of our amazing HANDMAKERY families! Thank you for tagging #handmakery on Instagram with your creations!
SUN BASK, SIP, SIT BACK & RELAX INTO SUMMER:
TAKE A SPLASH & JOIN US THIS SUMMER:
1. JUMP IN AS SUMMER ART CAMPS ARE QUICKLY FILLING!
Early online enrollment is highly encouraged as seating is limited! Jump into summer making + creating + connecting in a colorful community focused on a creative + collaborative childhood, in the heART of the Carbondale Creative District on magnificent Main Street!
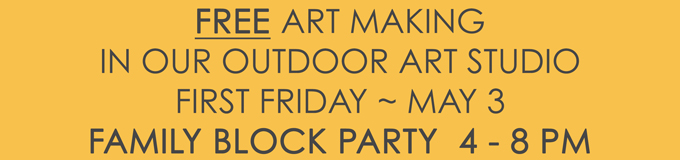
2. FAMILY BLOCK PARTY ~ FIRST FRIDAY MAY!
You don’t want to miss this event! If you’re local to the Roaring Fork Valley, be sure to join us for our 7th year hosting a ~ FREE art-making booth for ALL AGES! We’ll be making & creating in our outdoor art studio which will be located in downtown Carbondale |Colorado, at the heART of the Carbondale Creative District! Join us for the much-anticipated + annual + artful ~ FAMILY BLOCK PARTY!
3. LET’S CONNECT ON INSTAGRAM!
Tag us @handmakery with your creations on Instagram! Follow our blog for more inspiring process-based art projects! As always, thank you for following our artful adventure! Send us a note anytime! We’d love to hear what you’re thinking, dreaming, and envisioning! Much love and happiness creating in this creative + colorful world filled with collaboration + connection + community + arts & crafting! Happy Spring! xo Ami
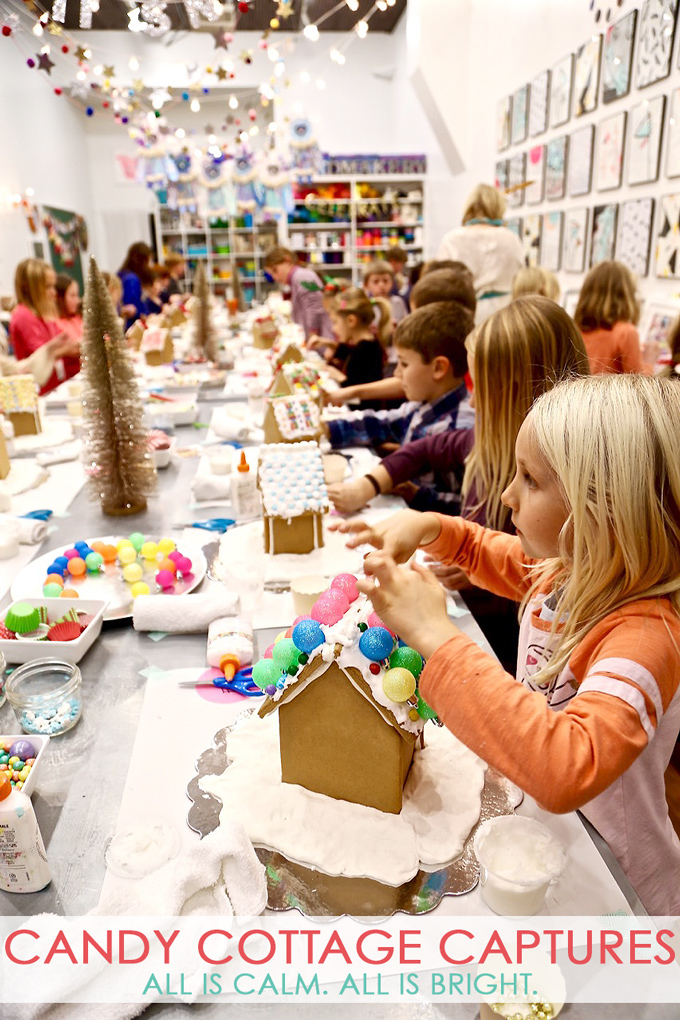
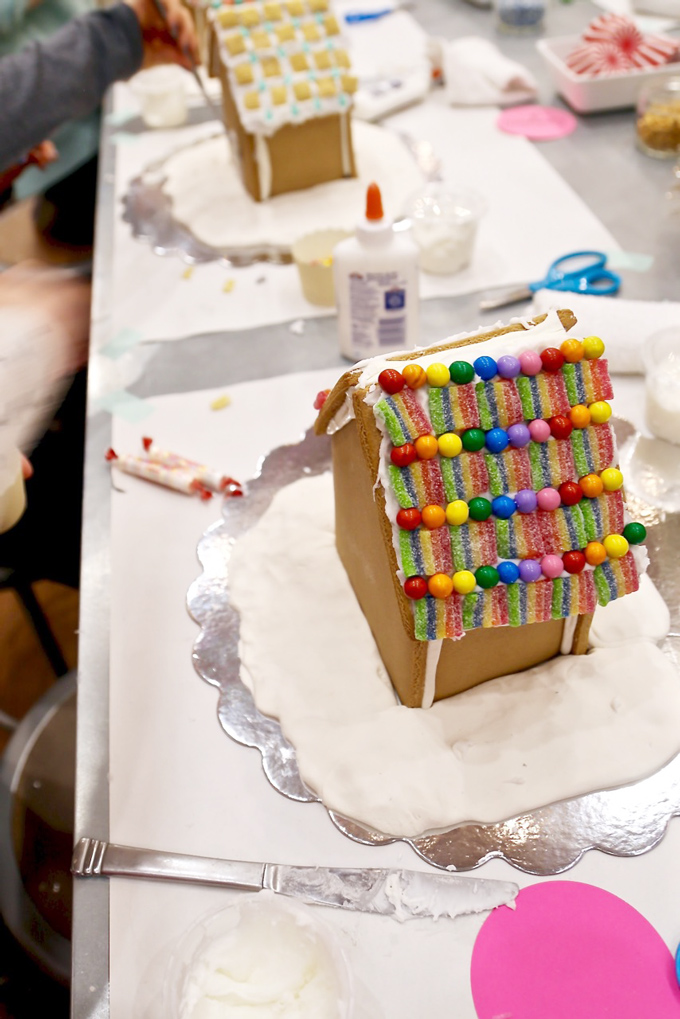
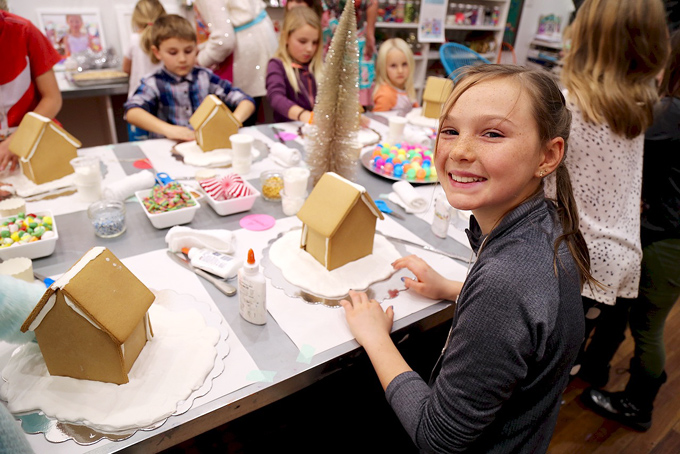
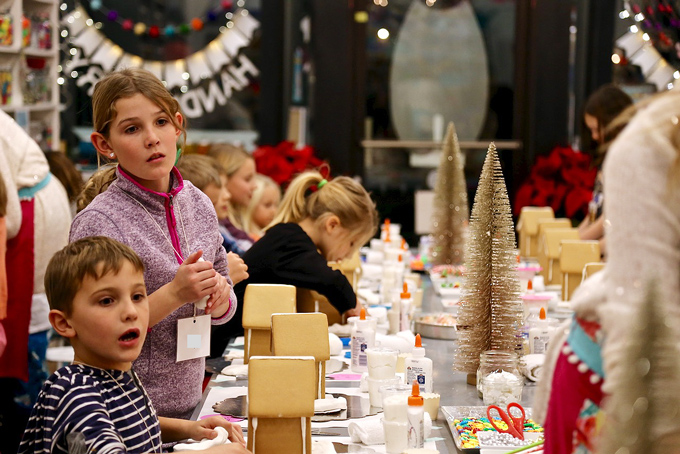
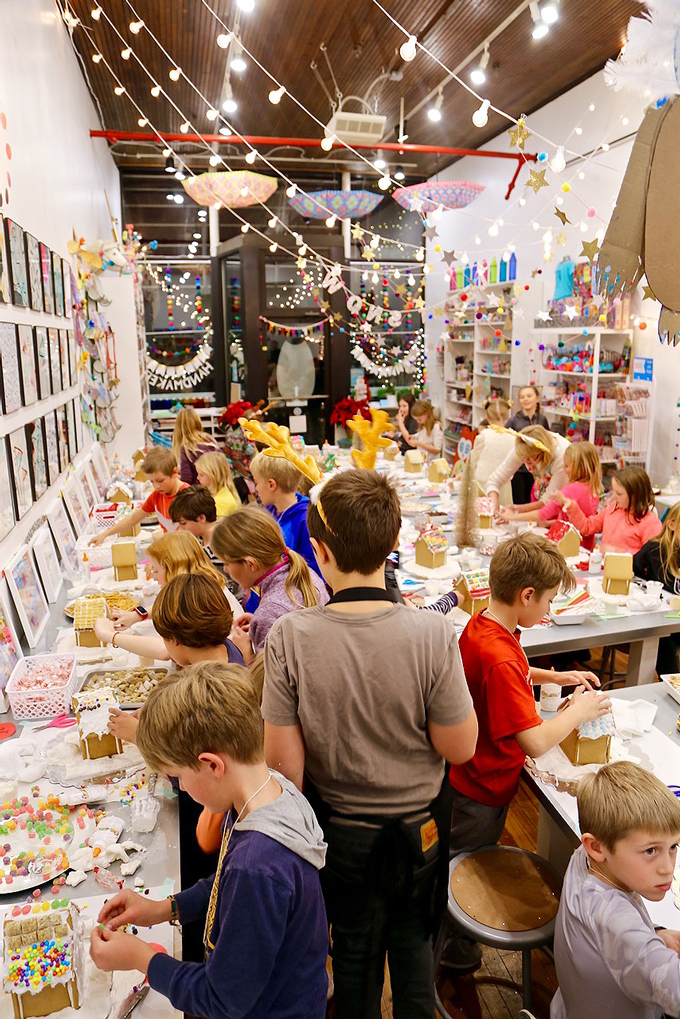
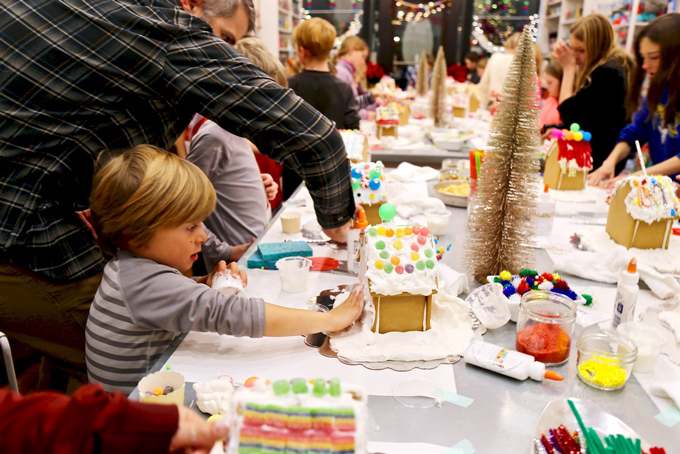
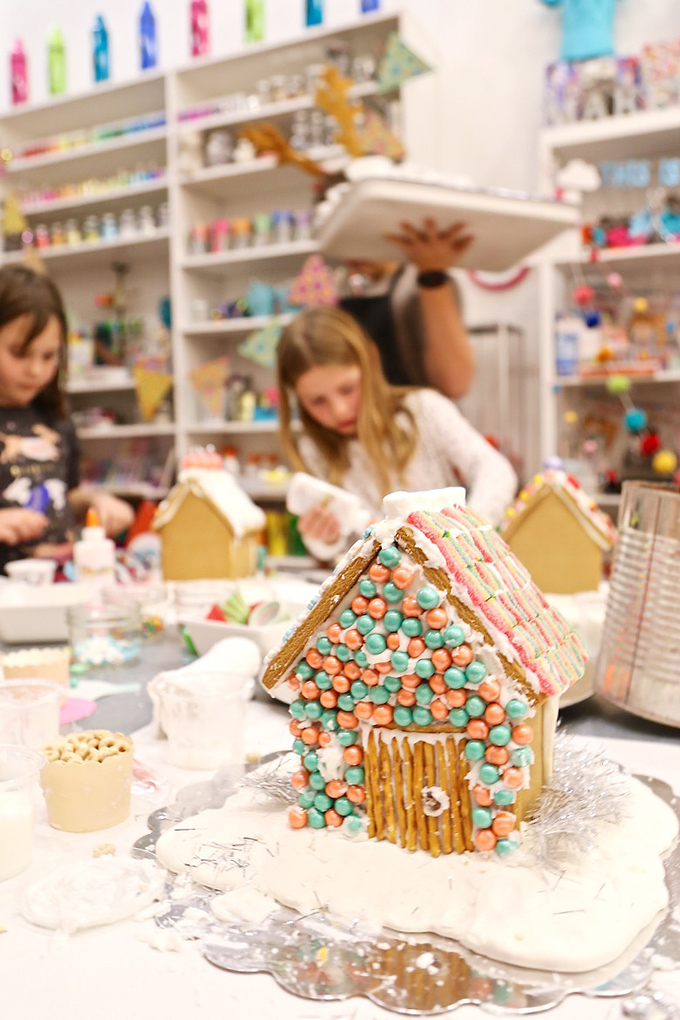
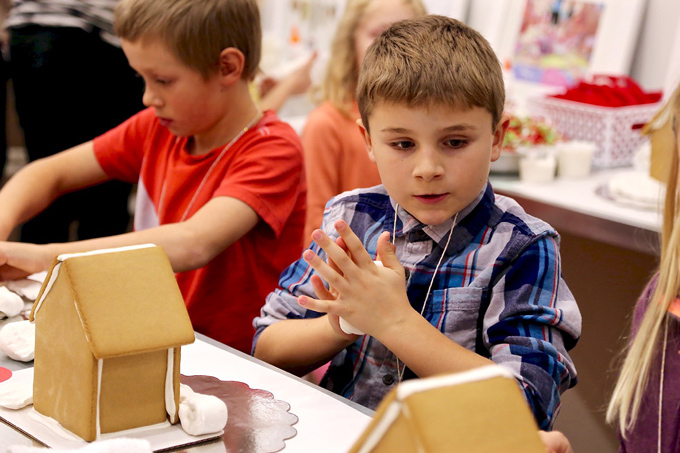
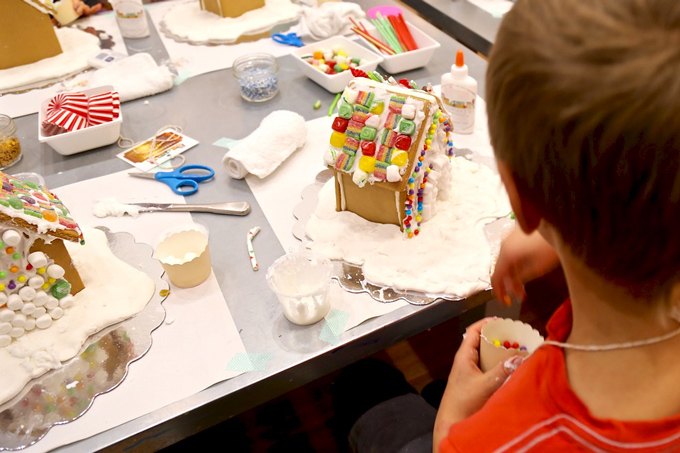
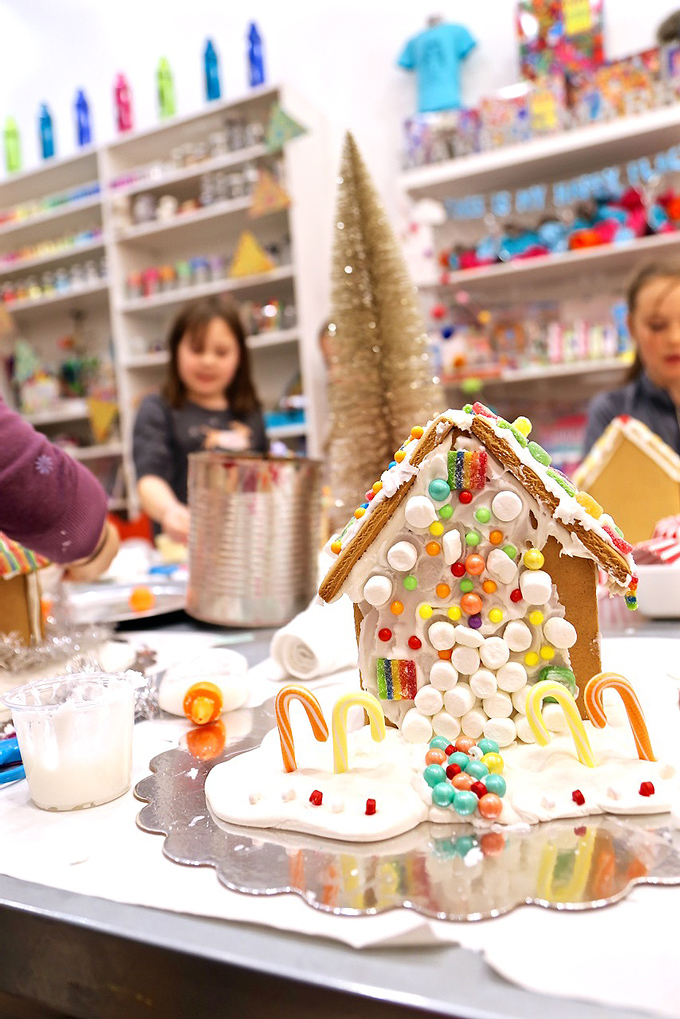
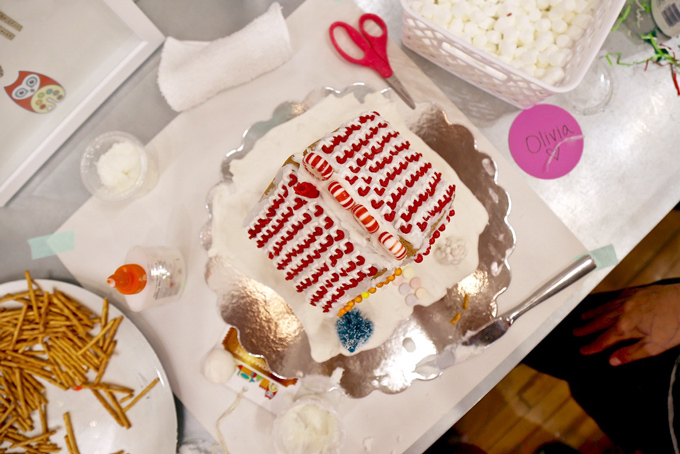
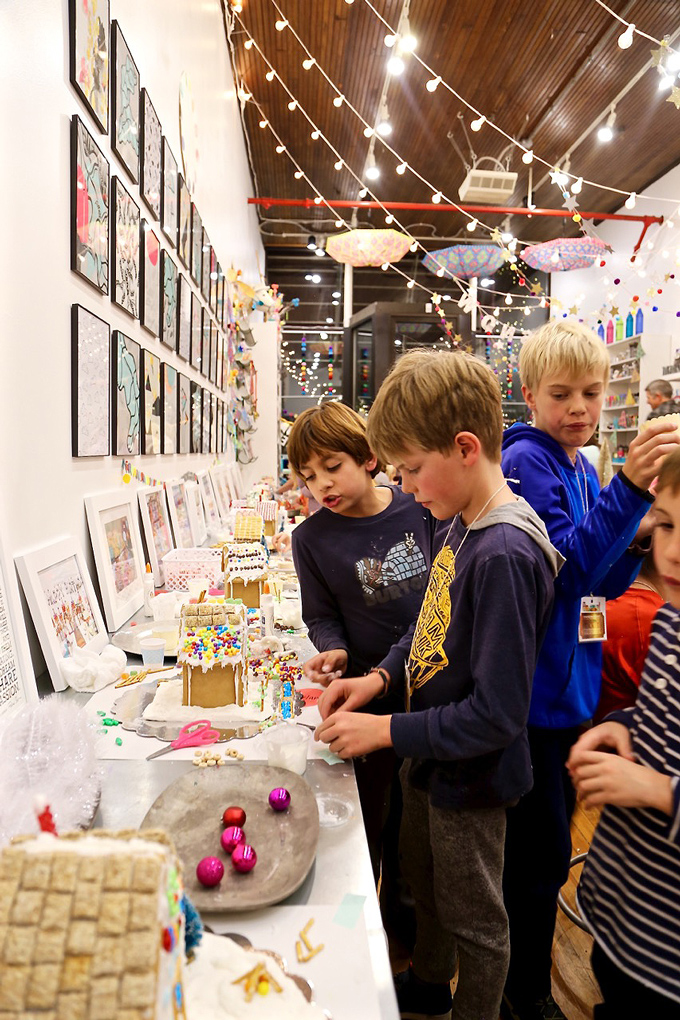
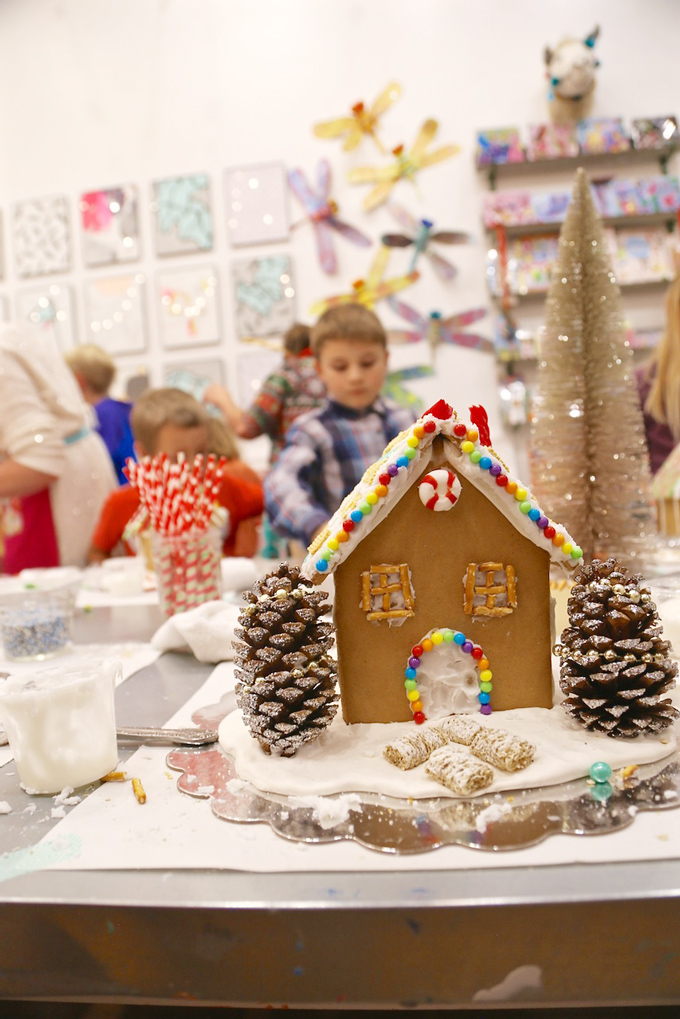
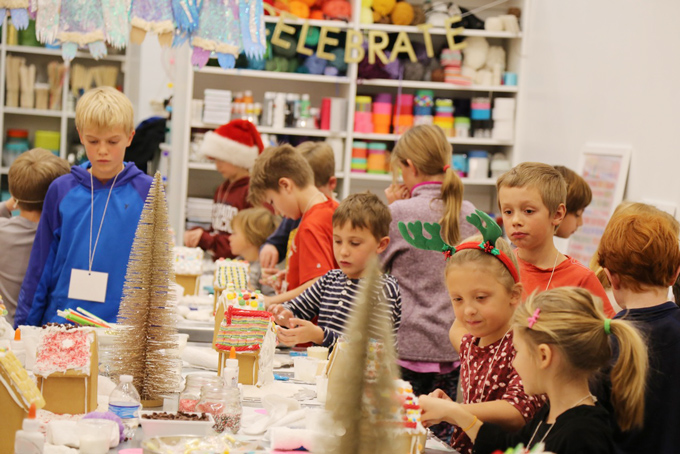
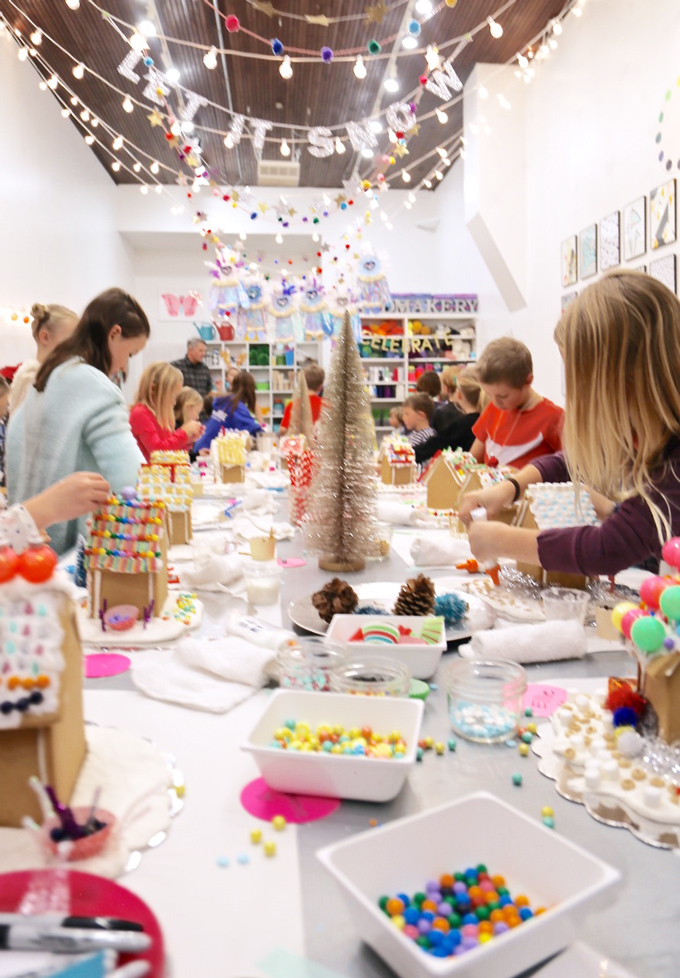
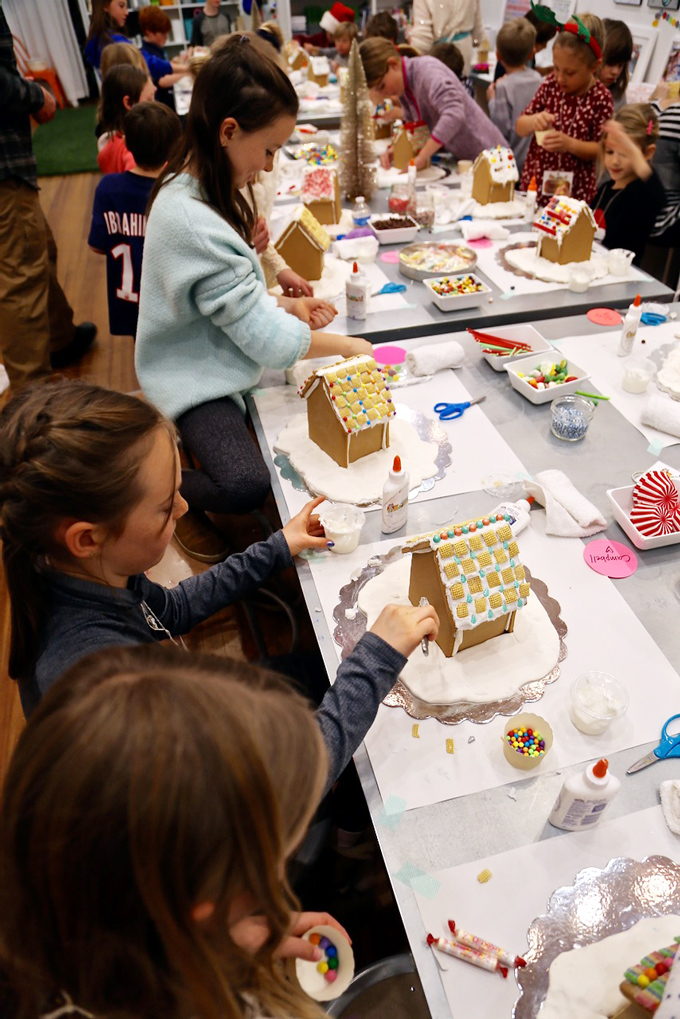
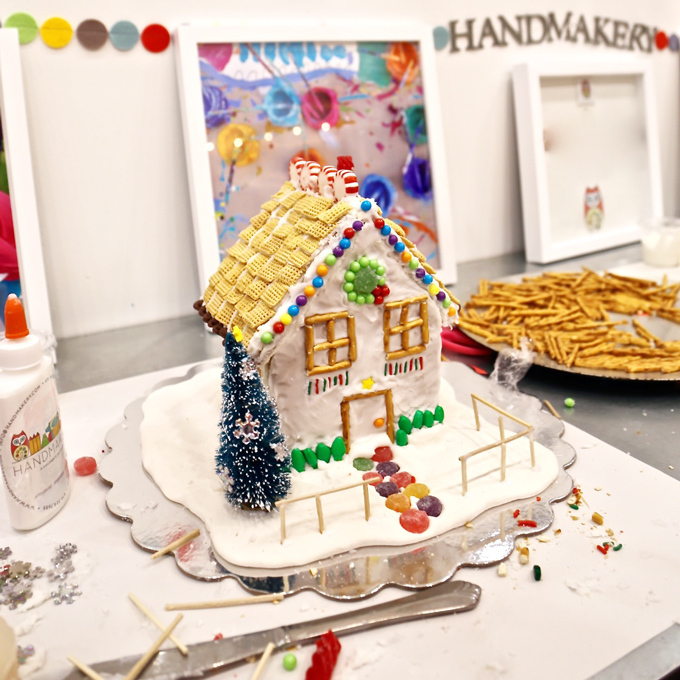
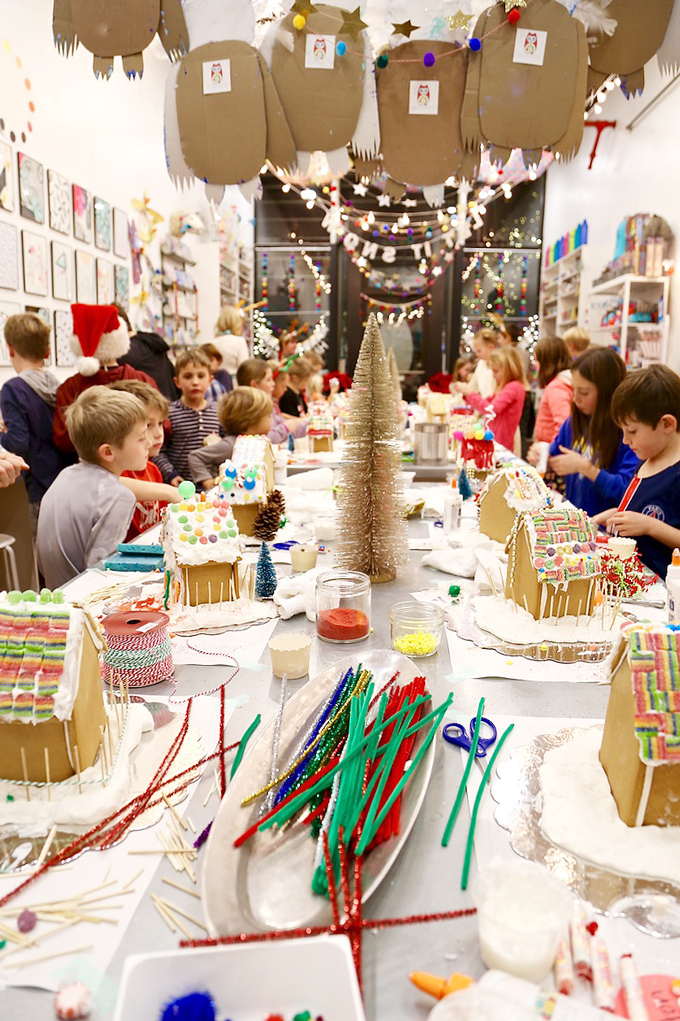
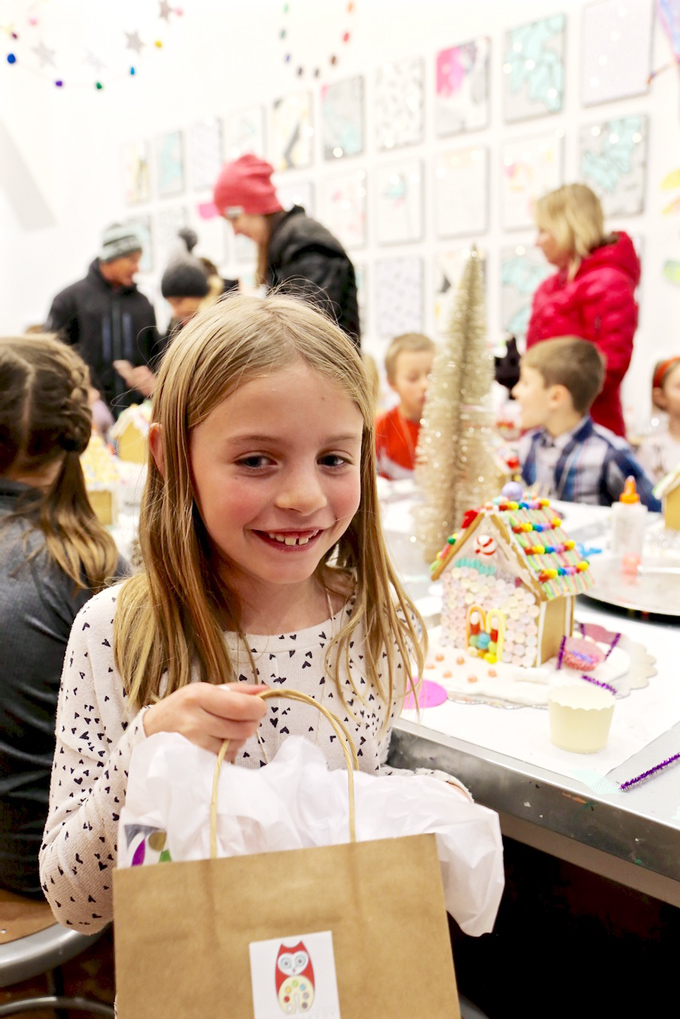
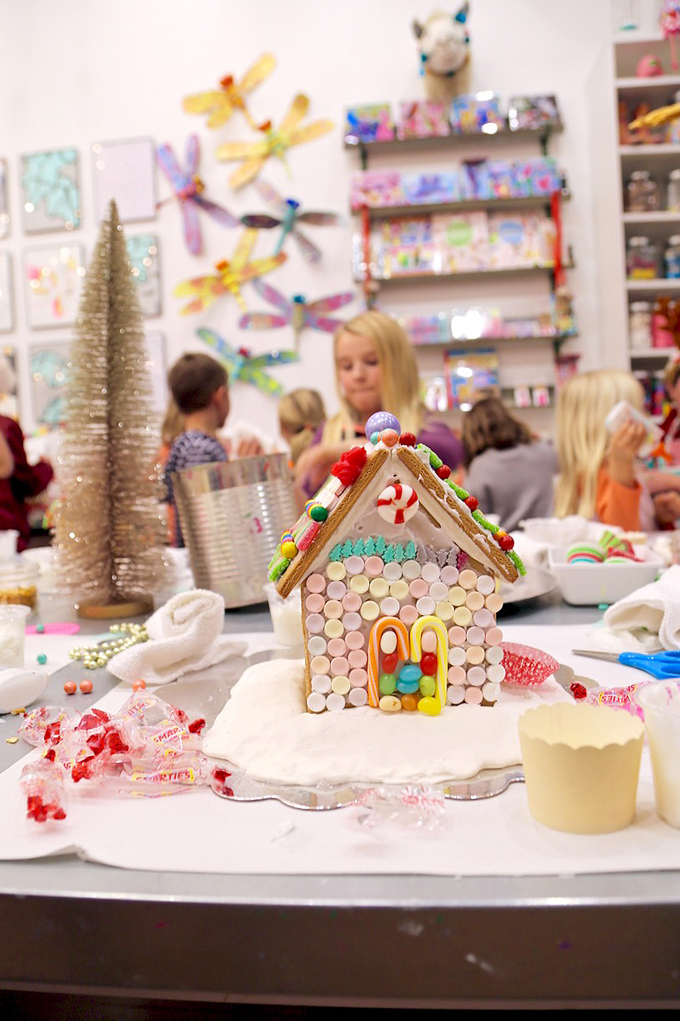
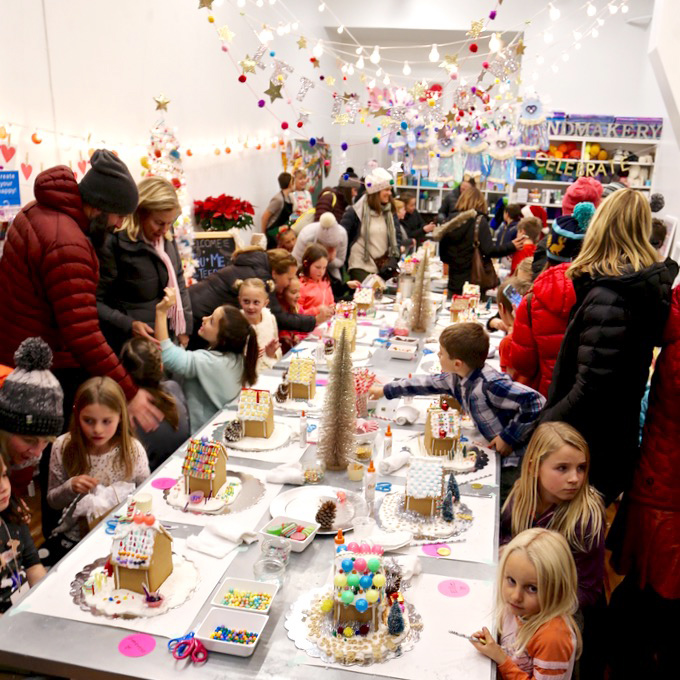
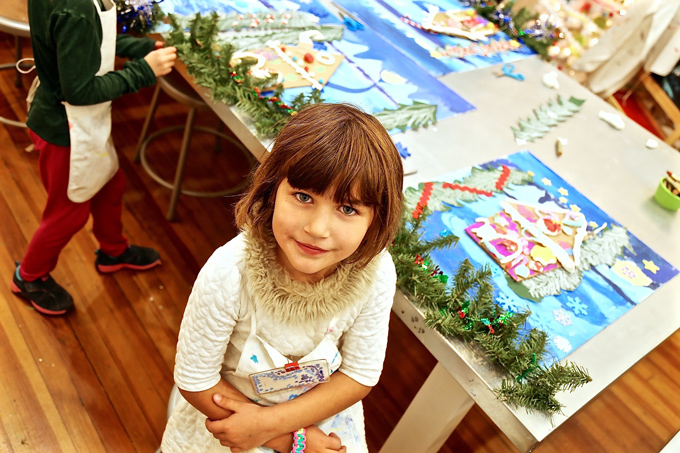
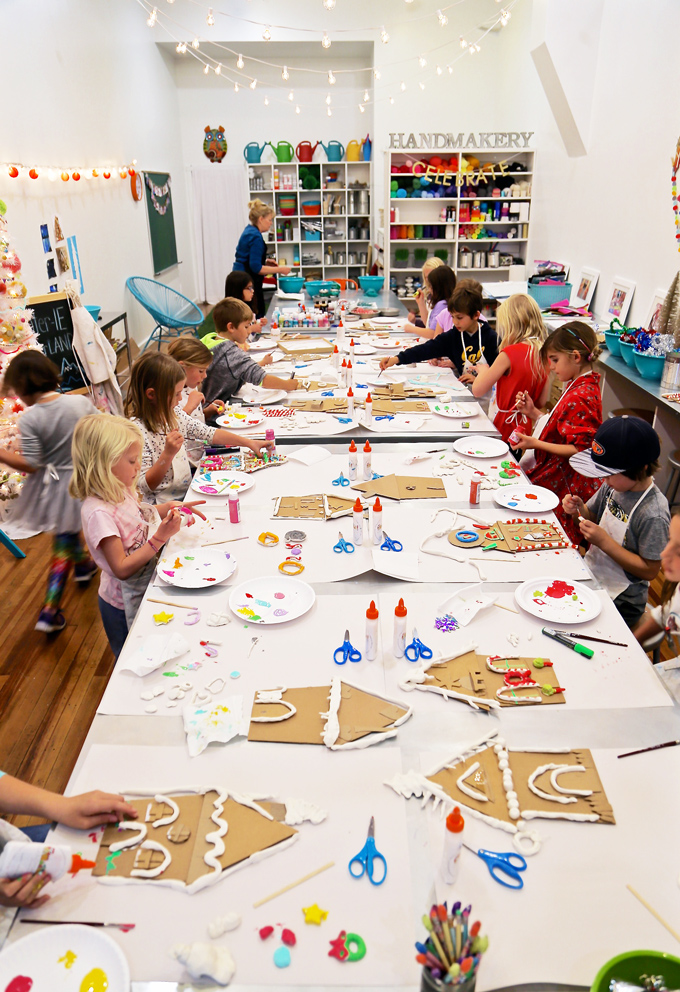
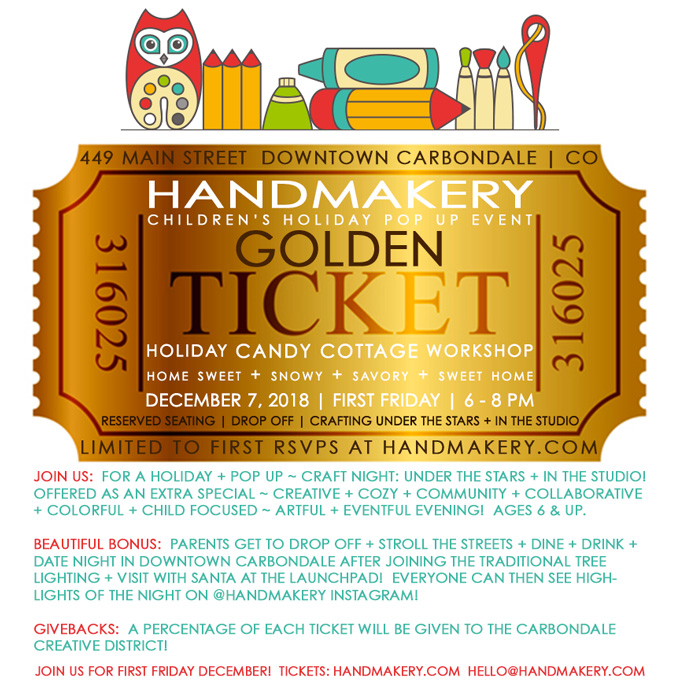
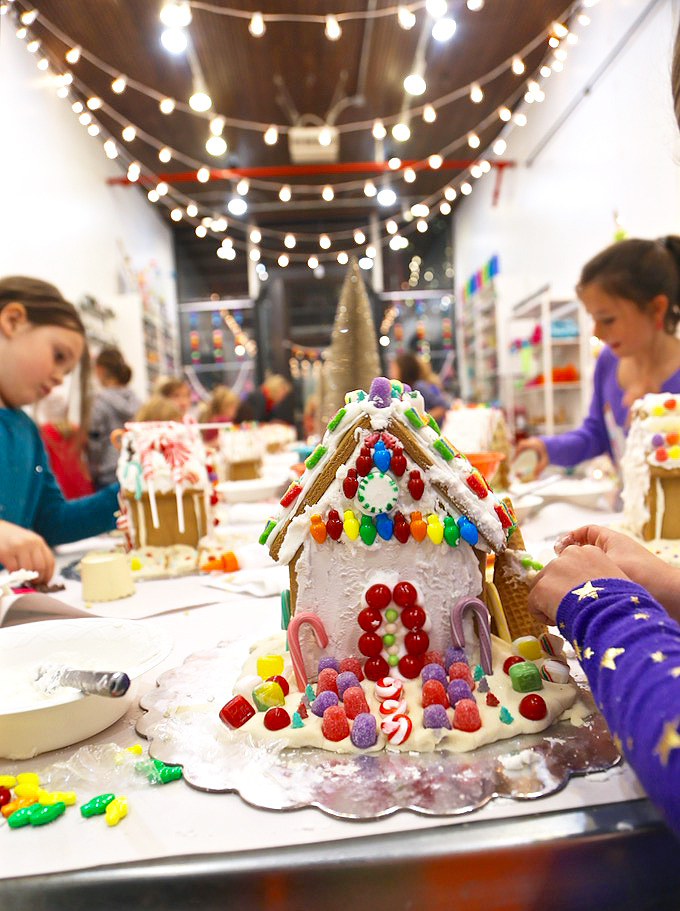
FIRST FRIDAY we hosted our annual + traditional ~ Candy Cottage + Golden Ticket Event! It was a cozy evening as every seat in the studio SOLD OUT several weeks in advance. Artists spent two hours in the art studio dreaming up delightful + decorative details using candies and other exciting embellishments downtown in the heART of the Carbondale Creative District. Earlier in the evening many families visited Santa over at Carbondale Arts for a festive photo and join in The Annual Tree Lighting Celebration on Main! Take a peek!
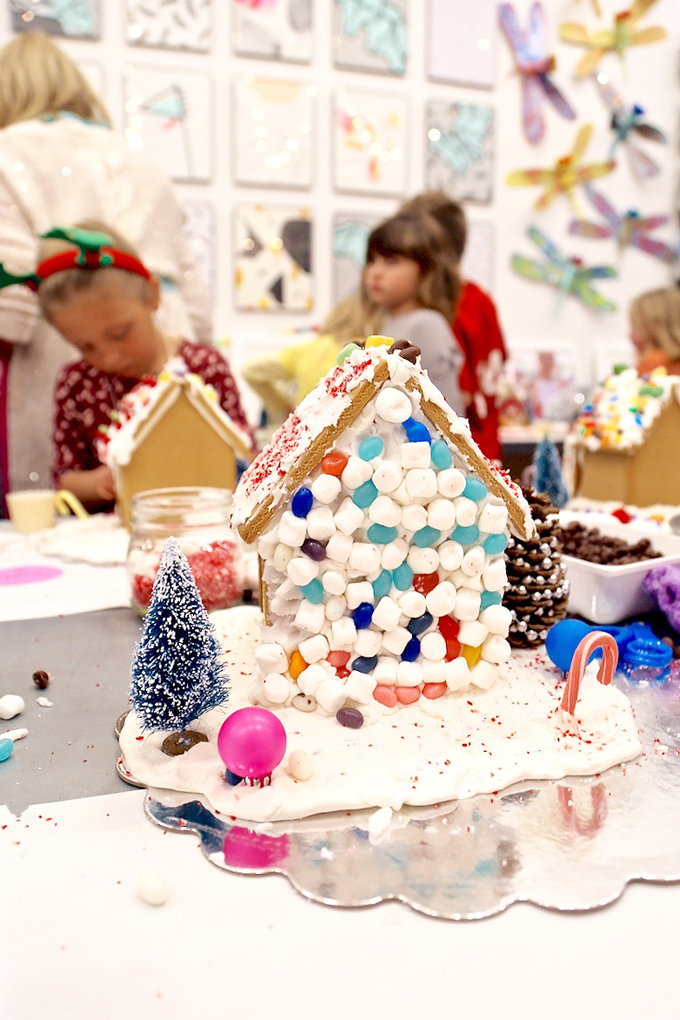
Love how this candy cottage has an elegant “squishy stained glass” appeal.
This event was offered as a “drop off” so parents could stroll downtown and dine, while kids could come together in a creative community focused on colorful cottages and candy!
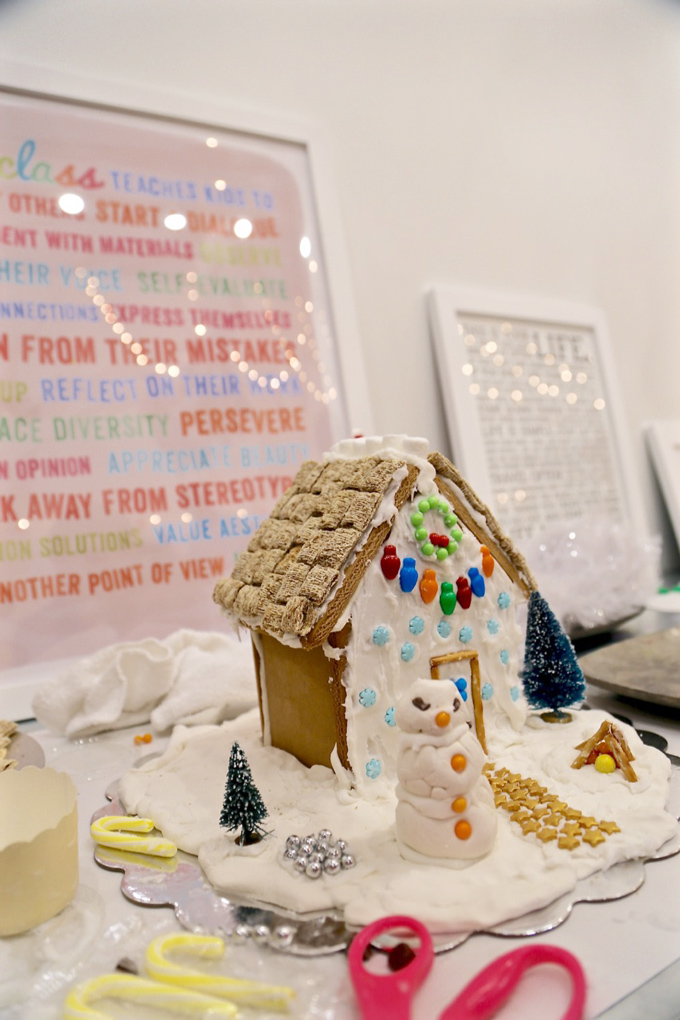
A detailed roof captured in color, pattern, repetition, and texture, yet oh so tasty!
Shimmery smiles of sugar plums.
Surprise and wonder with a hint of maker magic!
The workshop was buzzing with Santa’s elves hard at work. Even a few reindeer were making their way around to artfully assist!
Tiny hands making BIG art + accomplishments.
Love how the elements used in this candy cottage compliment one another for a eye-catching contrast.
Lots of thought went into how each artist was going to design and decorate their custom candy cottage!
The entryway of this sculpture was complete with a marshmallow arch and tiny rainbow balls to detail.
A sticky Friday night with “Visions of sugar plums dancing in their heads”…
There were many tasty temptations.
Another delightfully detailed rooftop, could you guess her father’s precise profession?
Many artists focused on spectacular landscapes to surround their clever + crafty creations.
A lovely rainbow pattern to define and detail!
The hunt for the perfect treat to tailor.
The magic of the makers felt a bit like mingling in Santa’s workshop!
A gorgeous straw rooftop made by this mini maker.
The creation of a landscape architect!
Making memories as makers that were m-m-m good!
The delightful details of kids as creators.
All was calm. All was bright! We truly had a wonderful night!
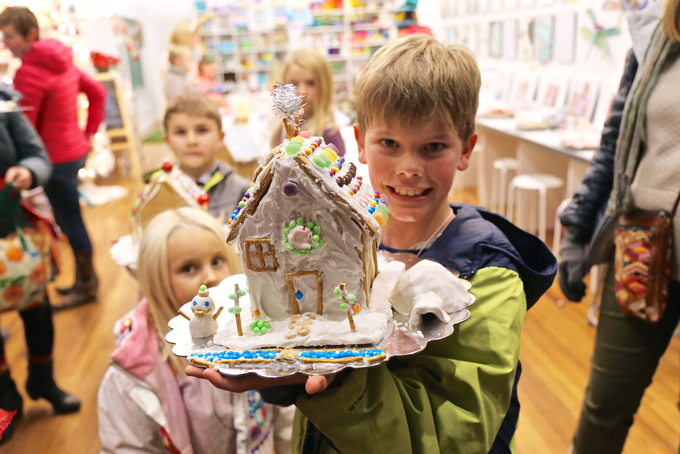
This artist received a special recognition for ~ TheMost Delightfully Detailed, but it was not an easy decision for the reindeer judges with all the impressive candy cottage creations!
A close up of the cottage selected as ~ The Most Delightfully Detailed.
It was pretty peaceful as parents came to pick up, just as the clock struck eight!
Another mighty fine cottage with a fantastic landscape to compliment!
handmakery A pretty peek at a priceless + perfect + on point pairing when it’s purely your painting party! Photo popped seconds before a parade of lil’ people were about to pour in for possibilities to ponder, and you’re the party person to please!
Happy Holidays! Tag us @handmakery with your creations on Instagram! Follow our blog for more inspiring process-based art projects! As always, thank you for following along on this artful adventure! Send us a note anytime! We’d love to hear what you’re thinking and dreaming! Much love and happiness creating in this creative + colorful world full of collaboration + connection + community + crafting!
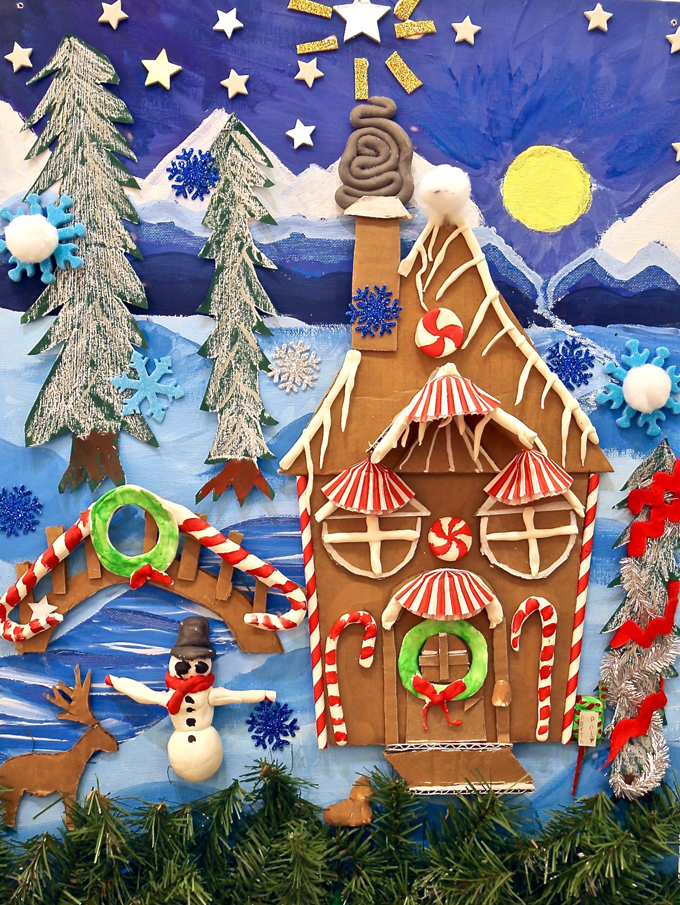
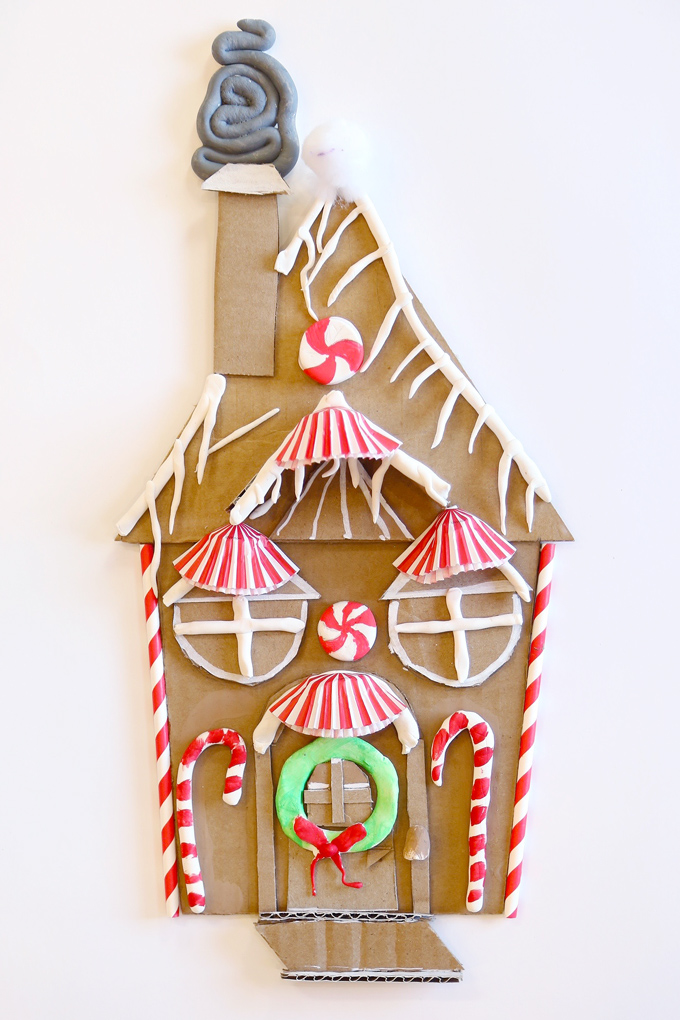
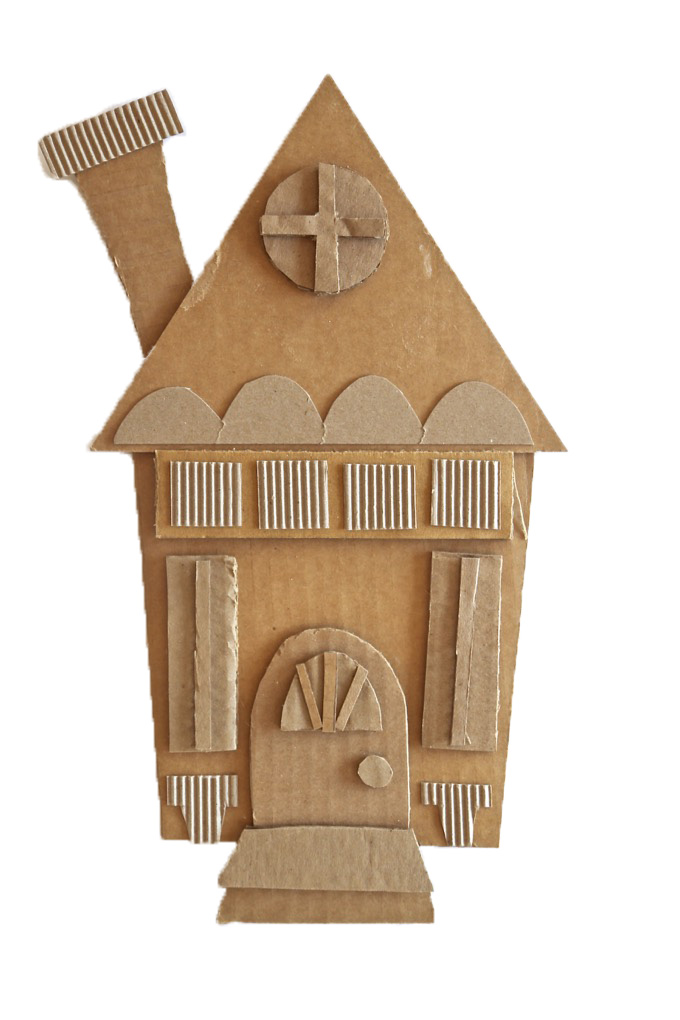
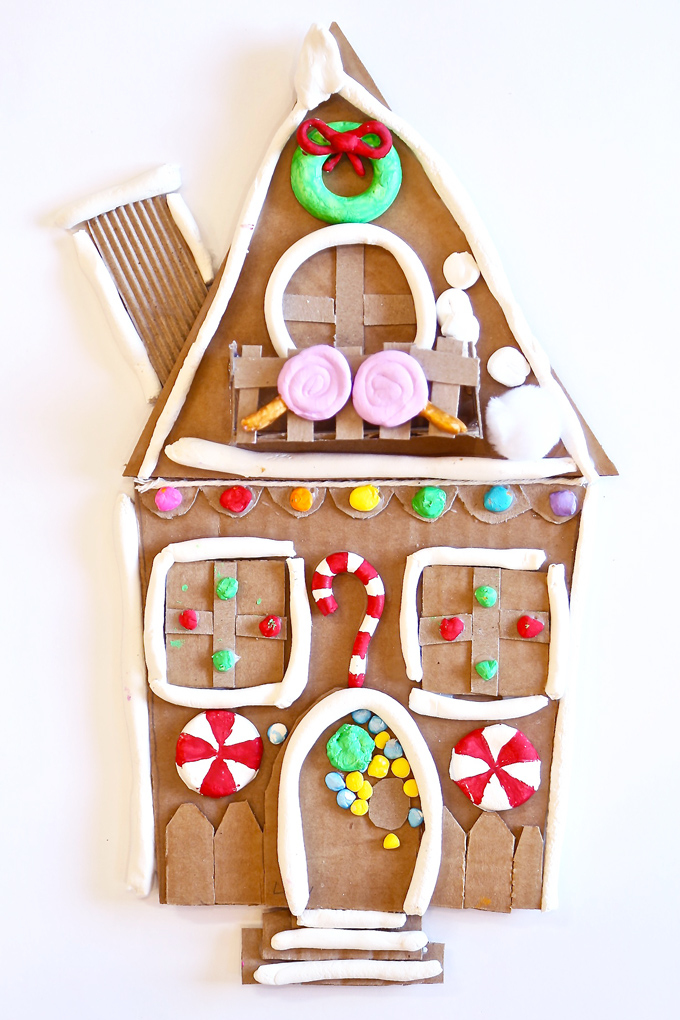
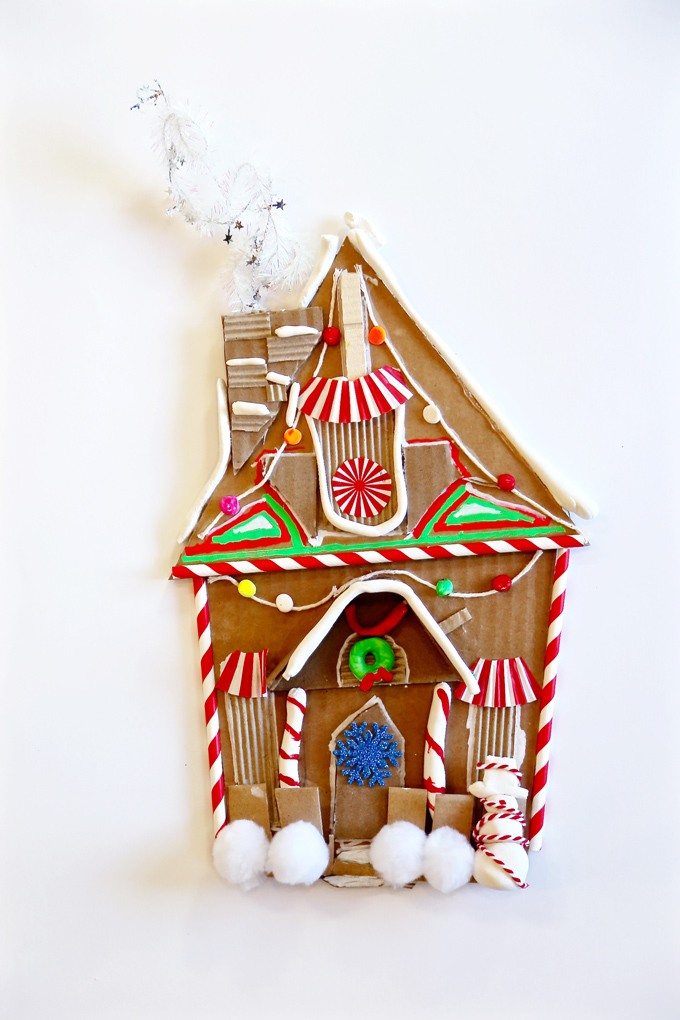
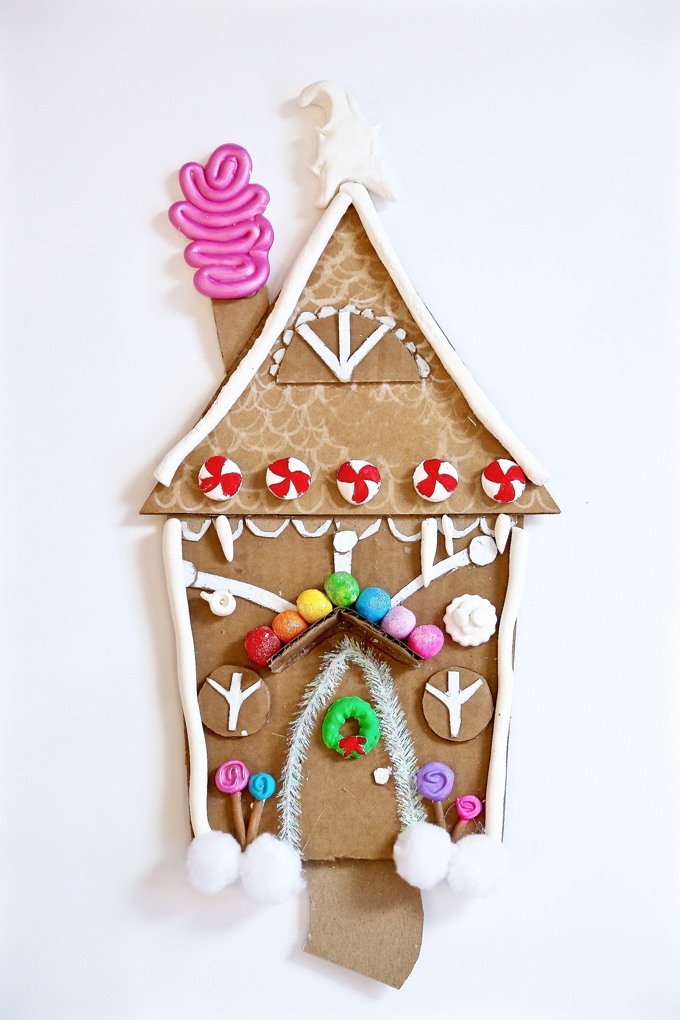
Happy December + Happy Holidays! Save yourself long hours in the kitchen spent mixing, rolling, cutting and baking gingerbread dough – use cardboard instead for a ~ DIY CARDBOARD “CANDY” COTTAGE!
This fantastic upcycled material is abundant and easy to use. Plus, you can avoid a sugar melt-down by skipping the temptation (and expense) of supplying bags of candy, sprinkles and royal icing – and sculpt your own candy cane columns and gumdrop windows using modeling dough.
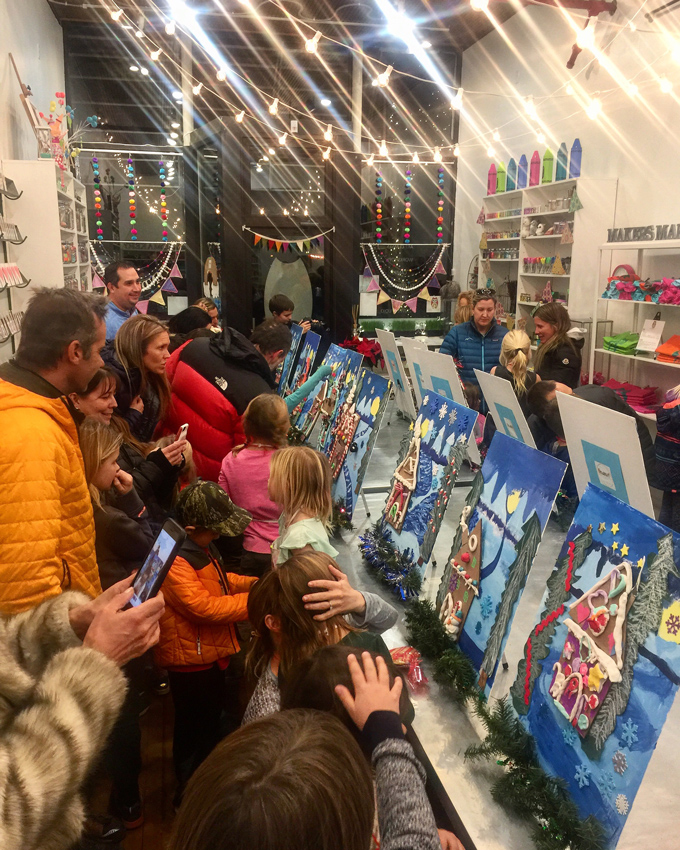
This open-ended, creative process is fun for ages 5-12 (or, say, age 35+, if Mama is so inclined). These cottages can be used as holiday ornaments, wall hangings, or added as a 3D element to a canvas painting, as shown here. You can even make a village; a timeless, long-lasting heirloom, completely made by – hand from the heART!
Traditionalists who want a classic edible gingerbread house (complete with candies galore) can skip the inevitable sticky cleanup at home, and instead, deliver their children to December’s FIRST FRIDAY ~ CANDY COTTAGE WORKSHOPat HANDMAKERY, where crumble-proof walls and every sweet adornment will be provided.
See the full CARDBOARD “CANDY” COTTAGE article in Winter Edition | Issue 10 of the MOUNTAIN PARENT magazine offered FREE throughout the Roaring Fork Valley in print (oh SO beautiful) and/or online throughout the world!
Embellishments- white pom-poms, red & white paper straws, striped cupcake papers, wire stars, & white string.
PROCESS FOR CARDBOARD “CANDY” COTTAGE:
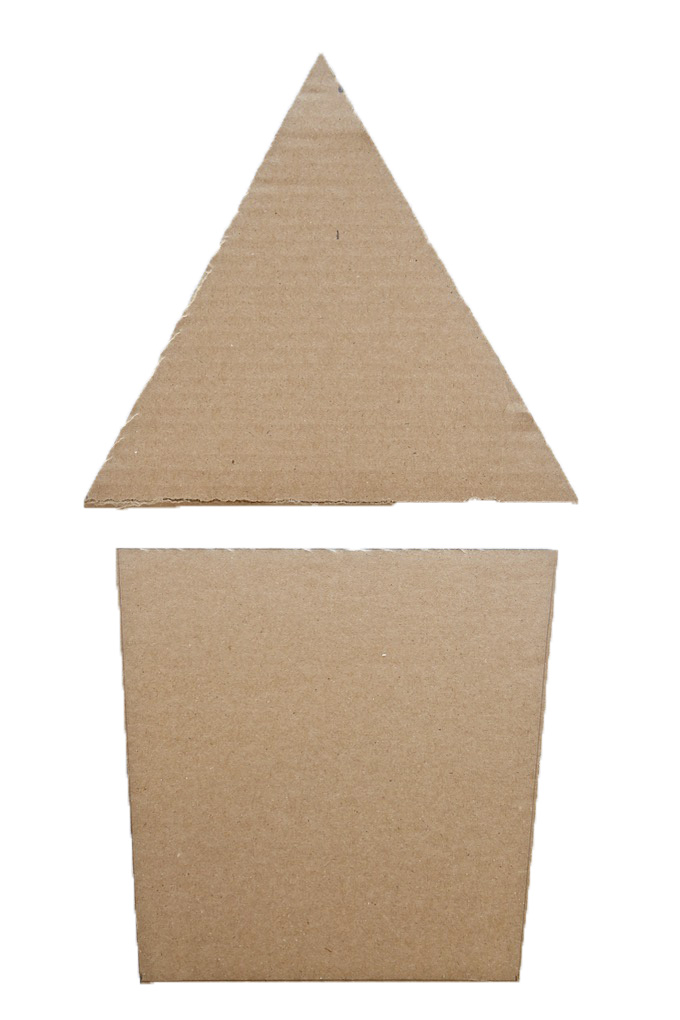
ONE Download a FREE printable template on handmakery.com/blog. Prepare a cardboard cottage cut-out ahead of time by cutting out two shapes: one will be the cottage, the other will be the roof. Using white glue, attach the cardboard cottage to the cardboard roof by overlapping just a bit and gluing in place. Dry.
TWO Have a mixture of smaller pieces of cardboard scraps available that can be cut and used for pop out details. Lighter weight cardboard is ideal as it’s easier to cut. Corrugated cardboard adds a wonderful texture and is also easy to cut. Architectural pieces can be drawn and cut to create doors, windows, porches, fences, shed roofs, steps, a chimney, and more. Draw, cut, arrange, and glue down detail pieces using white glue. Dry. Cottages will become one-of-a-kind mini-relief sculptures!
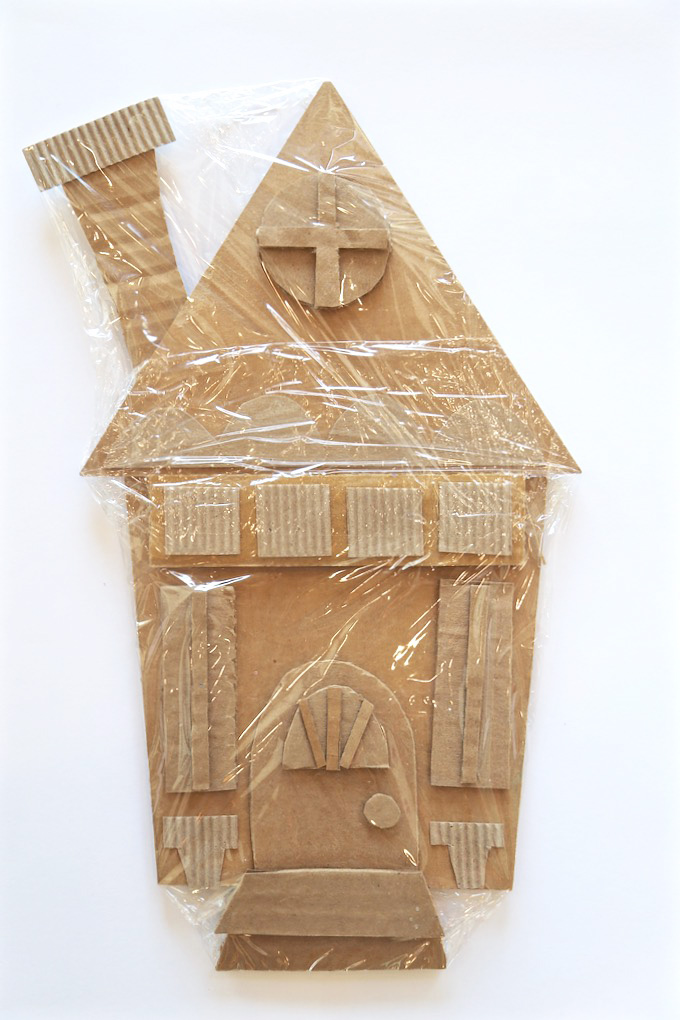
THREE Cover completed cardboard cottage with clear wrap and use masking tape on the back of the cottage to temporarily secure. This protected surface will allow modeling dough pieces to be placed on the house to dry without attaching to the cardboard cottage and will keep the cardboard protected from paint.
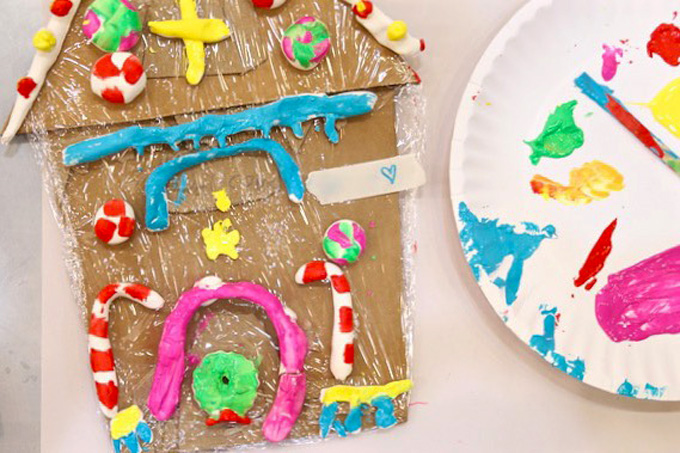
FOUR Keep cottage covered with clear wrap. Move into making accents using Crayola Model Magic which is a fantastic product for use, flexibility, and simple drying. Start by rolling coils to imply snow and icicles. These pieces will take on the look of white icing. These snowy details can run along the edges of the roof, cottage, above the door + windows, and atop the chimney. Use modeling dough to also make candies such as gumdrops, mints, candy canes, and other savory + sugary treats. Wreaths, snowballs, and snow piles can also be fun additions. Allow pieces to air dry in place, on top of the clear wrapped house.
FIVE Paint dry modeling dough candies using paint and a small brush. Allow painted pieces to dry on top of the clear wrapped cottage. Pieces that are to remain white are beautifully painted with white glue and sprinkled with fine white glitter for added sparkle. Dry.
SIX Carefully set all modeling dough piece aside and remove the clear wrap. Arrange pieces in place for gluing down onto cardboard. Most dough pieces can be glued with white glue. It can be helpful for an adult to hot glue fragile icing pieces for strength and a quicker dry time. Use chalk marker to add small details of color on the cardboard cottage. White chalk marker can imply small areas of icing and colored chalk marker can add vivid details to the cardboard pieces. Now, you can add your embellishments including, white pom-poms, red & white paper straws and striped cupcake papers, wire stars, and white string for lights. Most embellishments can simply be glued in place onto the cardboard.
Be sure to tag@handmakery on Instagram with your Cardboard “Candy” Cottage creations as we’ll be featuring your work on our feed! #candycottage
A peek inside the studio at a mini-exhibit + recognition ceremony for our Winter-IE Wonderland Workshop as family and friends gathered to celebrate Cardboard “Candy” Cottages atop a wintery landscape!
JOIN US IN THE STUDIO ~ FIRST FRIDAY, DECEMBER 7TH:
Happy Holidays! Tag us @handmakery with your creations on Instagram! Follow our blog for more inspiring process-based art projects! As always, thank you for following along on this artful adventure! Send us a note anytime! We’d love to hear what you’re thinking and dreaming! Much love and happiness creating in this creative + colorful world full of collaboration + connection + community!
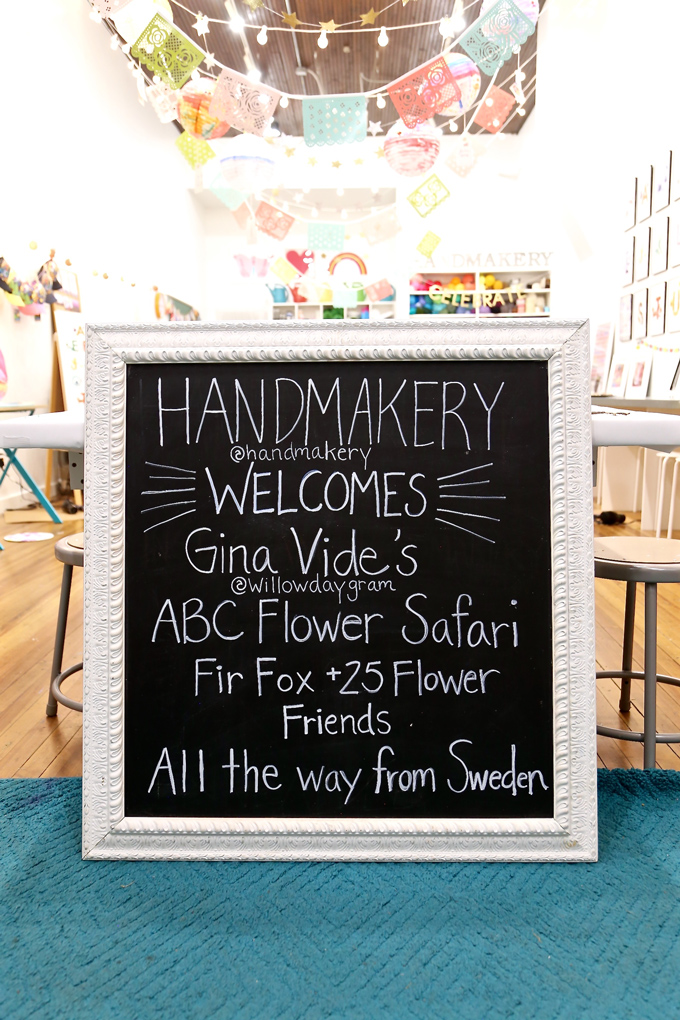
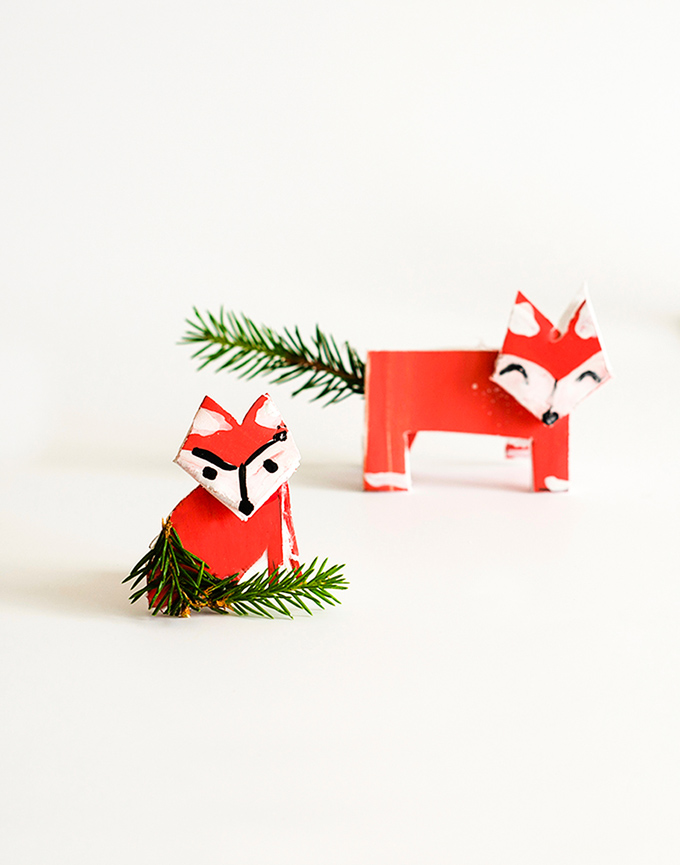
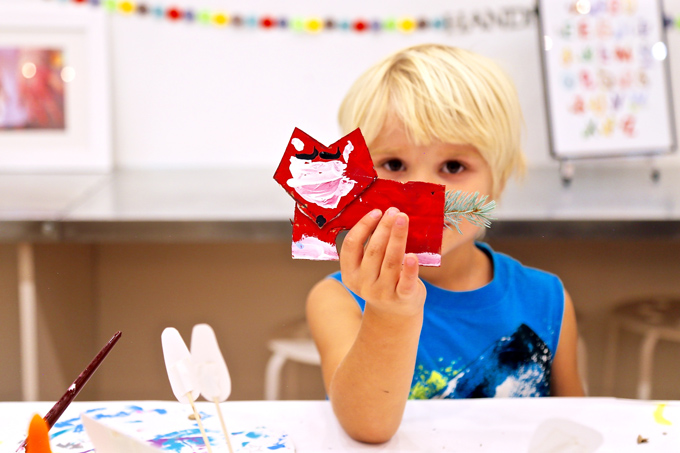
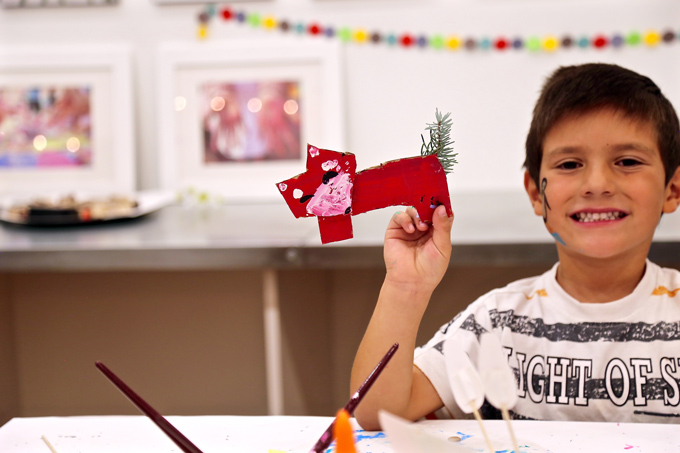
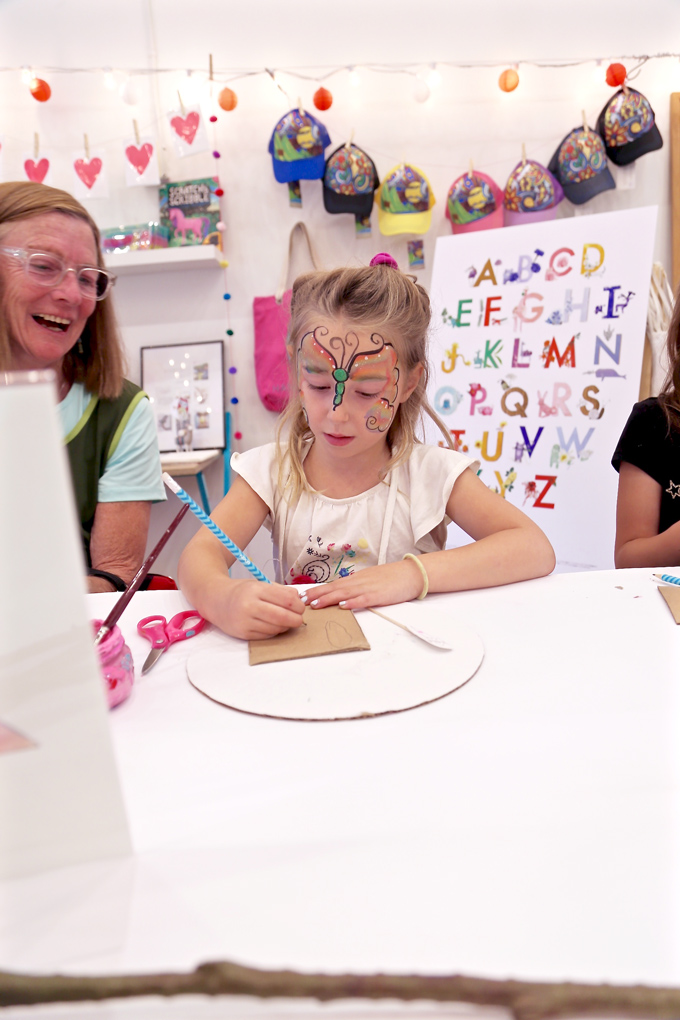
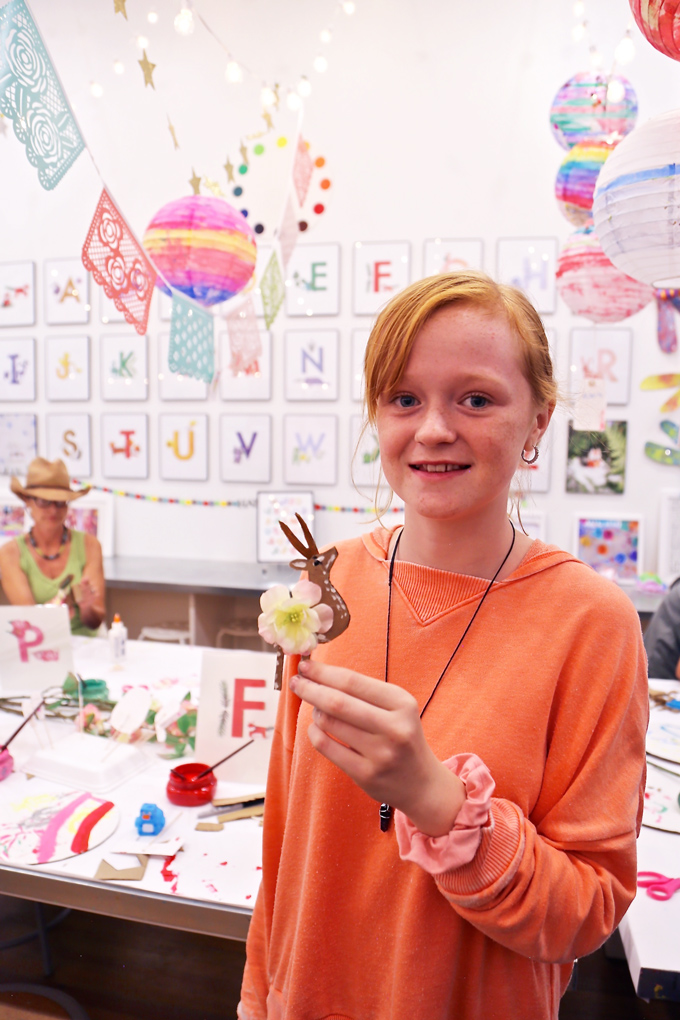
Thrilled to introduce you to Gina Vide ofWillowday! Gina is an amazing (…and oh SO talented) artist living in Sweden, between the sea and the city! She’s flower-inspired, a maker of miracles + magic + moments, with an ornate eye for “delightful detail in the delicate” captured through design and illustration! Her style is whimsical + wondrous, and completely full of woo + wow + wonder! She loves creating + crafting with children and exploring a creative + colorful childhood. So honored to have Gina’s ABC Flower Safari and Fir Fox + 24 Flower Friends travel to our studio for a little collaboration! Literally, they came by airplane into Aspen, for First Friday ~ September, to celebrate our One Year Anniversary, in our NEW location on Main Street! TODAY, Gina launches her ABC Flower Safari Art Prints! Next month she’ll launch her NEW book ~ ABC Flower Safari! The timing is just perfect to celebrate a sneak peek of her creations through a hands-on artmaking experience inspired by the artist herself! Enjoy peeking into Gina’s amusing animal alphabet as a little tasty treat this Thursday! Enjoy the joyous journey!
Our First Friday artmaking event ran from 6 – 8 PM. Early birds anxiously waited outside the studio, with faces and hands pressed to the glass! Happy faces were peeking in and excited to get creating with Gina’s ABC Flower Safari! Yes, a true artful adventure for all ages!
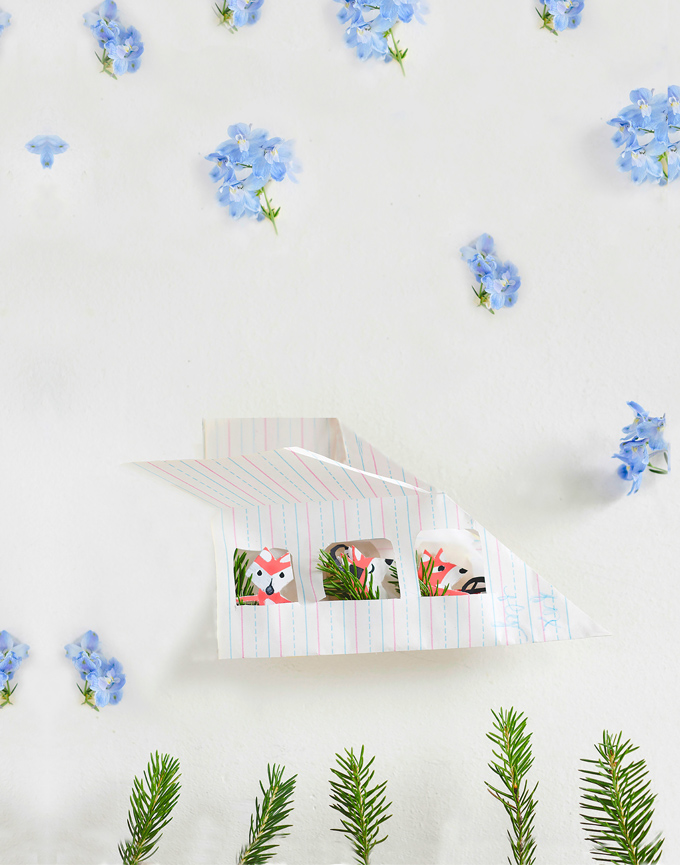
Gina Vide creates magic with her whimsical creatures made from paper, paint, cardboard, and flowers. Here you can see “Fir Fox” and a few of his furry friends as they take off by airplane from Sweden to visit the Rocky Mountains, landing in Aspen | CO, just before we picked them up for the ABC Flower Safari Exhibit!
Every letter of ABC Flower Safari is inspired by an animal and a coordinating flower. Meet “Fir Fox” pictured above. Can you even believe Gina created a full alphabet connecting an animal to a flower? We have her ABC Flower Safari Art Print in the studio and we’re happy to announce these original prints are now available in her Art Print Shop! You can also read more about our collaboration on Willowday!
A favorite photo of a little artist completely inspired by Gina’s “Fir Fox”! Children used cardboard, paper, paint, and flowers to create their very own Willowday inspiredmasterpiece on First Friday! Gina’s imagination runs wild, can’t even think about how whimsical her NEW book ~ ABC Flower Safari will be! Love this must-see, “Fir Fox” Adventures | No 4 | ~ “Once upon a Friday, Fox read a fairytale in the fern fort.” #willowdayfoxtales
Gina’s “F is a Fir Fox” is part of a series she developed to spark imagination in kids and the world around them, using flowers, paper, cardboard, and animals. You can use #willowdayproject to share some of your very own creations part of #willowdayflowersafari on Instagram!
Gina started this series with kids in mind. It grew from her long interest in children, teaching, nature, play, and parenting with a fun crossover to illustration. She loves the simplicity of elements and imagination found in nature walks with children that evoke a story.
We met several years ago on Instagram (@willowdaygram + @handmakery) and became part of the Rockin’ Art Moms. Over the years we’ve kept in touch and have formed a friendship afar…someday we’ll meet! Gina started a summer series, Friday Flowers for Kids, on Instagram. She was able to complete her delicate + detailed series by September as the perfect highlight to welcome fall and First Friday! It all came together and the gallery wall went up with ~ ABC Flower Safari handcrafted by Gina Vide!
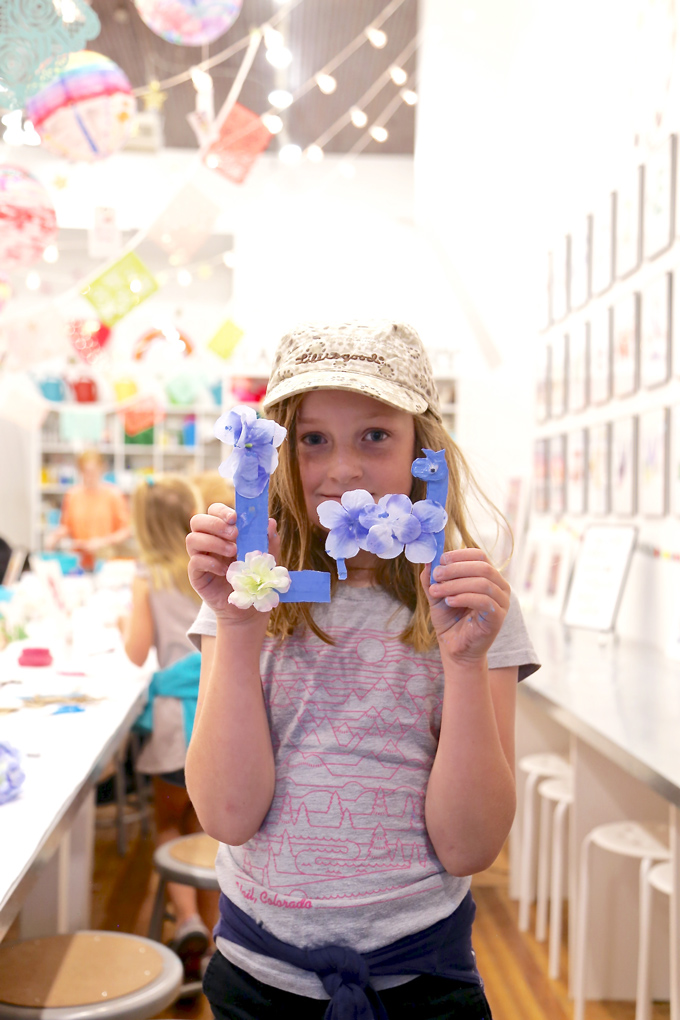
A favorite letter is Gina’s “Lilac Llama”! We weren’t able to get ahold of lilacs this late in the season but how this artist so lovely improvised! Discover Gina’s 3D Lilac Llama with template to make your very own.
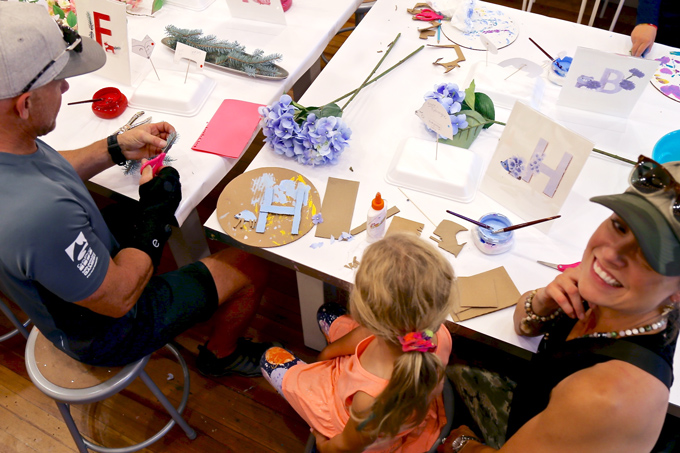
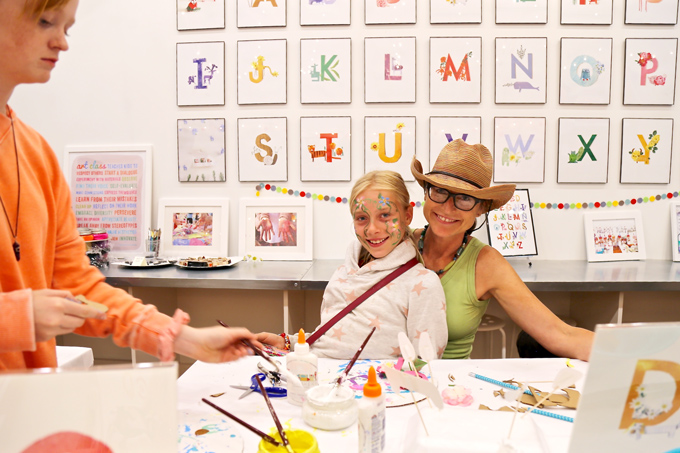
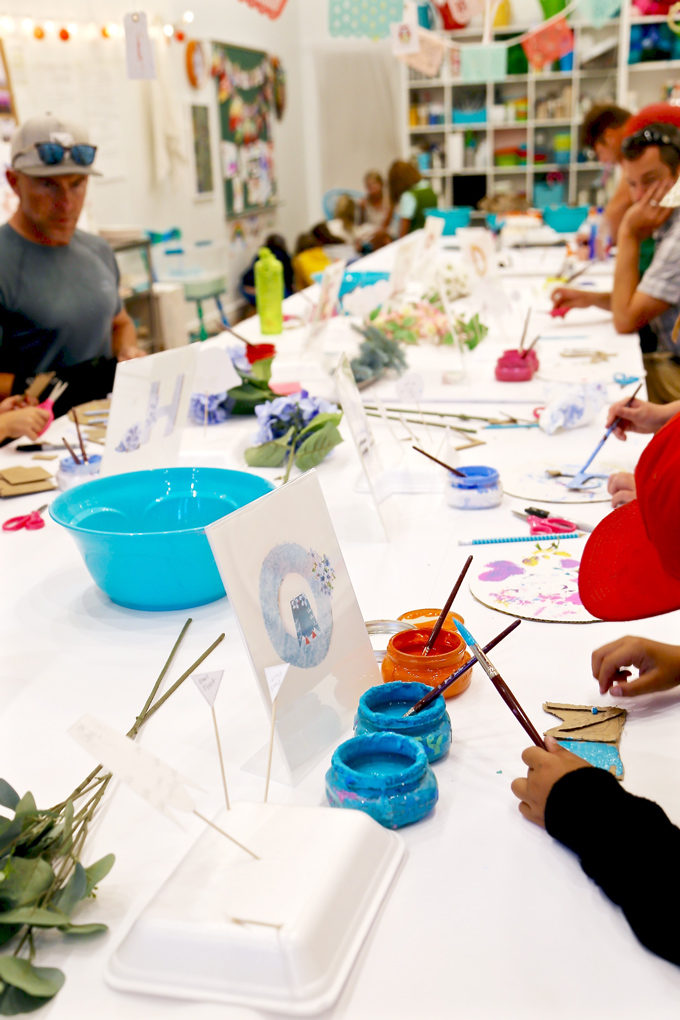
The studio was alive and in full bloom as children of all ages shuffled through the studio (sneak peek) with their families. Picking flowers, painting cardboard, cutting and gluing paper, assembling parts and arranging pieces.
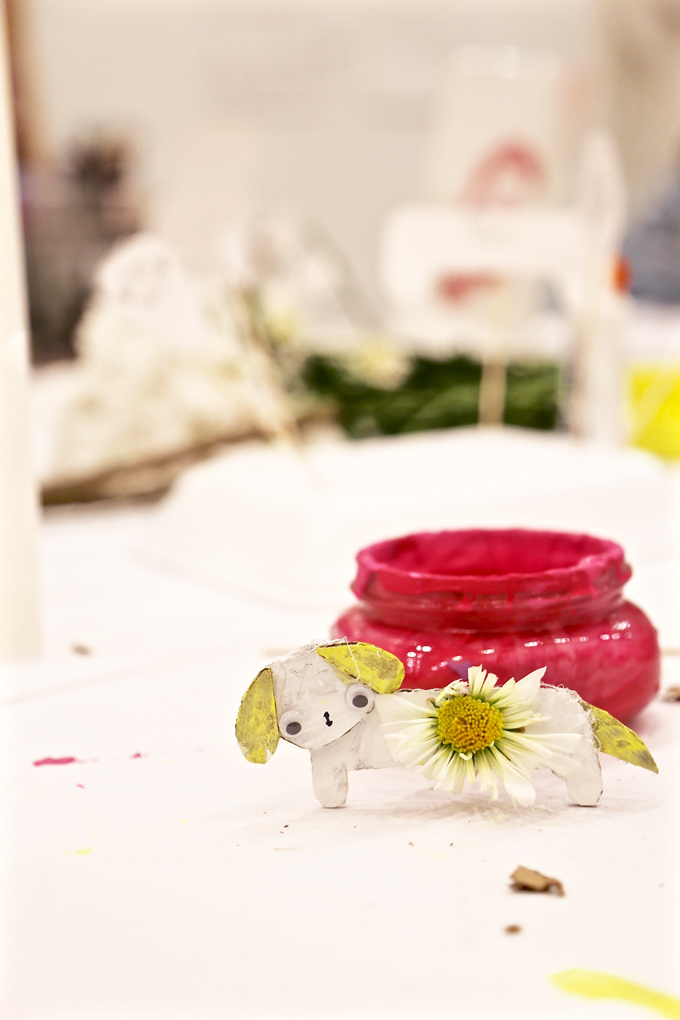
Look at this delightful dog inspired by Gina’s letter D “Daisy Dog” created by a nine-year-old, aka my daughter!
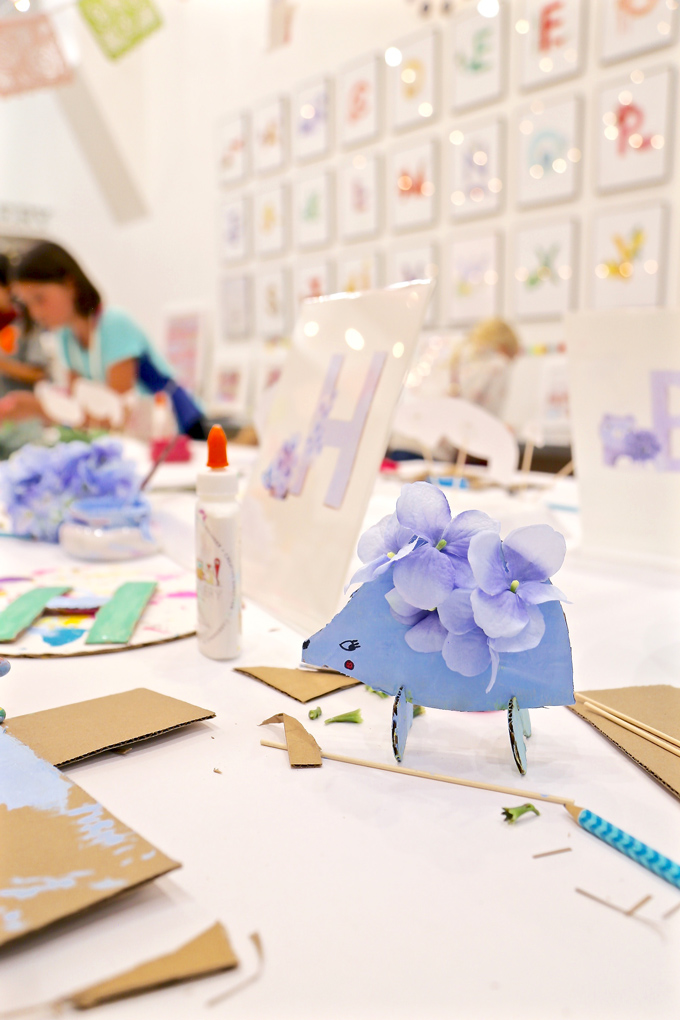
A most mastered “Hydrangea Hedgehog” inspired by Gina Vide’s letter H!
Love how this family formed a team of makers.
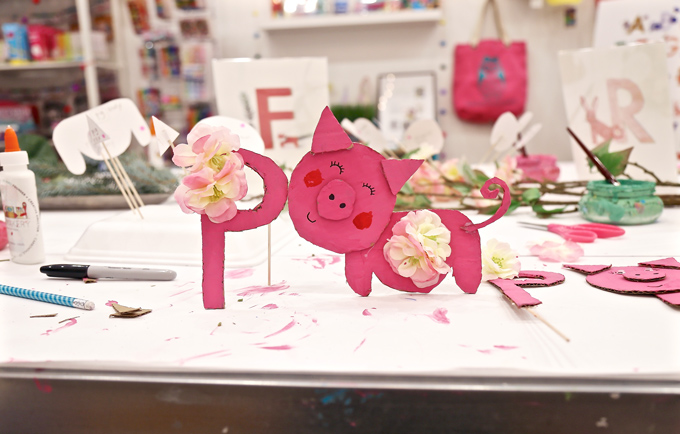
This sweet-sisterly duo spent the evening inspired, emulating Gina’s letter P “Peony Pig” for a priceless + pink + pair of pigs on parade!
This family “art affair” definitely brought community, closeness, collaboration, creativity, color, and craft to a complete circle!
A couple of happy zookeepers in the studio of safari!
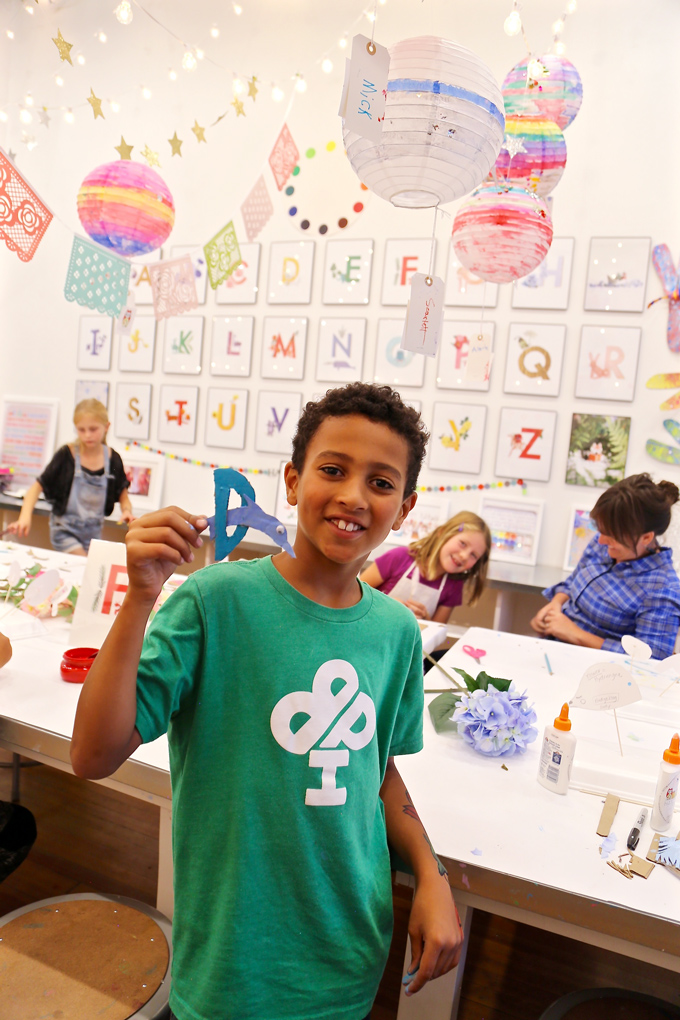
Another F is for “Fir Fox” mastered by this maker!
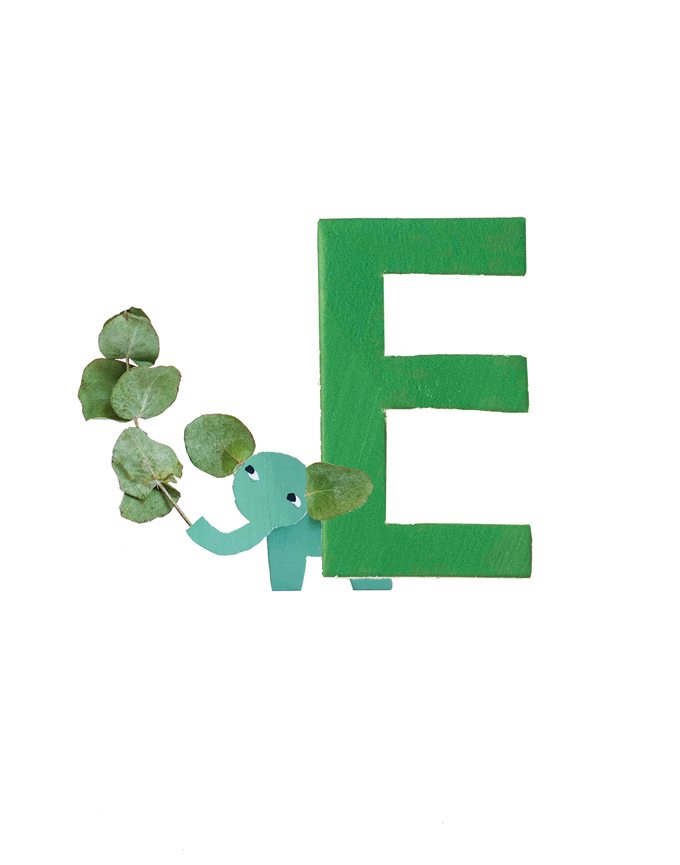
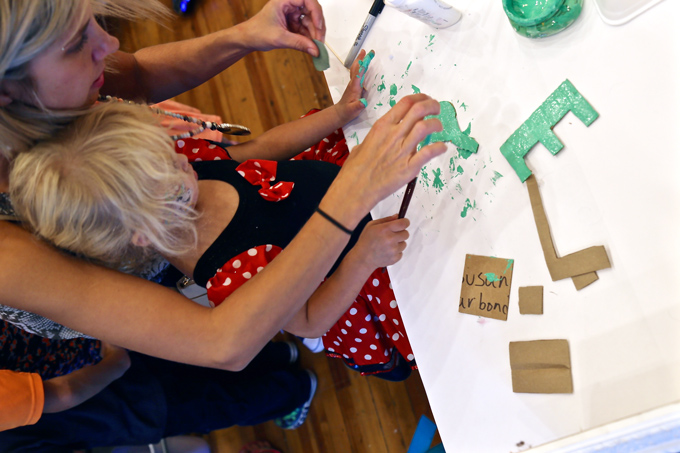
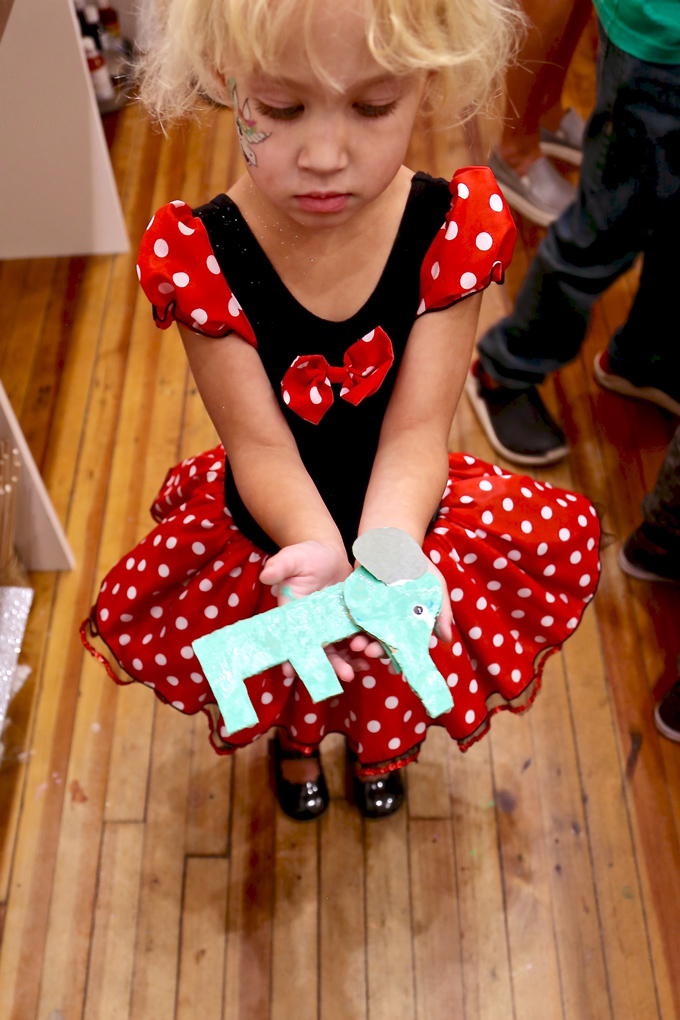
Meet E is for “Eucalyptus Elephant” definitely a most favorite in the ABC Flower Safari collection!
This artist must have known she’d need to wear red to compliment, and really make her gorgeous green elephant pop in this priceless photo with a little P-O-W-!!! and polka dots!
Many artists were intrigued and inspired to create their own creations and unique combinations! Love this delightful D for dolphin!
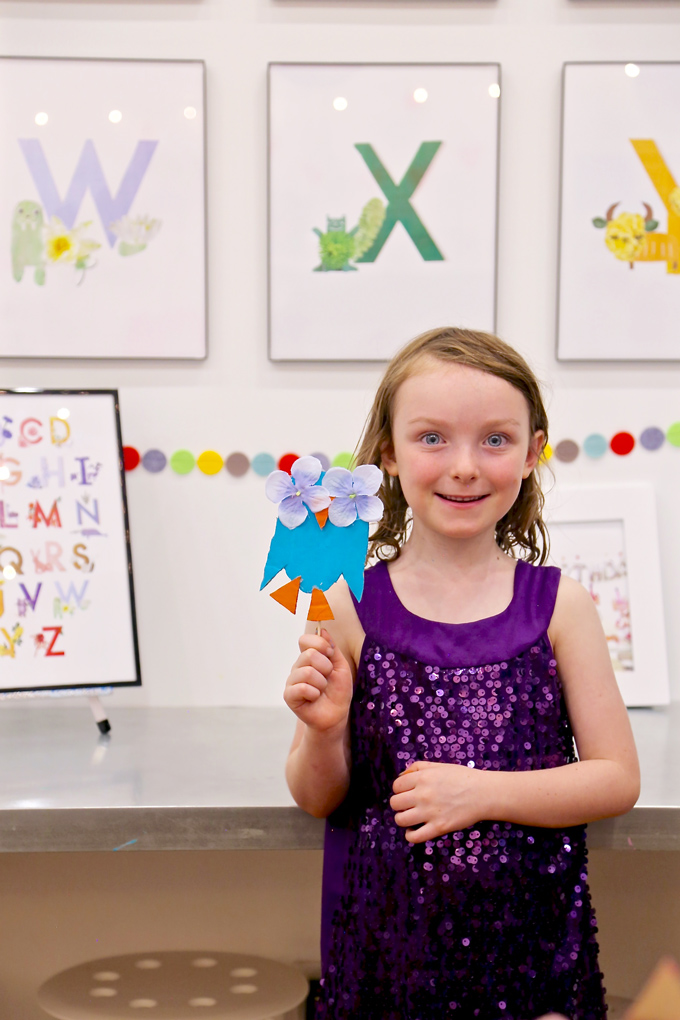
With our logo being the owl, couldn’t conclude without adding Gina’s letter O is an “Oxypetalum Owl” handpainted in one of our most favorite tints of turquoise!
Love how this mini maker matches her eyes to her owl’s eyes in a wide-eyed expression! Hooo!
Next month Gina Vide will be launching her NEW book ~ ABC Flower Safari! We look forward to celebrating with her! Be sure you’re on Gina’s Willowday Mailing List! Excited to announce HANDMAKERY will be highlighting a very special “fox celebration” inspired by Gina’s “Fir Fox” which is perfect as we welcome fall, the changing seasons, and Gina’s NEW book!
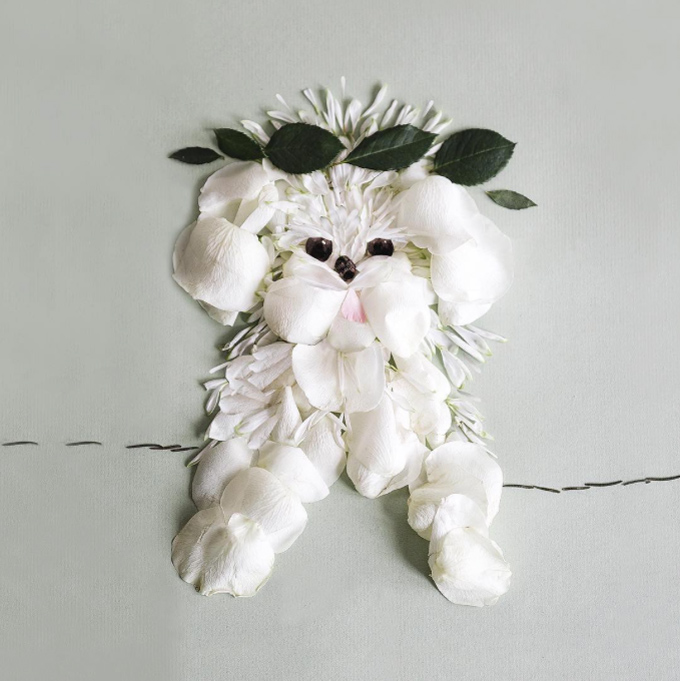
In the studio, Gina also creates the most beautiful pieces using petals, leaves, and other items collected from nature during her walks in nature! Definitely pop into her Art Print Shop and say hello! Thank you Gina Vide for bringing your inspiration all the way from Sweden! So LOVE all you do!
Tag us @handmakery with your creations on Instagram! Follow our BLOG for more inspiring process-based art projects! As always, thank you for following along on this artful adventure in beautiful Carbondale | CO at 449 Main Street! Send us a note anytime! We’d love to hear what you’re thinking! Much love and happiness creating in this creative + colorful world full of collaboration + community!
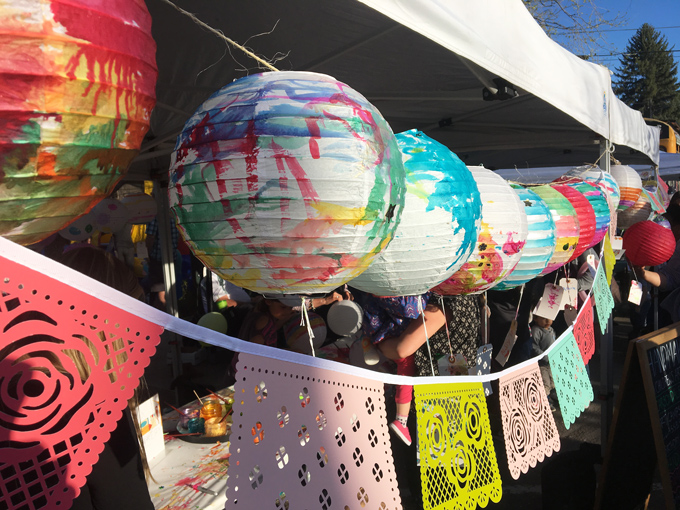
May’s First Friday always brings our entire community out for the annual ~ Family Block Party! Friday evening we hosted ~ DIY Painted Paper Lanterns in our outdoor art studio from 4 – 8 PM. Take a peek at a quick video clip to music! Cheers to a wide-open canvas for all ages to explore! A huge thank you to everyone for joining this festive event in downtown Carbondale | CO! Take a peek at all the magic in our outdoor studio! By the end of the night, all 130 paper lanterns were out of sight, heading home for colorful + creative delight! Connect with us @handmakery on IG for the next creative + community + colorful happening!
Excited to share with you a project recently dreamed up, designed, created, and of course, constructed in our very own downtown art studio! Take a BIG splash into our ~ DIY Forever Fishbowls! This project was created, carried out, and creatively constructed in several of our mixed age, six-week, after school, hands-on + mixed media, art workshops creating with young artists!
Beyond excited to also announce hands on + mixed media + NEW ART WORKSHOPS START NEXT WEEK for a wide array of ages! Hop on over to ENROLL AT HANDMAKERY.COM as spaces are quickly filling! While visiting, peek at new photos on our site and IG feed!
As you can clearly see, artists used a wide array of mixed media to bring their vision to life! Below, you’ll discover all you need to create your very own ~ DIY Forever Fishbowl. The big + beautiful bonus, you’ll never send a fish into fishy heaven, EVER EVER EVER again. YES, this fishy will truly live F-O-R-E-V-E-R and children LOVE this fact! Like, XOXOXO times a million or LOVE for a lifetime!
Happy New Year!!! Looking back, one of our most favorite workshops for children included ~ wee Wondrous Weavings on Wooden Looms! Oh my, the possibilities of textile design! These mini-masterpieces were created by 6 – 10-year-old artists! Our NEW ~ 2018 Winter Art Workshop Brochure is hot-of-the-press! Workshops start early January, yes this week and they’re filling up fast, just hop on over to our simple SIGN UP! If you’re looking for hands-on + mixed media + creative expression + an artful highlight to each week + a chance to meet new families and friends JOIN US + ENROLL TODAY! You can also connect with us on Instagram @handmakery to keep an eye on what we’re creating in the studio from special art events to birthday parties, and of course everything in between at our NEW art studio located at 449 Main Street in Carbondale | CO in the heart of the Carbondale Creative District!
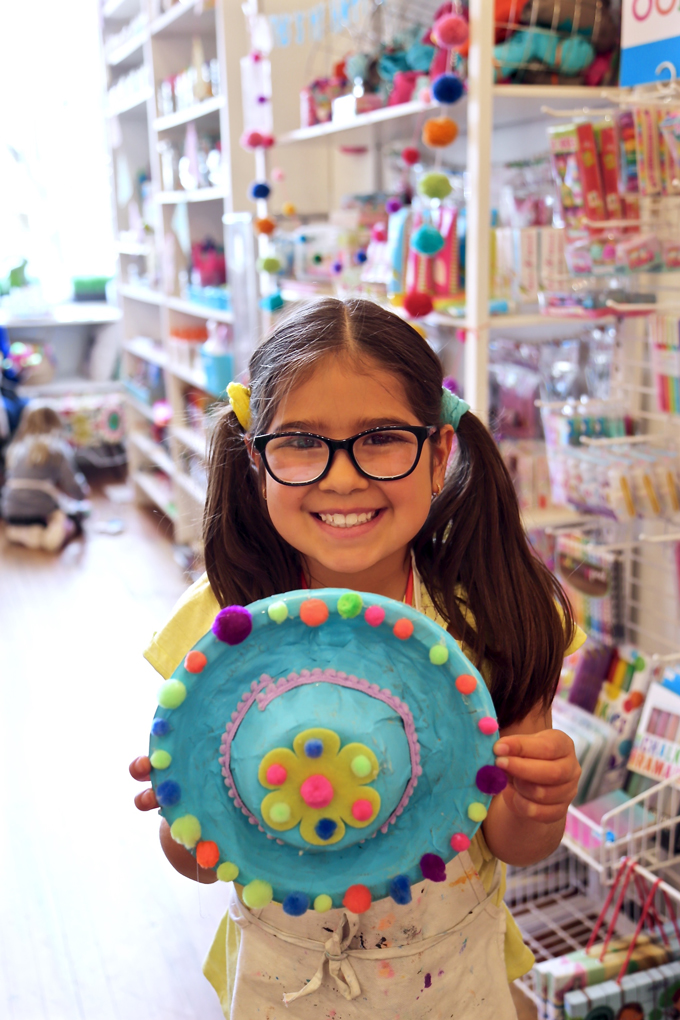
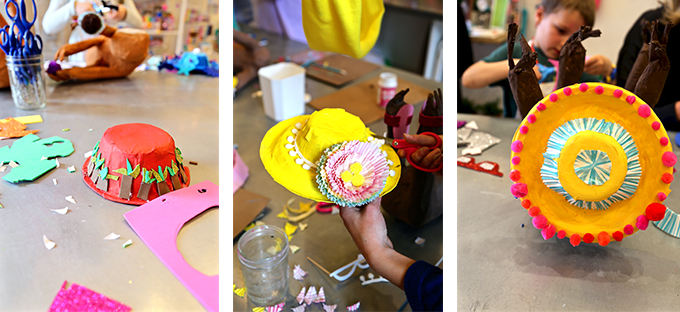
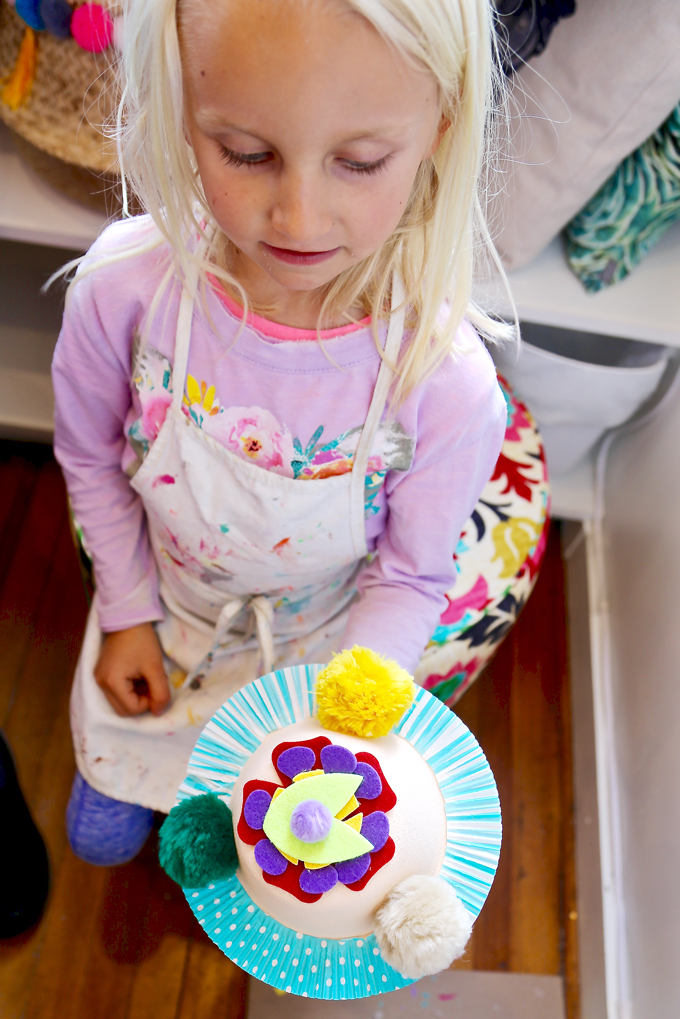
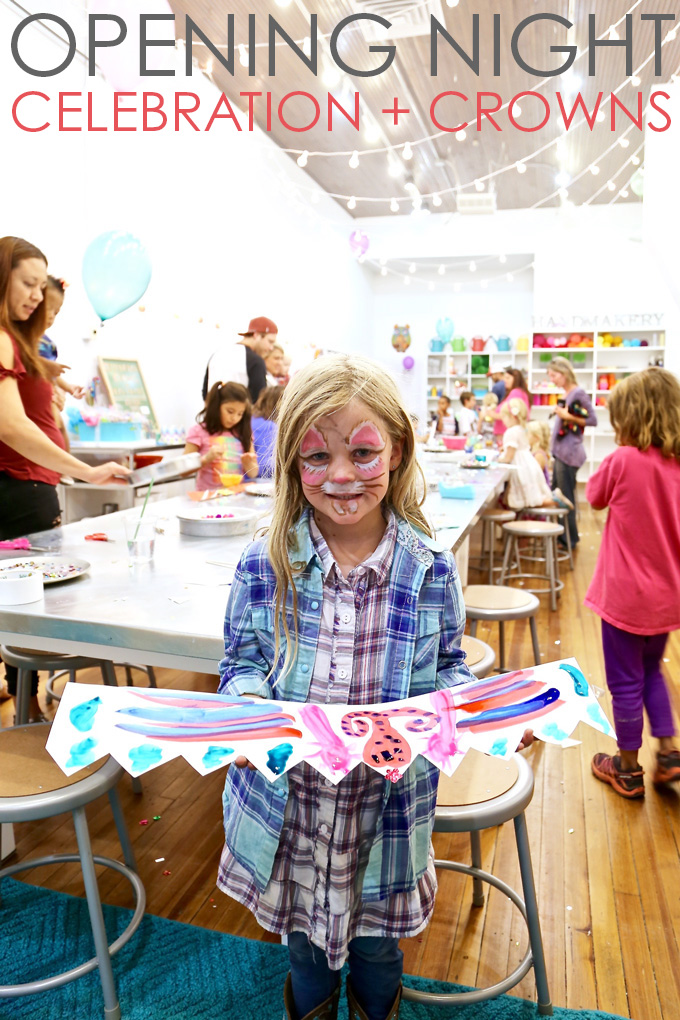
First Friday was our ~ Opening Night Celebration at our NEW art studio location at 449 Main Street in downtown Carbondale | CO! With a wide array of ages and not knowing exactly how many guests we’d have joining in, we kept it celebratory + simple + full of dazzle, painting and embellishing ~ Celebration Crowns! Main Street was blocked so everyone could enjoy an evening strolling the streets of historic downtown! The night was festive and full of flavor, with everyone back-in-town from summer adventures. The community was alive, vibrant, and actively adventuring around this artistic town!
We hope you’re enjoying the last days of summer! Have you heard the news!?! HANDMAKERY just moved to Main Street! We’ve been working all summer to get our new studio up, running, and ready for HANDMAKERY’SOpening Night Celebration ~ First Friday, September! We’re so excited to be located in downtown Carbondale | CO! We’ll now be located in the heart of historic downtown at 449 Main Street, in between flowers, yoga, coffee and across from piping hot pizza, sounds tempting, right!?! Yes, we definately have the BEST neighbors! We’re incredibly excited to be part of the community and the Carbondale Creative District!
Summer involved planning, designing, constructing, ordering, organizing, and decorating our new studio which we LOVED! Highlights of our new space include: being nestled in the heart of the community, 14′ ceilings, timeless wood floors, historic charm, a crisp + clean + modern flair, natural lighting + big windows, all our favorite art supplies, and maybe our favorite element… a teeny-tiny restroom!
PLEASE PENCIL IN + JOIN US:
September 1st | First Friday 4 – 8 PM
HANDMAKERY’S Opening Night Celebration + First Friday ~ FREE Art Making + Suprise Giveaways + Studio Tour!
STUDIO SNEAK PEEK EVENT:
We hosted a ~ Studio Sneak Peek + Free Kids Art Making last Thursday from 4-6 PM! Several families + creatives came to tour the NEW studio and out-on-the-town to create ~ a wondrous wearable~ to shine + showcase + sport + spotlight around town on ~ First Friday, September 1st! We had 100+ people attend this spectacular evening event! A HUGE thank you to everyone that attended our first event! The support for mini makers on Main (…and coming soon BIG maker events….including adults, ladies, couples, family + friends) was incredible! See additional photos of the sneak peek in this week’s Sopris Sun newspaper on page 8!
Take a peek at our video-clip gone-wild over on Instagram, highlighting all the artful activity of our ~ Studio Sneak Peek!
At the ~ Studio Sneak Peek, artists created {hands on + mixed media} Owl Feathered Necklaces using cardboard, beads, jumbo pipe cleaners, markers, glue, stickers, string, sparkles and more! Everyone had a great time in the studio! Over the last several years over on Instagram, I’ve admired Wendee Wingfield, a local + Roaring Fork Valley photographer. Wendee RSVPed to our event, I couldn’t even believe it! We had never met before but when she walked in with her five children, I was beyond thrilled to finally meet Wendee and her children in person! Wendee Wingfield generously sent me a gorgeous collection of photos she took of the ~ Owl Feathered Necklaces her children created in our NEW art studio on Main Street. If you’re not on IG yet, it’s a fantastic place to meet new friends with similar interests! Find us on IG @handmakery!
Take a glimpse at Wendee’s Wingfield’s photos below and discover her amazing talent + beautiful collection over on IG @wendeewingfield! You’ll be amazed at what she sees through her lens and the life she creates!