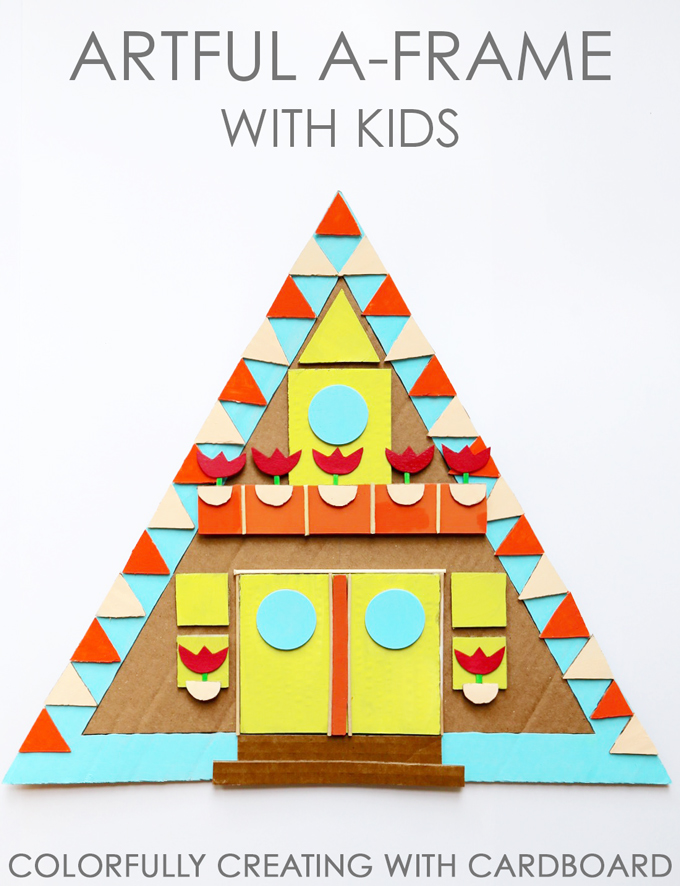
Get cozy, creative, and cardboardconstructive from your casita with our architecturally trending DIY ~ ARTFUL A-FRAME WITH KIDS! Take a peek at our {hands on + mixed-media} process creating with crafty kids in Carbondale, Colorado in our downtown art studio at 449 Main Street and be sure to follow our artful adventure on Instagram!
An A-frame is an architectural house style known for its steep-angled roofline that generally begins at the foundation and meets at the top in the shape of the letter A. They became quite popular around the world in the mid-50s through the 1970s, but they’re totally trending today!
SUPPLIES FOR ~ ARTFUL A-FRAME FOR KIDS:
Paper and pencil
A-frame online inspiration, included below.
Utility knife (adult-use)
Straightedge and geometric shape stencils
Wooden sticks and a tool for cutting (optional)
Glue
Scissors
Paints, brush, water & container
Embellishments (optional)
PROCESS FOR ~ ARTFUL A-FRAME FOR KIDS:
ONE Collect cardboard upcycled from a large pizza box top.
TWO Take a peek at trending #aframe inspiration on Instagram. We’ve included a lovely list below!
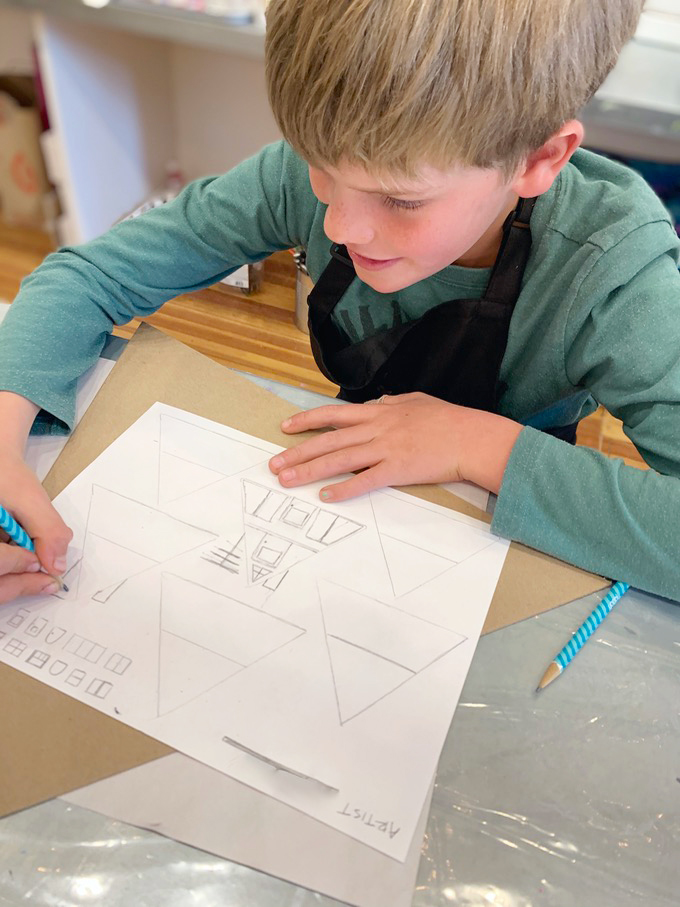
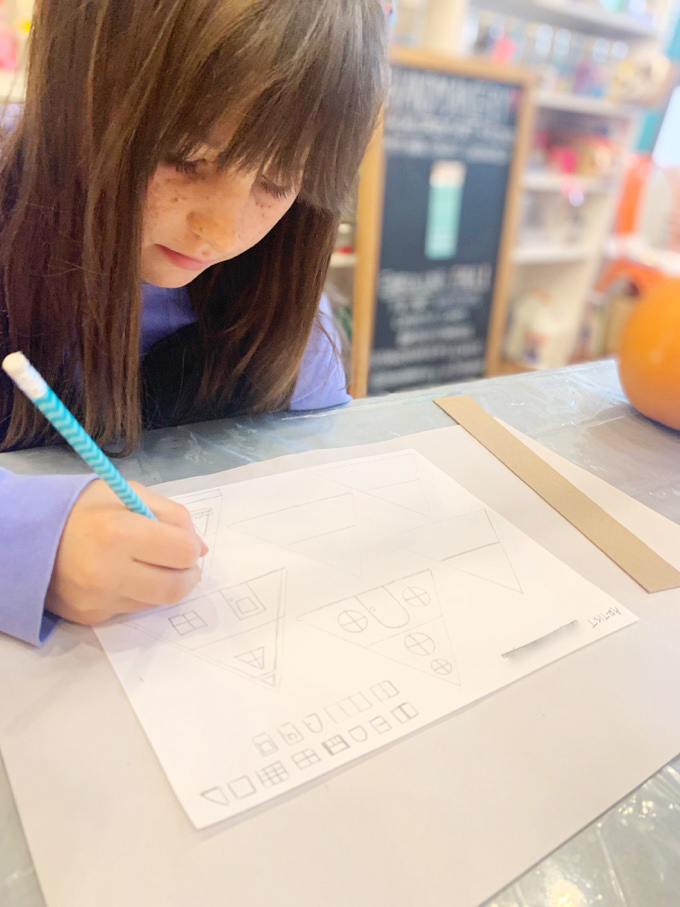
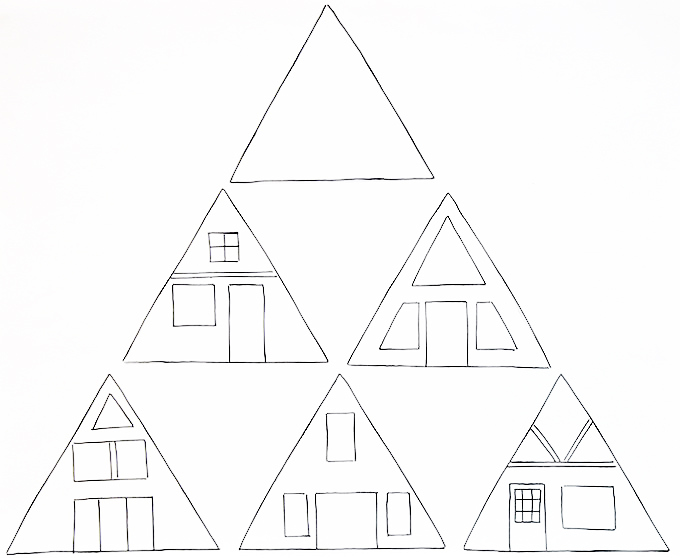
THREE Start with a few simple triangles, pre-drawn onto sketch paper, for mini open-ended sketches. Young artists can work towards their vision, sketching within these triangles, to then create their favorite design to construct. Focus on sketching the main elements which might include doors, windows, sliders, decks, and more. A-frames are most often two-stories and symmetrical, but the sky is the limit! Just be sure to set your sights high and soar!
FOUR Use simple sketch ideas to begin construction. Here are some simple sample layouts for visual reference to artfully inspire.
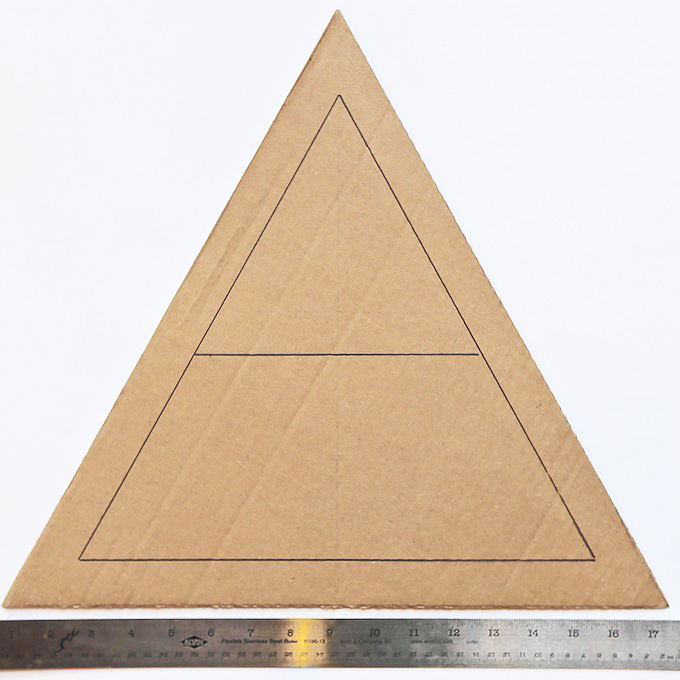
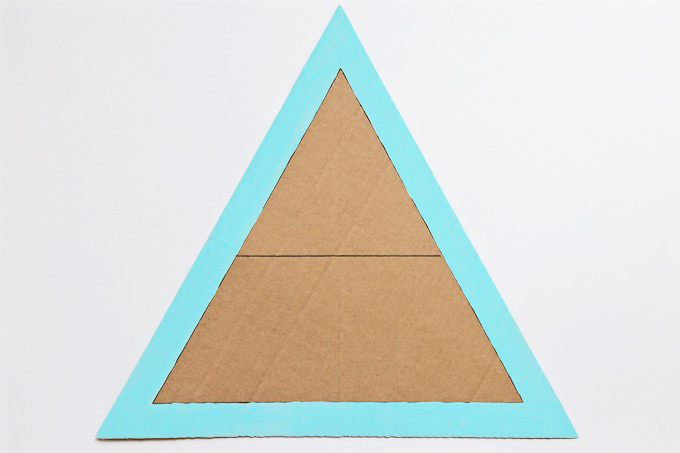
FIVE Precut a large cardboard piece into a triangular base using a utility knife (adult-use) at a 45° angle. Then measure a 1 1/4″ border around all the three sides using a pencil. Midway, mark the second story with a horizontal line or keep it open for a single story with a vaulted interior. The inside of your A-frame is a completely open canvas to artfully design.
SIX Pick a favorite color. Using acrylic paint, cover all three sides with a solid coat. You can also use painter’s tape to get a crisp edge.
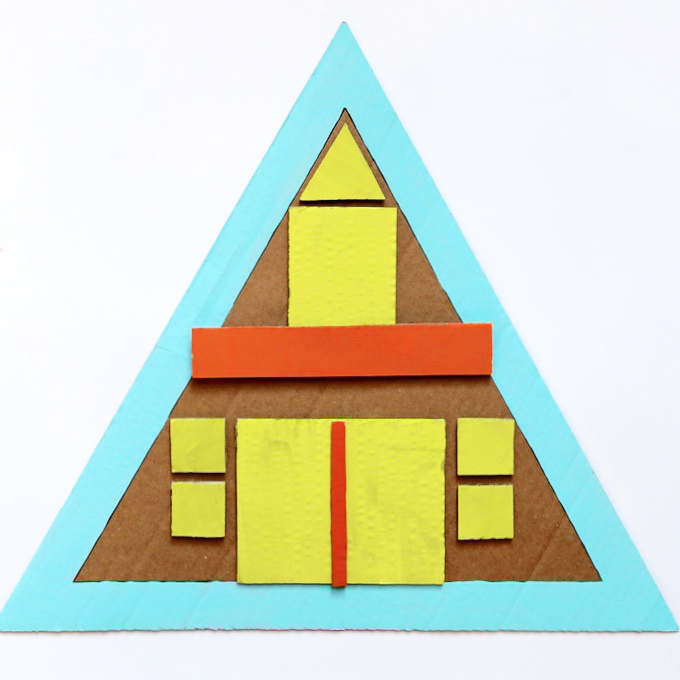
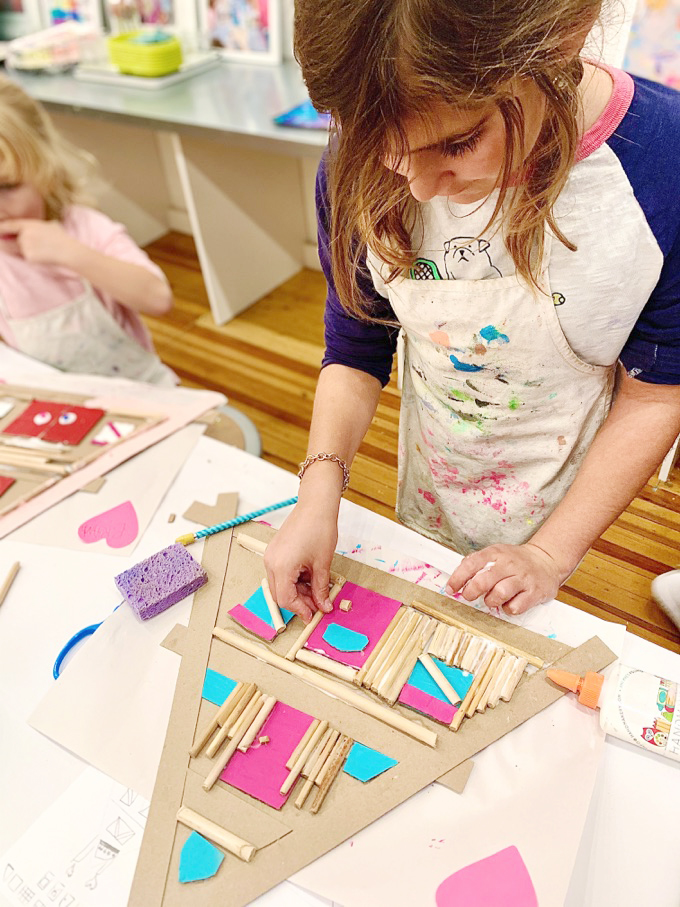
SEVEN Precut cardboard pieces into smaller, more manageable pieces for younger artists to explore. This makes cutting cardboard much easier for smaller hands. We usually have a bowl full of squares and rectangles in a variety of sizes. From these basic cardboard shapes, children can use a ruler or geometric stencils to create their own unique shapes for doors, windows, and additional parts.
EIGHT Select three main colors to complete your color pallet. On a separate work surface, paint individual elements, such as doors and windows using a medium-sized brush and acrylic paint. Dry all pieces separately. Keep interior pieces moveable so artists can rearrange and make changes to their layouts before finalizing piece placement by gluing down.
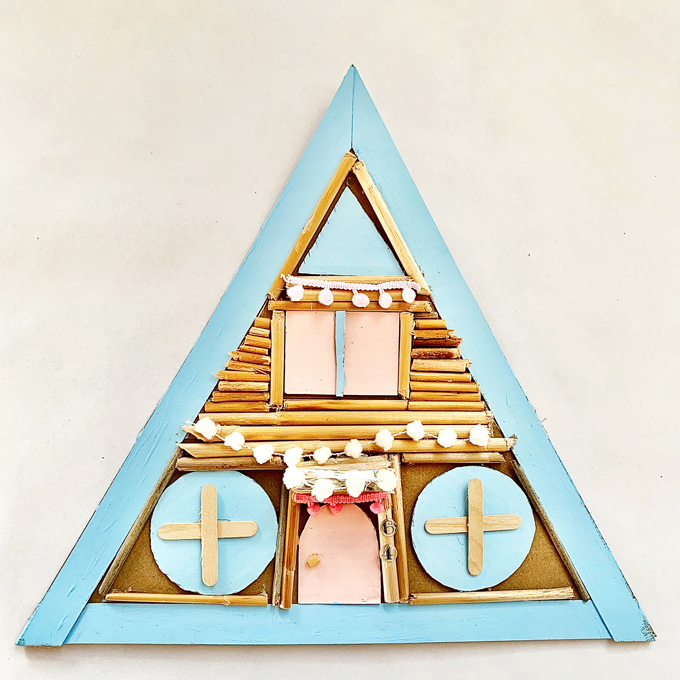
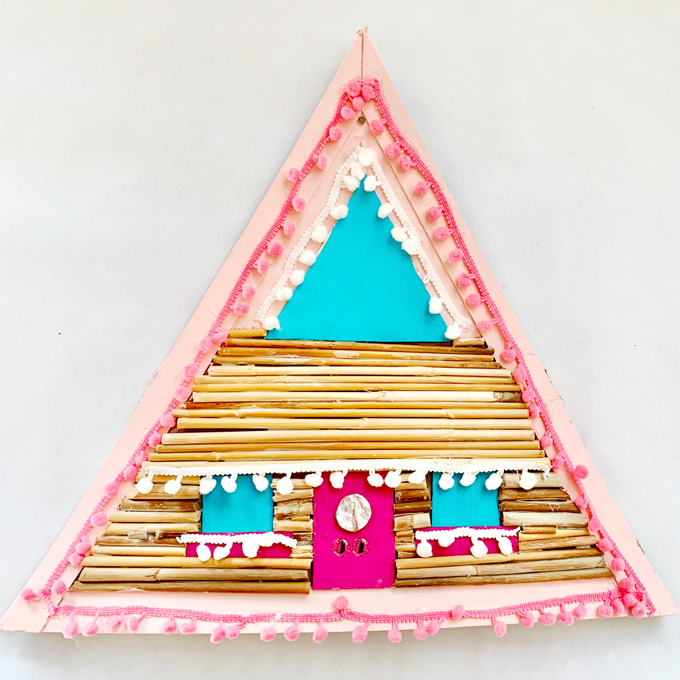
NINE Tiny cardboard pieces can be added to personalize. Take a peek at the divided lites in the windows in this A-frame. Many artists focused on symmetry for their A-frame but asymmetry is also a wonderful possibility. Young artists will love exploring this process and everything in between.
Love the circular and triangular windows on this blue A-frame with pom pom ribbon to compliment the archway entry!
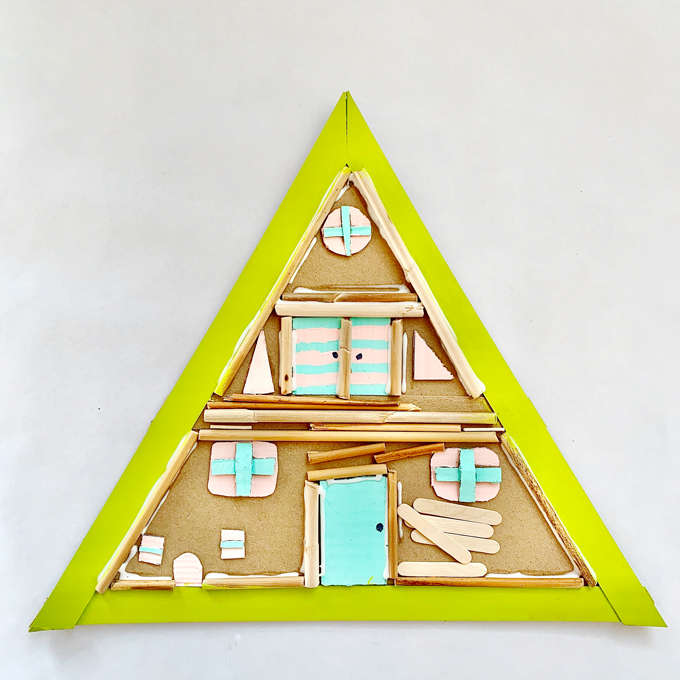
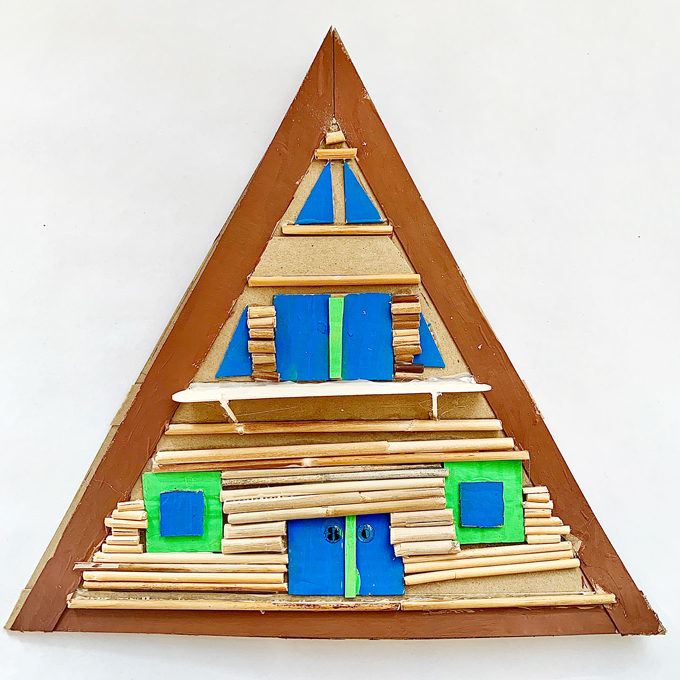
TEN As a favorite “optional element” artists can add wooden pieces to make this project more real-world in construction. Kids LOVE working with wood! We collected cattails in the fall and most importantly pre-dried these sticks in the sun for several weeks so they wouldn’t shrink and pop off the cardboard when glued down. Cattails are an amazing and abundant resource in the great outdoors. They simply grow around wetlands and are easy to cut with heavier weight scissors. My daughter and I cut over 200 for this project. The best part about cattails you’re wondering? Cattails are smooth, straight, and simple to cut. Older children can cut cattails independently using small (6″) diagonal cutters or dikes, of course with adult supervision, to specific lengths. Younger artists can mark the length with a pencil and have an adult assist with the cutting. In the springtime, cattails have been drying out all winter so they’re ready to go without dry time. Collect, remove the top fluff, peel the outer layers to get to the center stick, and simply cut to any length! This element in nature is brilliant!
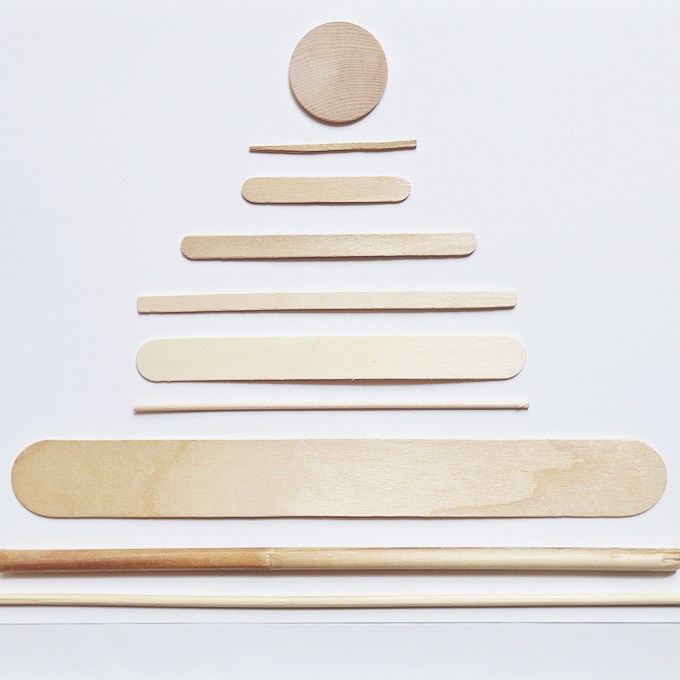
Additional wood pieces to artfully add might include, craft sticks, popsicle sticks, skinny sticks, mini craft sticks, natural mini wooden craft sticks, jumbo craft sticks (great for decks and porches), tiny dowels, wooden skewers, toothpicks, flat rounds, and more!
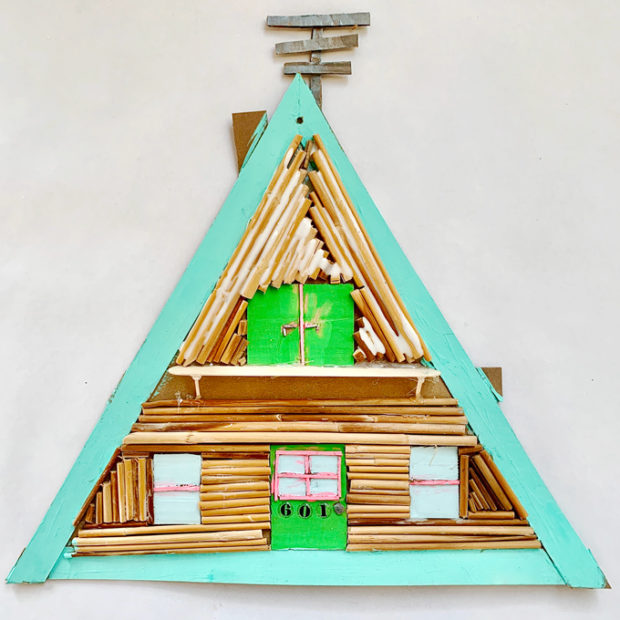
Most wooden pieces can be glued down with a generous application of white glue and dried overnight. A popout deck or balcony might need a little hot glue reinforcement. Doesn’t this A-frame have a wondrous in the woods or lovely log cabin feel?
Artists LOVED working with real wood as a “real world” architectural element for diversifying their siding in directions including vertical, horizontal, and artfully angled. The natural cardboard also remained as a natural compliment to spaces not covered in wood. Artists got clever and crafty adding window boxes, circular windows, stairways, railings around balconies and decks, entry archways, tv antennas, and more! Kids are just oh so clever and always so very crafty!
Tag us on Instagram with your creations. We’d absolutely LOVE to see what you’re making and creating! As always, thank you for following our artful adventure on Main Street in the heART of the Carbondale Creative District! Send us a noteanytime! We’d love to hear what you’re thinking, dreaming, envisioning, and of course, our favorite ~ CREATING!
Much love and happiness creating in this creative + colorful world filled with collaboration + connection + community + arts & crafting! Happy Springtime from our studio to your cozy, crafty, and creative cozy casita!
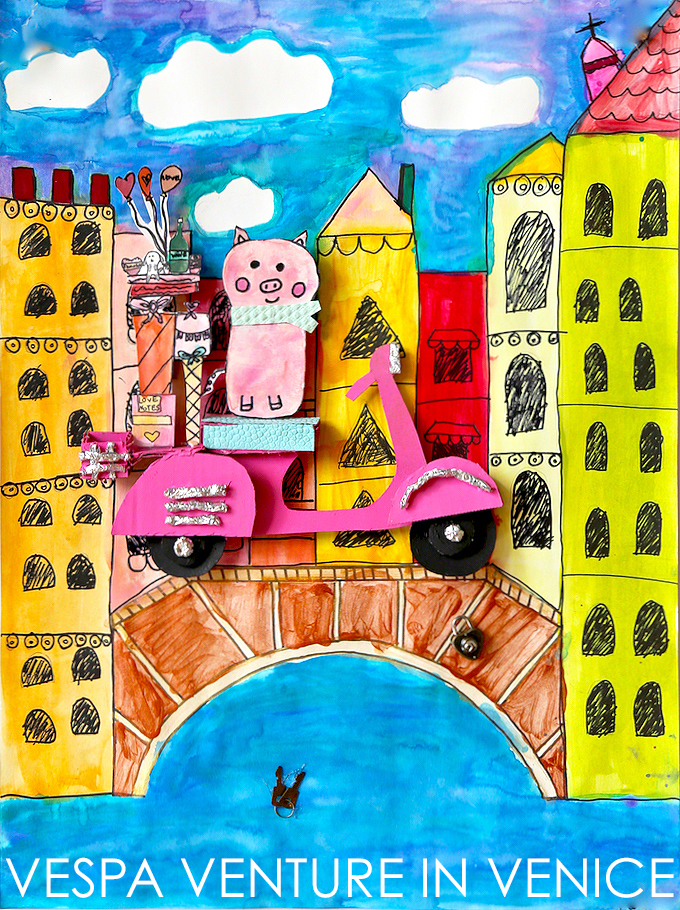
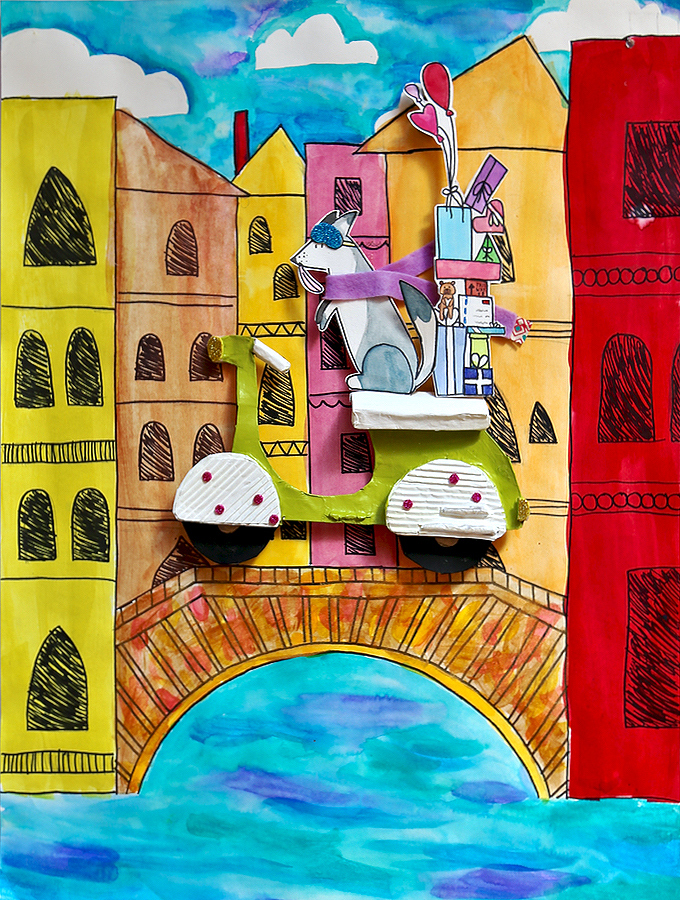
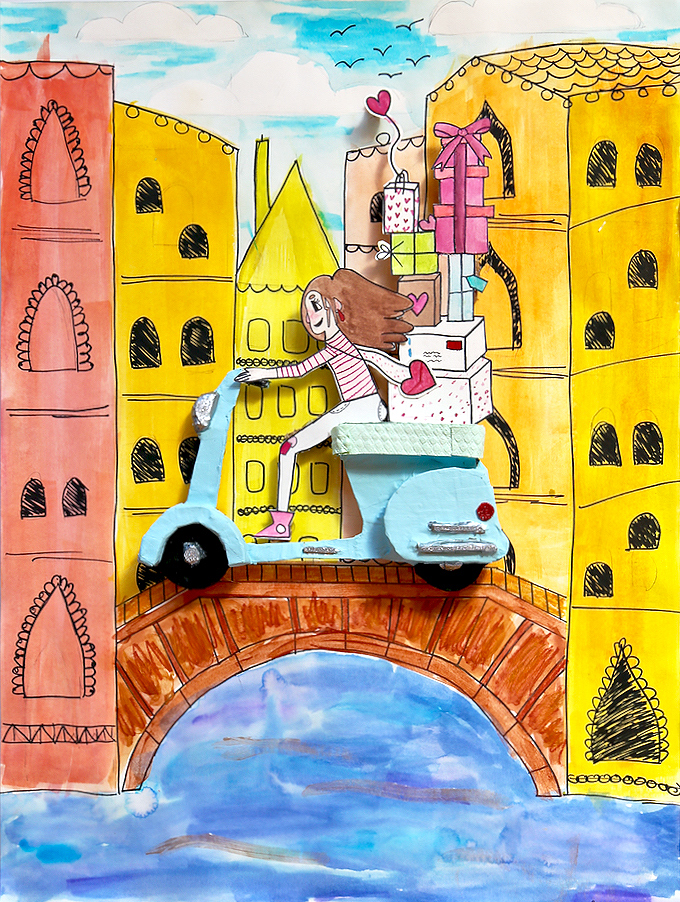
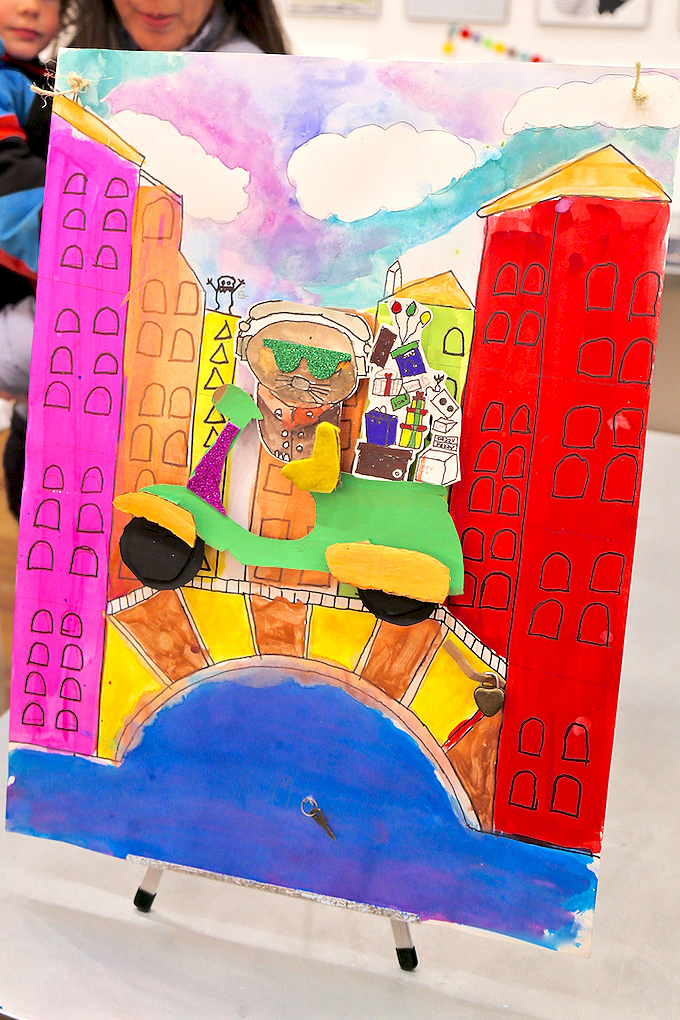
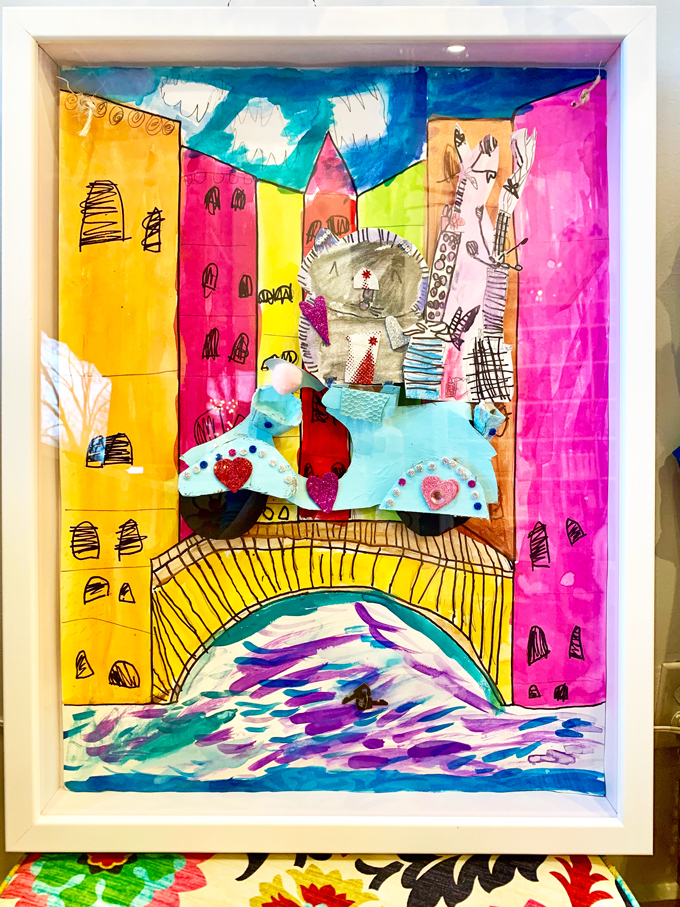
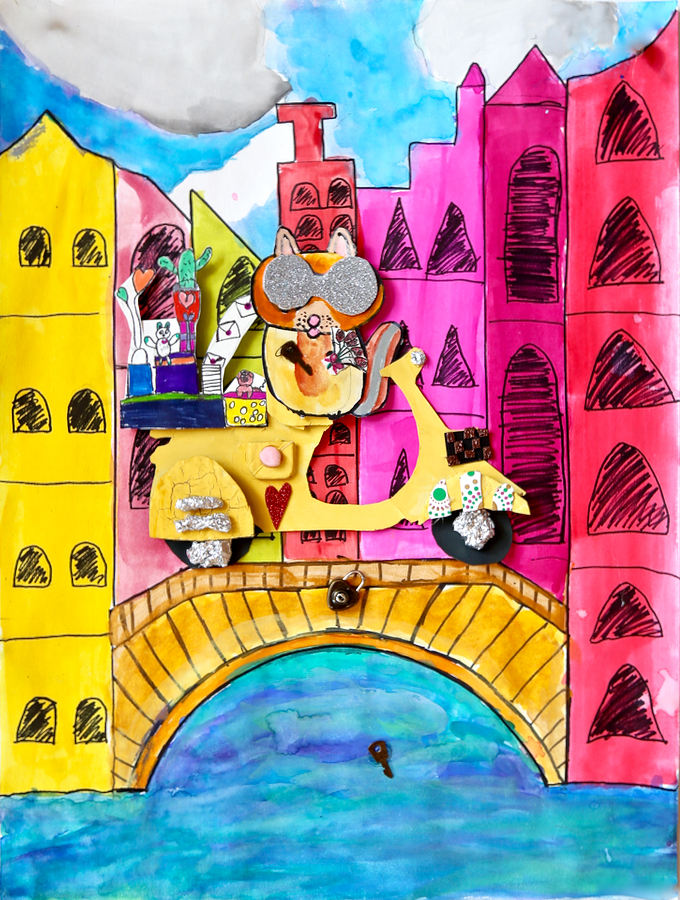
Meet and mingle with our ~ DIY Vespa Venture in Venice created by young makers! If you’re connected with us onInstagram, you’ve seen young artists creating these precious popped out pieces in an after school workshop just before Valentine’s Day, hence the love lock addition! The vision was to create a colorful creature, possibly a vivacious vole, venturing and vrooming through the streets of Venice on a vibrant Vespa, full of Valentine’s gifts galore…that’s a whole lot of V’s, right!?! Of course, you could design any type of pretty packages for transport or choose any cute creature to be captain. Take a peek at our {hands on + mixed-media} process creating with crafty kids in Carbondale, Colorado in our downtown art studio at 449 Main Street.
Have you ever wanted your very own Vespa scooter!?! They come in SO many beautiful colors under the sun! They’re simply so easy to spot on a summery street in all sorts of savory shades. How could you ever choose from seafoam green, luscious lime, savory sky blue, amazing aqua, sunshine yellow, outrageous orange, just to name a few of the “scoops of sorbet”! Someday I’ll own my very own but for now, these vrooming Vespas completely fill my heart. Children LOVE creating things that are cute, crafty, creative, connected, contoured, centered on cardboard, all with a clever catch! This project took a splash into artsy architecture, a love lock tradition on-trend, and added a speedy story to showcase. Then there was the venturing vole (you could create any creature or even a humanized character) making a vrooming Valentine’s Day special delivery by Vespa!
YES!!! Our SUMMER ART CAMPS just opened for early enrollment! We also have our last SCHOOL YEAR ART WORKSHOP coming up with just a few spaces ~ a TOUCAN’S TRIP TO TAHITI in TIE-DYE starting the week of April 13th! Take a feathery flight this spring and join us in the studio!
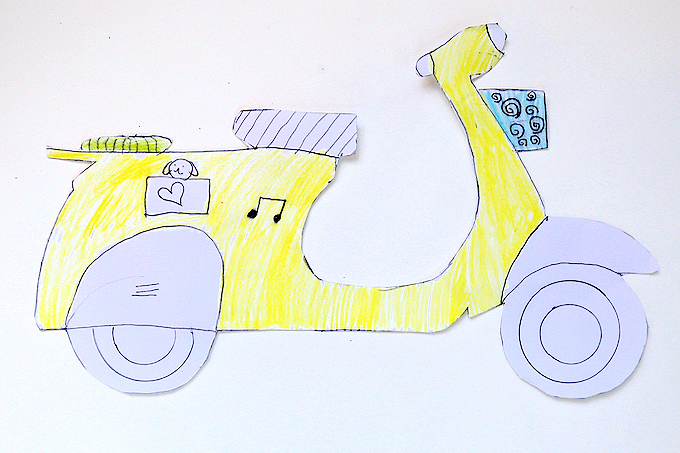
ONE Sketch a variety of Vespas using photos for reference. Select your favorite and get started on some exciting designing and color planning.
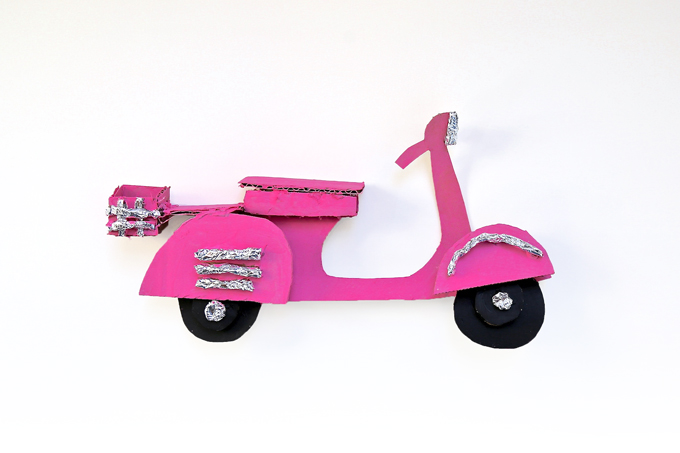
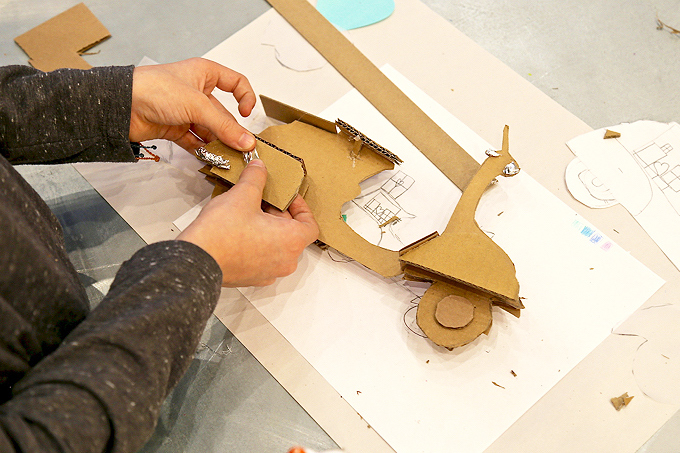
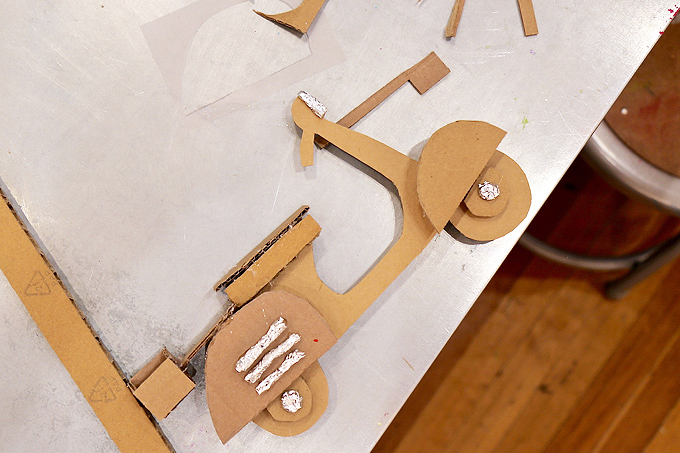
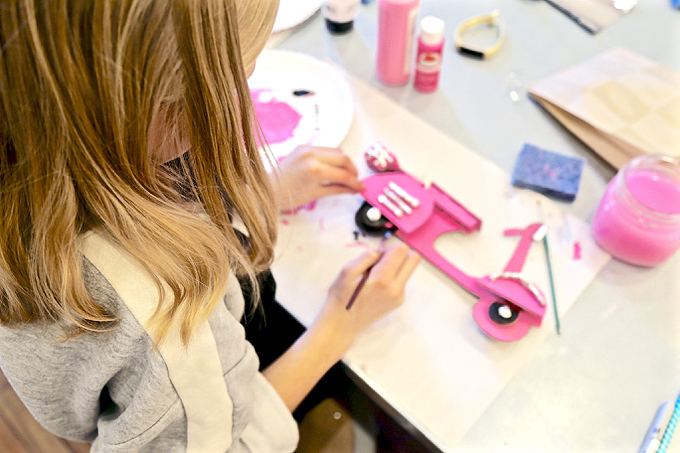
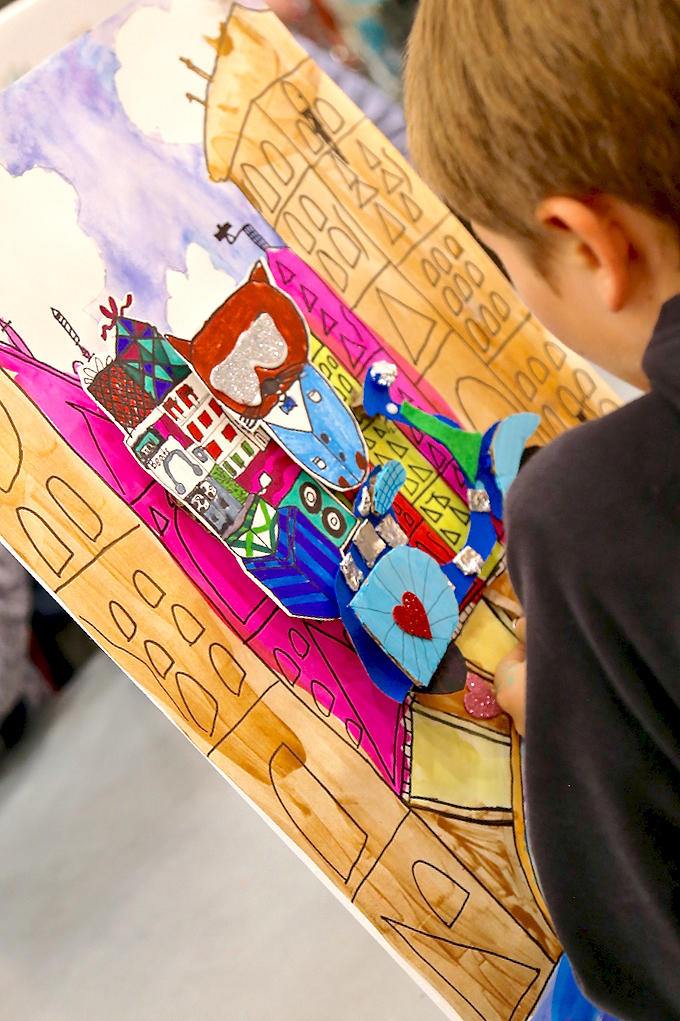
TWO Create the full body of your Vespa by sketching it out on light-weight cardboard. Cutout. Decide which components you’d like to pop out to create added dimension. Most of our artists popped their fenders, seats, racks, lights, and more! Smaller pieces take on more “pop” with traditional cardboard. We had an easy to cut, yet “thick cardboard” to create “spacers” between pieces to pop-out even more dimension. These pieces were simply glued between.
THREE Glue parts and pieces in place using white glue or a “cool temp” hot glue. Foil was a very moldable material for added detail but it needed to be hot glued. Some artists covered their foil with paper-mâché, while others used foil as a metal accent and left it artfully exposed.
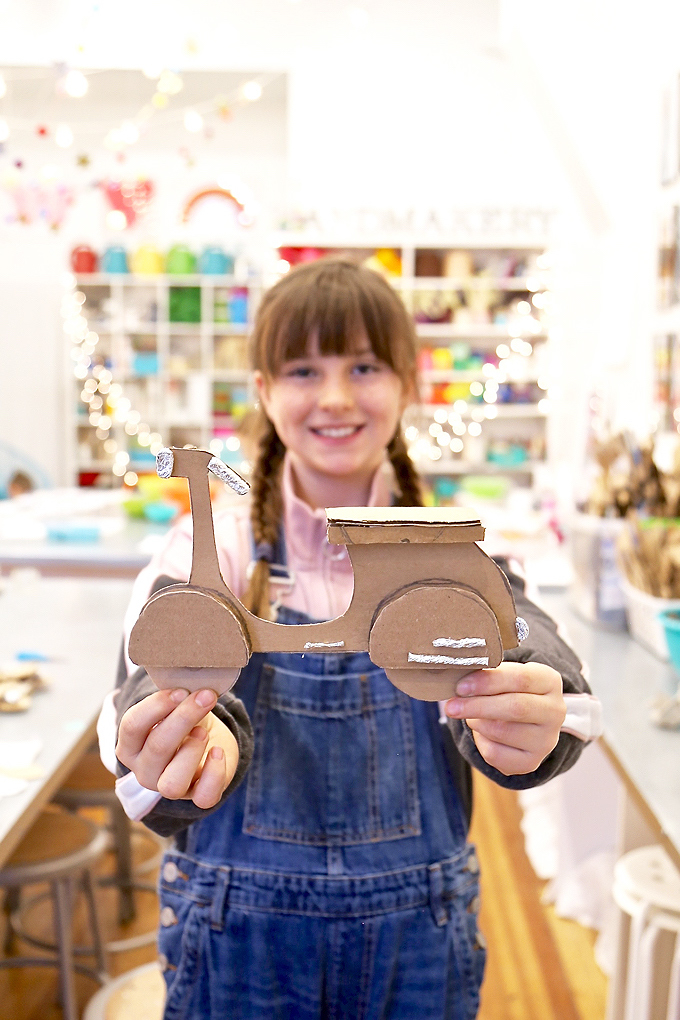
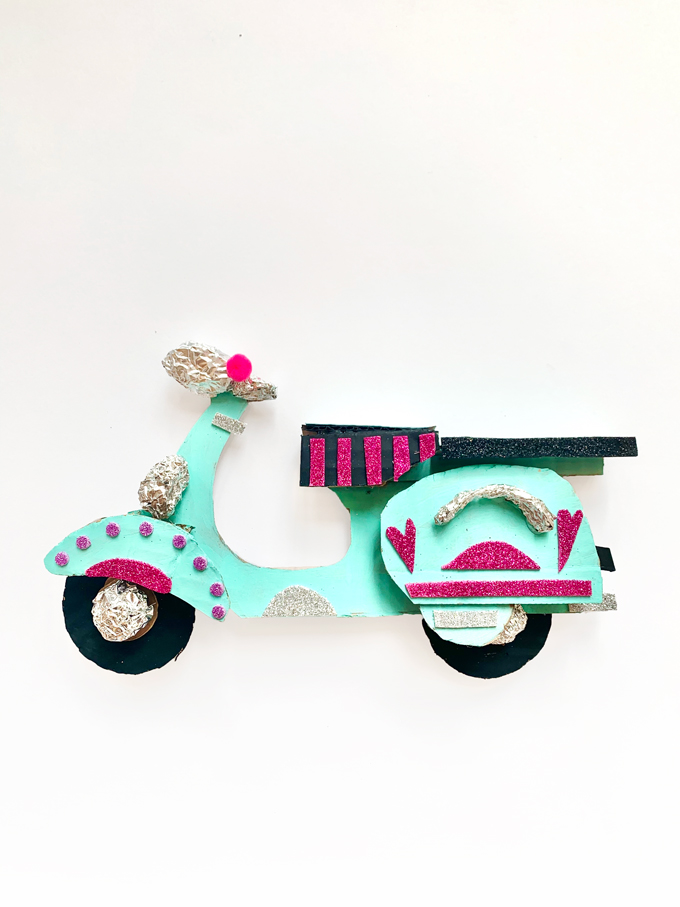
Waa-laa! Here you have a finished Vespa ready for a Venice venture. Did you know Vespa is an Italian brand of scooter? The name means wasp in Italian. The Vespa has evolved from a single model motor scooter manufactured in 1946, to a full line of scooters. To think it all started in Italy.
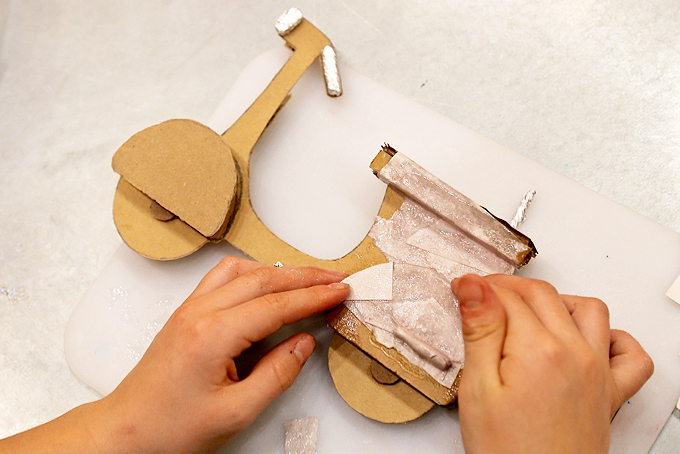
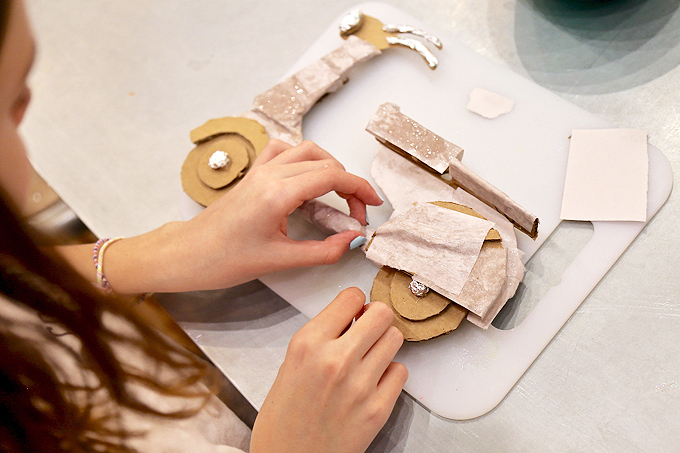
FOUR Paper-mâché is optional. Our older artists had time to add a light layer of paper-mâché. Paper-mâché creates strength and unifies but it’s an optional step if you don’t have enough time, especially since the finished Vespa will be connected to another element for added strength.
Most artists love adding a little paper-mâché to their life! Extra small pieces of newsprint enabled the contours to still show the dimension and detail. If you do mâché your Vespa, fully dry before moving onto paint.
FIVE Paint your Vespa one solid color. Dry. Then move into smaller detail painting until your heart’s content.
SIX Embellish using specialty papers, sticky foams, foil, pom poms, and more. Secure in place with glue.
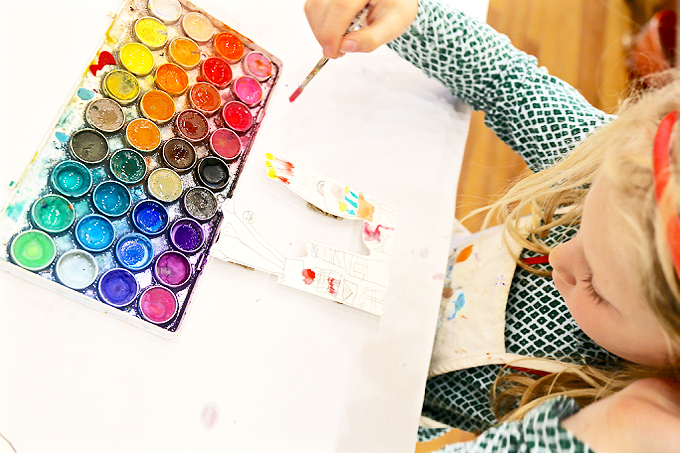
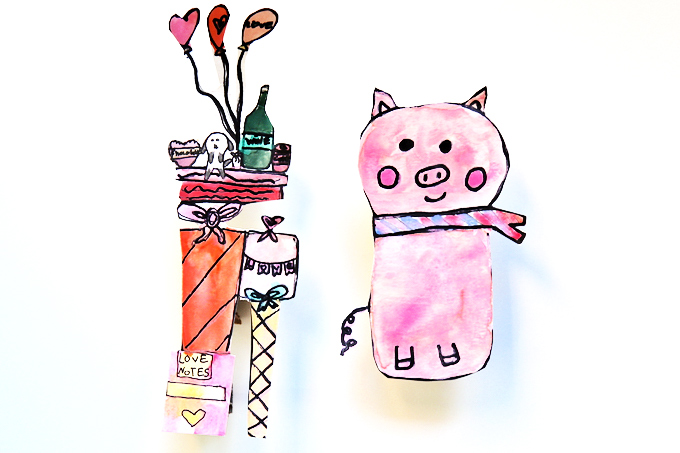
SEVEN Working on heavy-weight watercolor paper, sketch out a humanized creature with a whole lot of character to drive your Vespa (possibly a vole, pig, hedgehog, or maybe even a panda) and sketch out a stack of packages for your Vespa to transport! Define with permenent marker. Paint using watercolors or additional supplies at hand. Artists love adding watercolor pencils and watercolor crayons for artful accents. Dry pieces and cutout. Add thick cardboard pieces to the backs to pop out pieces before adding to the background element coming up next!
DRAWING + PAINTING A VENETIAN CITYSCAPE
Take a splash into creating a Venetian cityscape for your Vespa!
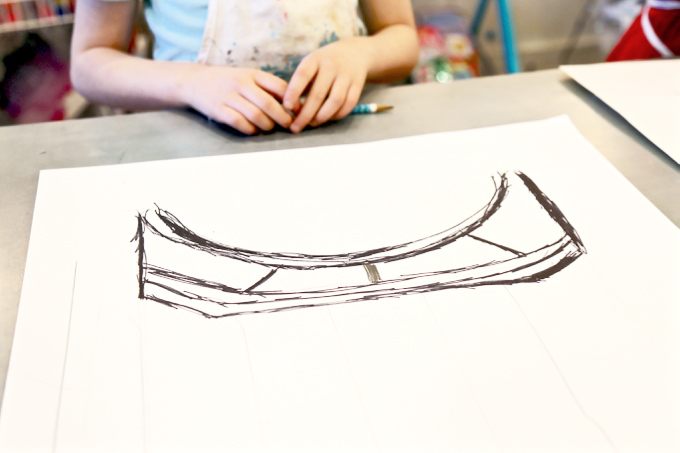
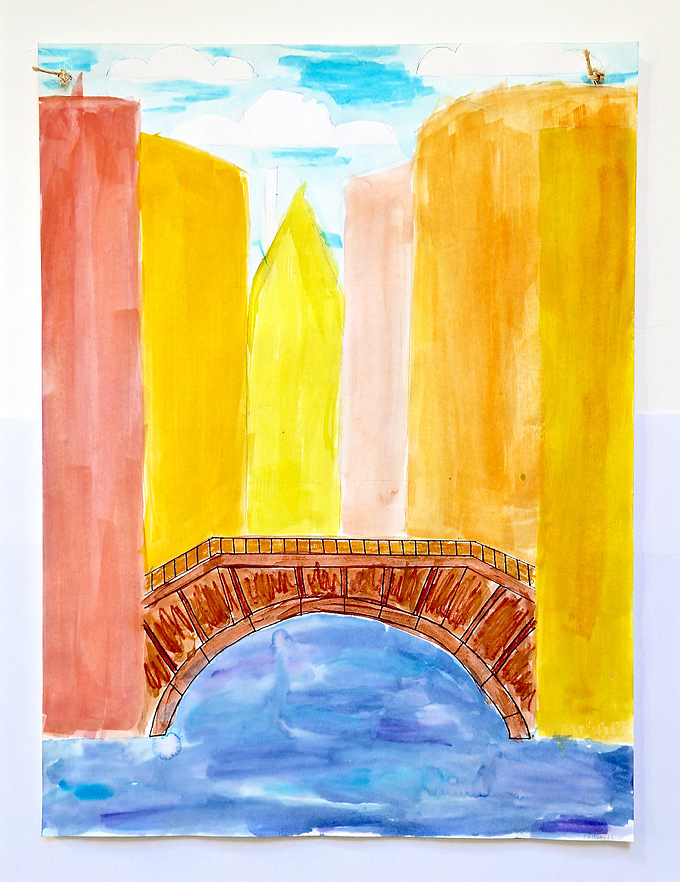
ONE Working on 18 x 24″ heavy-weight watercolor paper, we created a simple stencil for the center bridge placement to give young artists a starting point which had the curve line bottom, top line, and both side-lines, similar to the image above but less detailed. From this point, artists individualized their bridges by incorporating additional curves, lines, and details. The bridge, above the canal waterway, was then painted using a warm “golden pallet” of warm liquid watercolors.
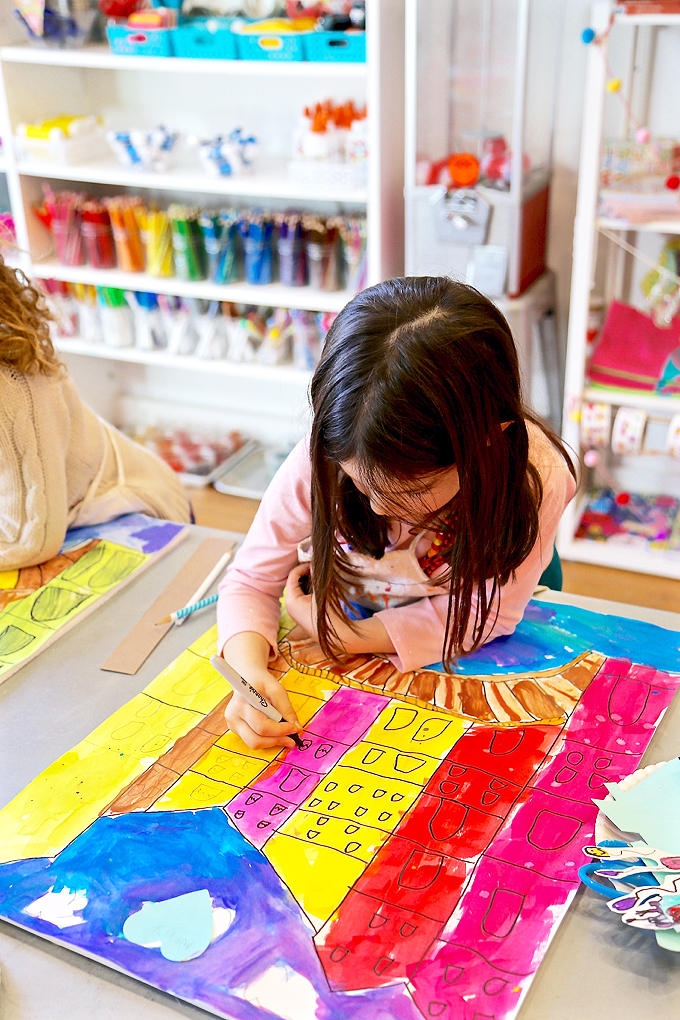
TWO Create buildings using vertical lines with a ruler or yardstick. It seemed best to have 6 – 7 buildings. We discussed how building further away will appear smaller. We also discussed how the buildings were in the distance and how they could appear more “washed or sketch-like or loose” as this wasn’t the most important detail to this piece. Buildings were painted using a wash of warm watercolors.
THREE Move into painting the waterway, aka the canal, using cool watercolors for a colorful contast. We used a combination of traditional pallet watercolors and liquid watercolors. Travel up to painting your sky using cool colors which may entail clouds. Explore a variety of wet on wet techniques and washes. Dry.
FOUR Use a pencil to create the horizontal “3 – 4 levels or stories” on each building and add windows. Look at windows on old Venetian buildings and how they’re different than windows on skyscrapers of today. Compare architecture of today to historic architecture in Venice.
A bird’s eye view of painted pieces just before windows were added.
FIVE Use a black permanent marker to finalize windows and additional details. Most artists colored their windows in black to create a pop of color and contrast.
Love the additional waterlines-n-waves + bridge detail this artist added to her piece to personalize using a permanent marker!
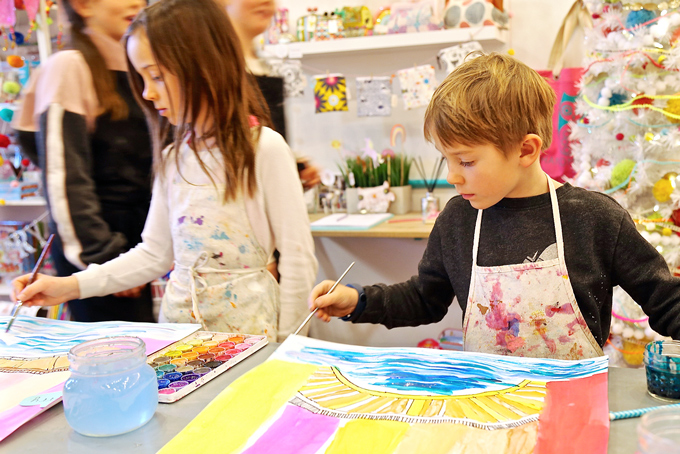
SIX Assemble your entire piece and glue down all the clever + creative + crafty components which include a Vespa, creature aka driver, and packages all on top of your bridge above the lovely canal in Venice. Learn about the love lock tradition and add a mini metal lock to the bridge and toss keys into the canal to celebrate the completion of your colorful creation!
Take an upclose peek at all the clever additions on this piece.
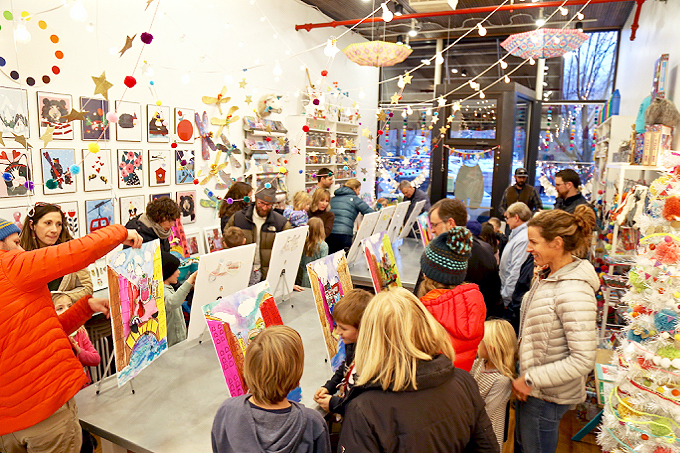
Celebrate childhood + creativity + coming together as a community before taking a trip to Venice inspired by your very own clever creation!
Absolutely love this precious piece that was created by one of our youngest artists and immediately framed by her lovely mama in a sweet shadowbox for showcase, sweetness, and safekeeping!
This is my current scooter of travel, but you’ll be the first to know if I take the leap to get my very own Vespa for vrooming & venturing the downtown streets of our little mountain town of Carbondale, Colorado!
Tag us on Instagram with your creations. We’d absolutely LOVE to see them! As always, thank you for following our artful adventure on Main Street in the heART of the Carbondale Creative District! Send us a note anytime! We’d love to hear what you’re thinking, dreaming, envisioning, and of course, our favorite ~ CREATING!
Much love and happiness creating in this creative + colorful world filled with collaboration + connection + community + arts & crafting! Happy Springtime from our studio!