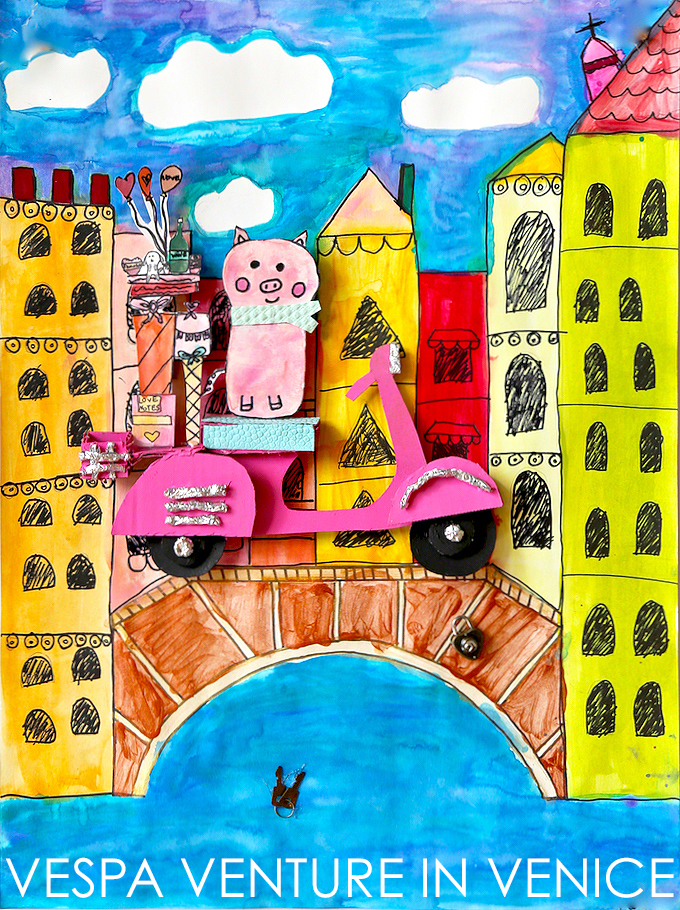
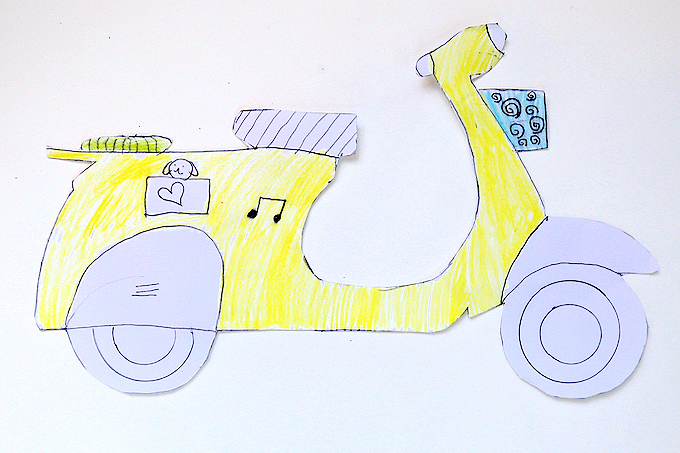
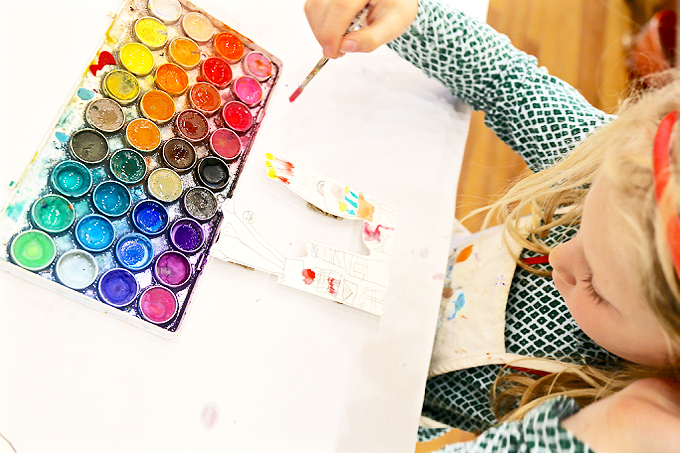
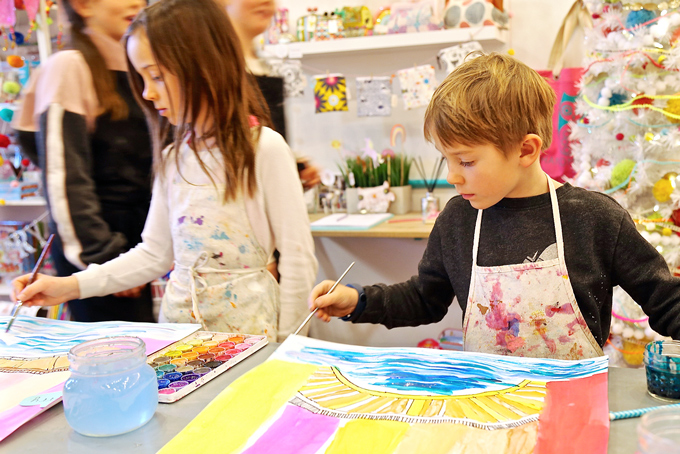
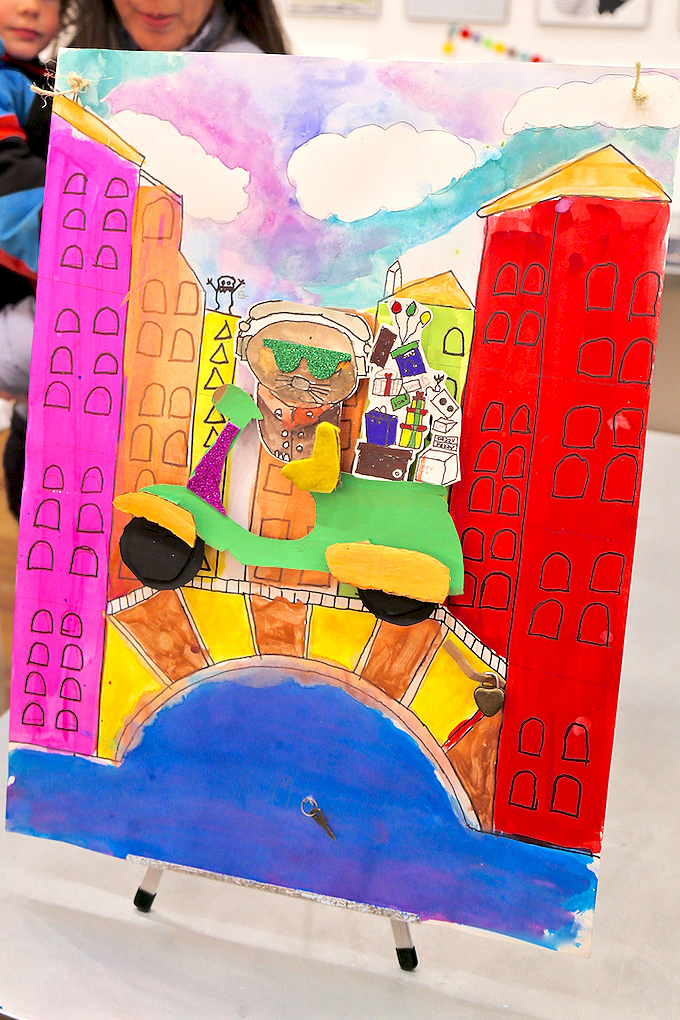
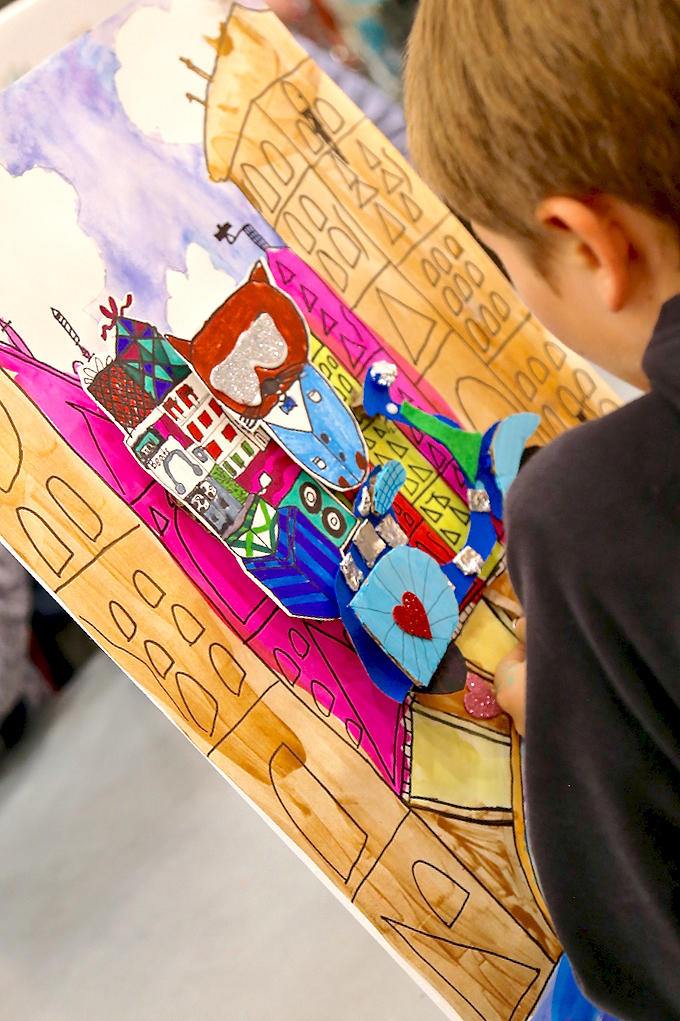
Meet and mingle with our ~ DIY Vespa Venture in Venice created by young makers! If you’re connected with us onInstagram, you’ve seen young artists creating these precious popped out pieces in an after school workshop just before Valentine’s Day, hence the love lock addition! The vision was to create a colorful creature, possibly a vivacious vole, venturing and vrooming through the streets of Venice on a vibrant Vespa, full of Valentine’s gifts galore…that’s a whole lot of V’s, right!?! Of course, you could design any type of pretty packages for transport or choose any cute creature to be captain. Take a peek at our {hands on + mixed-media} process creating with crafty kids in Carbondale, Colorado in our downtown art studio at 449 Main Street.
Have you ever wanted your very own Vespa scooter!?! They come in SO many beautiful colors under the sun! They’re simply so easy to spot on a summery street in all sorts of savory shades. How could you ever choose from seafoam green, luscious lime, savory sky blue, amazing aqua, sunshine yellow, outrageous orange, just to name a few of the “scoops of sorbet”! Someday I’ll own my very own but for now, these vrooming Vespas completely fill my heart. Children LOVE creating things that are cute, crafty, creative, connected, contoured, centered on cardboard, all with a clever catch! This project took a splash into artsy architecture, a love lock tradition on-trend, and added a speedy story to showcase. Then there was the venturing vole (you could create any creature or even a humanized character) making a vrooming Valentine’s Day special delivery by Vespa!
YES!!! Our SUMMER ART CAMPS just opened for early enrollment! We also have our last SCHOOL YEAR ART WORKSHOP coming up with just a few spaces ~ a TOUCAN’S TRIP TO TAHITI in TIE-DYE starting the week of April 13th! Take a feathery flight this spring and join us in the studio!
ONE Sketch a variety of Vespas using photos for reference. Select your favorite and get started on some exciting designing and color planning.
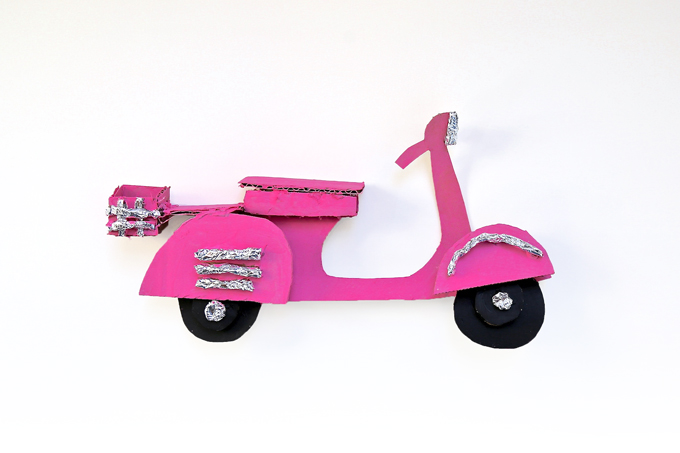
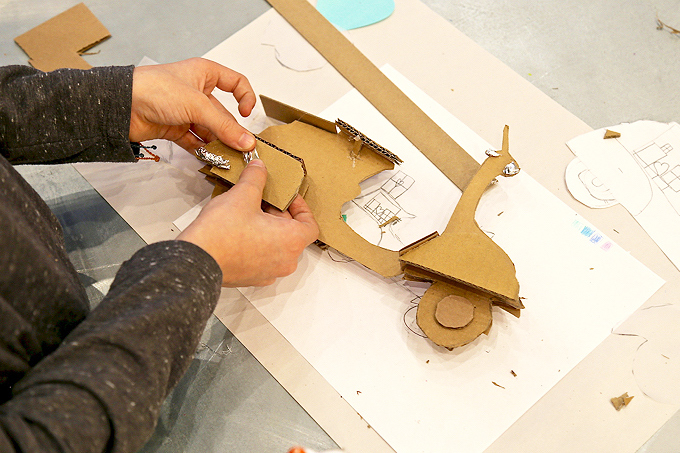
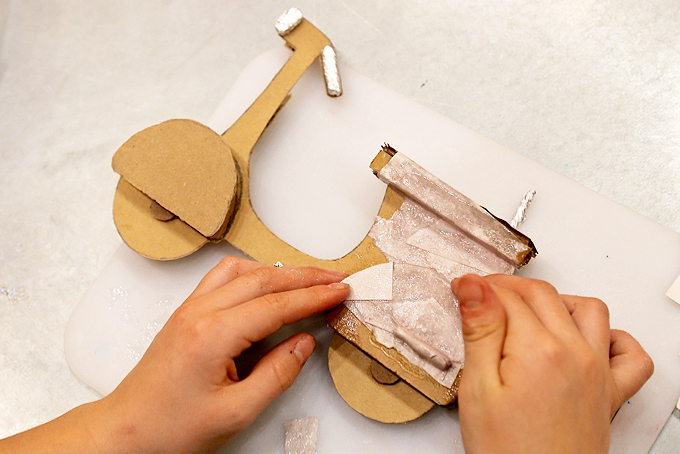
TWO Create the full body of your Vespa by sketching it out on light-weight cardboard. Cutout. Decide which components you’d like to pop out to create added dimension. Most of our artists popped their fenders, seats, racks, lights, and more! Smaller pieces take on more “pop” with traditional cardboard. We had an easy to cut, yet “thick cardboard” to create “spacers” between pieces to pop-out even more dimension. These pieces were simply glued between.
THREE Glue parts and pieces in place using white glue or a “cool temp” hot glue. Foil was a very moldable material for added detail but it needed to be hot glued. Some artists covered their foil with paper-mâché, while others used foil as a metal accent and left it artfully exposed.
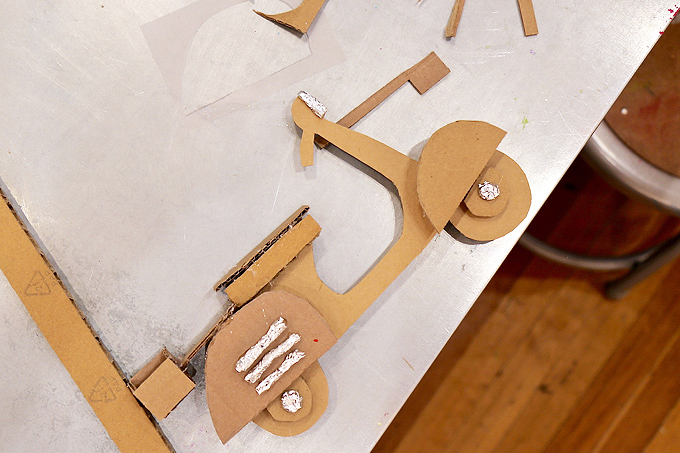
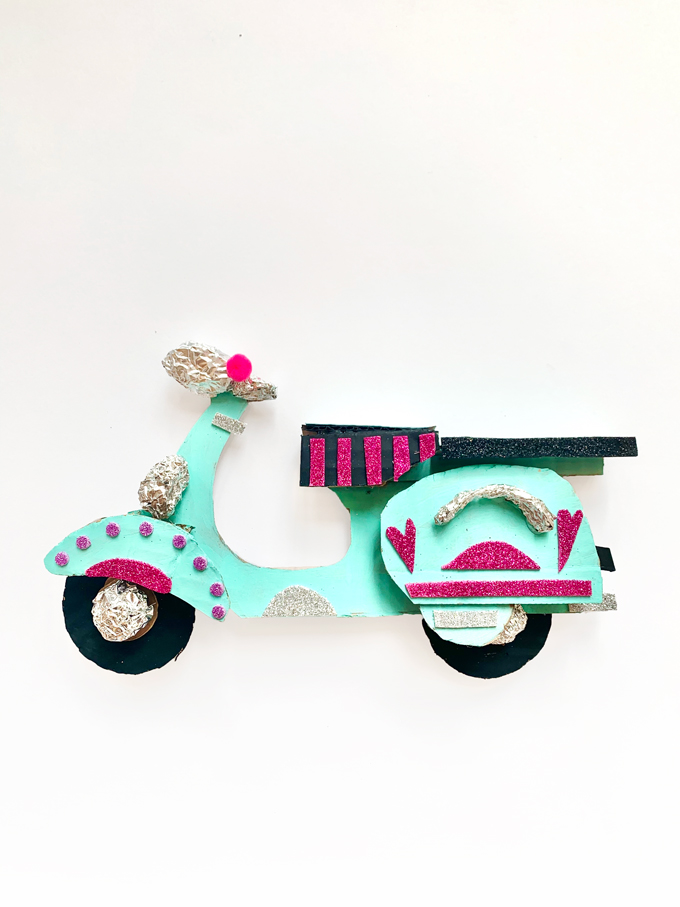
Waa-laa! Here you have a finished Vespa ready for a Venice venture. Did you know Vespa is an Italian brand of scooter? The name means wasp in Italian. The Vespa has evolved from a single model motor scooter manufactured in 1946, to a full line of scooters. To think it all started in Italy.
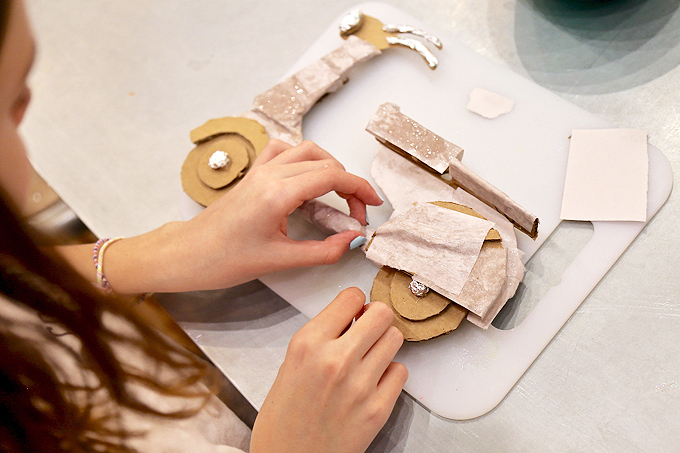
FOUR Paper-mâché is optional. Our older artists had time to add a light layer of paper-mâché. Paper-mâché creates strength and unifies but it’s an optional step if you don’t have enough time, especially since the finished Vespa will be connected to another element for added strength.
Most artists love adding a little paper-mâché to their life! Extra small pieces of newsprint enabled the contours to still show the dimension and detail. If you do mâché your Vespa, fully dry before moving onto paint.
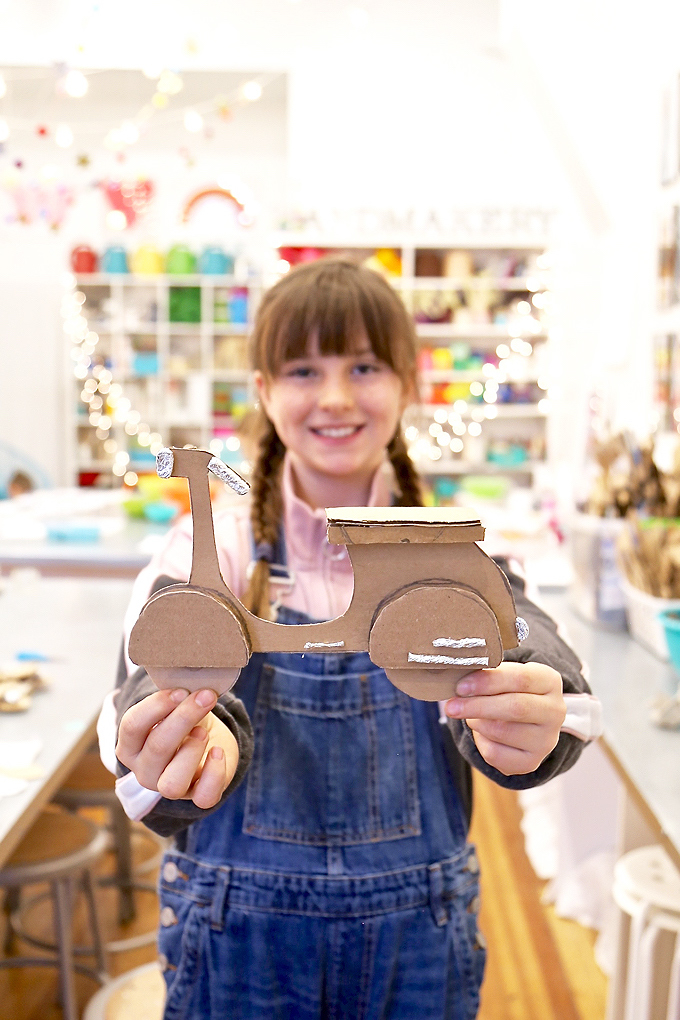
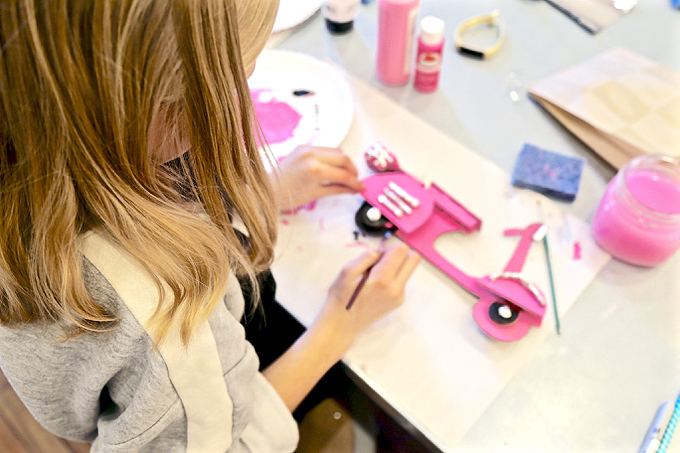
FIVE Paint your Vespa one solid color. Dry. Then move into smaller detail painting until your heart’s content.
SIX Embellish using specialty papers, sticky foams, foil, pom poms, and more. Secure in place with glue.
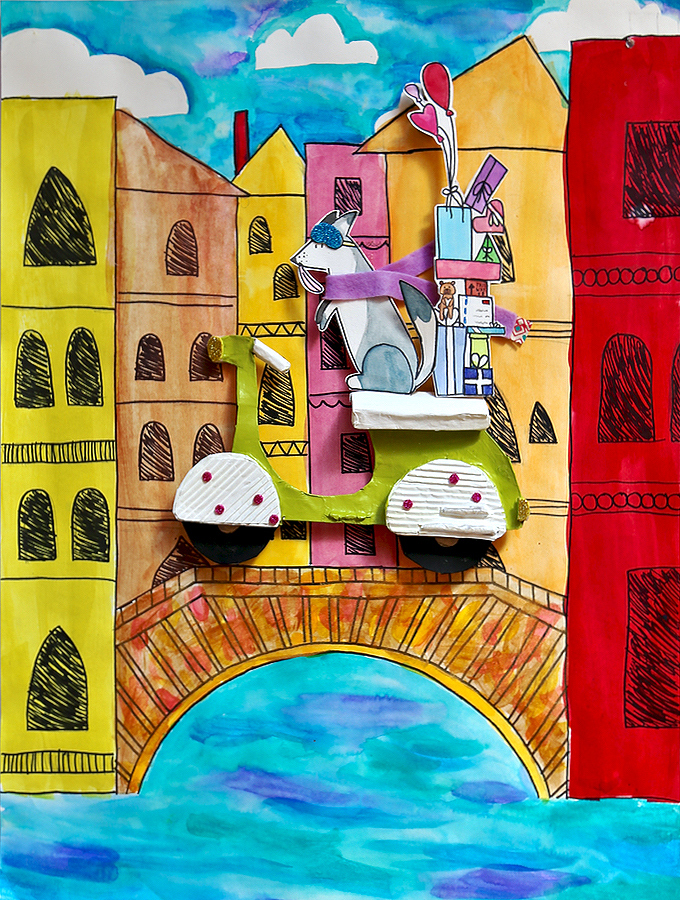
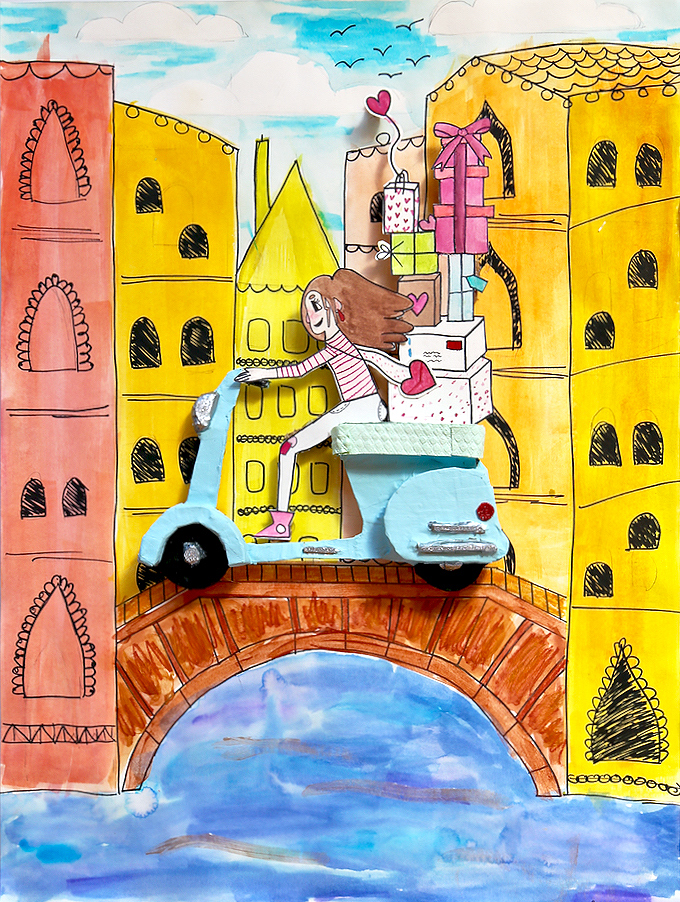
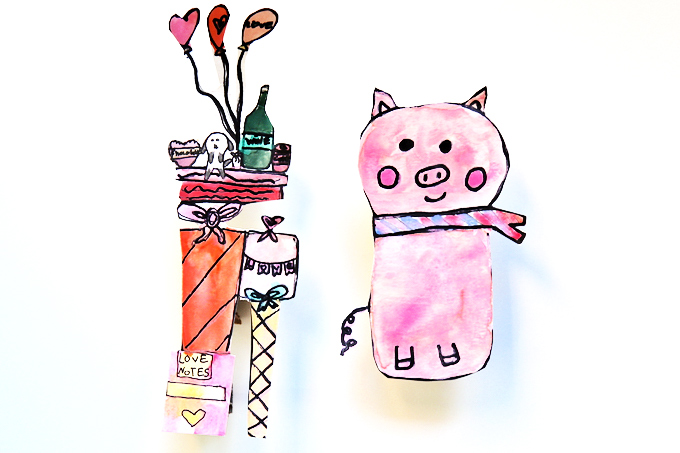
SEVEN Working on heavy-weight watercolor paper, sketch out a humanized creature with a whole lot of character to drive your Vespa (possibly a vole, pig, hedgehog, or maybe even a panda) and sketch out a stack of packages for your Vespa to transport! Define with permenent marker. Paint using watercolors or additional supplies at hand. Artists love adding watercolor pencils and watercolor crayons for artful accents. Dry pieces and cutout. Add thick cardboard pieces to the backs to pop out pieces before adding to the background element coming up next!
DRAWING + PAINTING A VENETIAN CITYSCAPE
Take a splash into creating a Venetian cityscape for your Vespa!
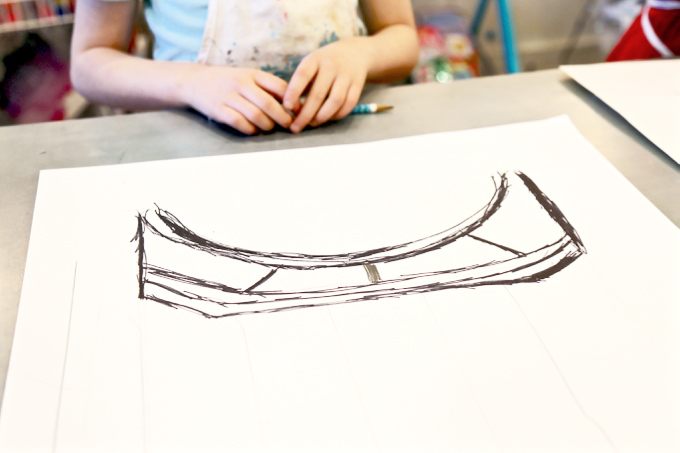
ONE Working on 18 x 24″ heavy-weight watercolor paper, we created a simple stencil for the center bridge placement to give young artists a starting point which had the curve line bottom, top line, and both side-lines, similar to the image above but less detailed. From this point, artists individualized their bridges by incorporating additional curves, lines, and details. The bridge, above the canal waterway, was then painted using a warm “golden pallet” of warm liquid watercolors.
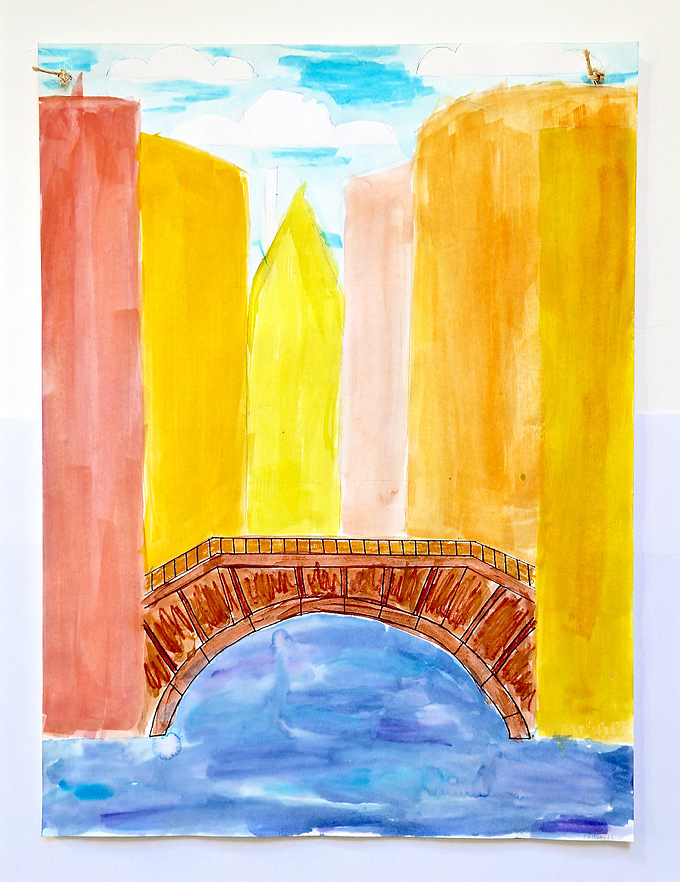
TWO Create buildings using vertical lines with a ruler or yardstick. It seemed best to have 6 – 7 buildings. We discussed how building further away will appear smaller. We also discussed how the buildings were in the distance and how they could appear more “washed or sketch-like or loose” as this wasn’t the most important detail to this piece. Buildings were painted using a wash of warm watercolors.
THREE Move into painting the waterway, aka the canal, using cool watercolors for a colorful contast. We used a combination of traditional pallet watercolors and liquid watercolors. Travel up to painting your sky using cool colors which may entail clouds. Explore a variety of wet on wet techniques and washes. Dry.
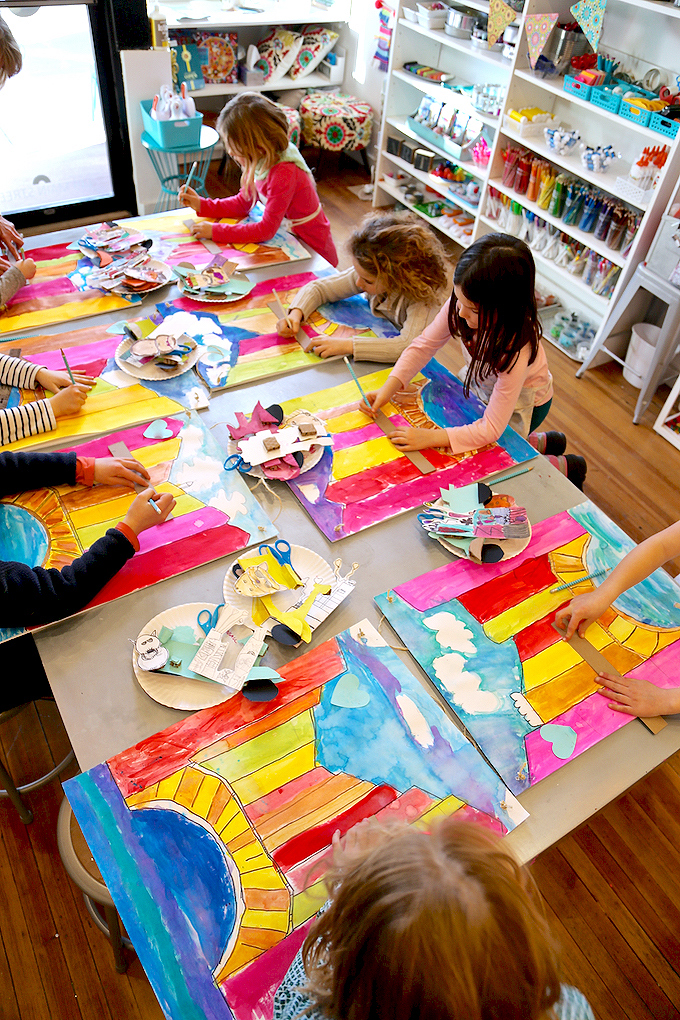
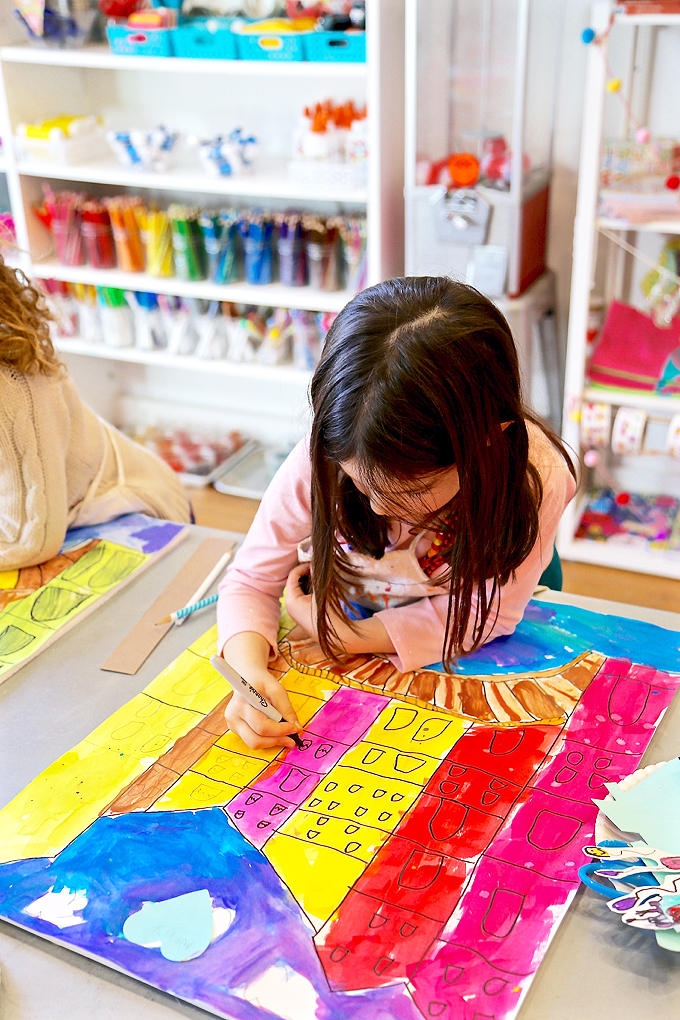
FOUR Use a pencil to create the horizontal “3 – 4 levels or stories” on each building and add windows. Look at windows on old Venetian buildings and how they’re different than windows on skyscrapers of today. Compare architecture of today to historic architecture in Venice.
A bird’s eye view of painted pieces just before windows were added.
FIVE Use a black permanent marker to finalize windows and additional details. Most artists colored their windows in black to create a pop of color and contrast.
Love the additional waterlines-n-waves + bridge detail this artist added to her piece to personalize using a permanent marker!
SIX Assemble your entire piece and glue down all the clever + creative + crafty components which include a Vespa, creature aka driver, and packages all on top of your bridge above the lovely canal in Venice. Learn about the love lock tradition and add a mini metal lock to the bridge and toss keys into the canal to celebrate the completion of your colorful creation!
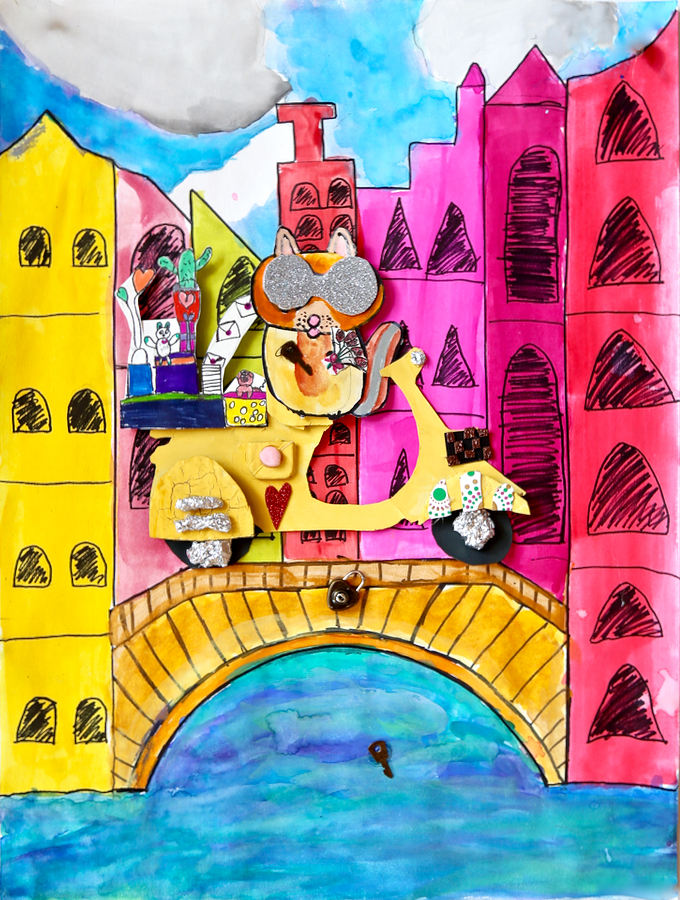
Take an upclose peek at all the clever additions on this piece.
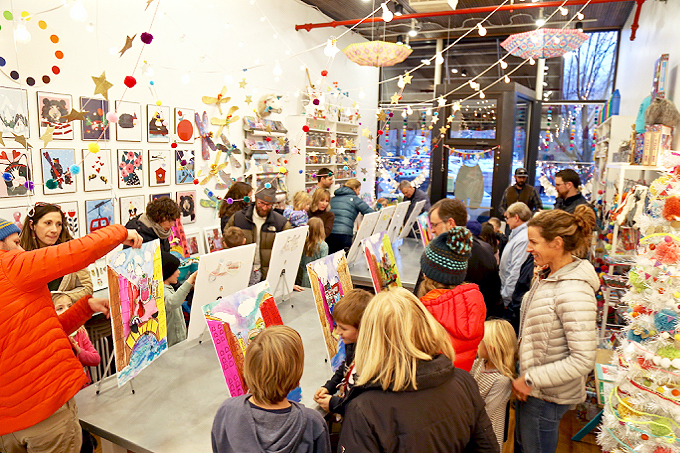
Celebrate childhood + creativity + coming together as a community before taking a trip to Venice inspired by your very own clever creation!
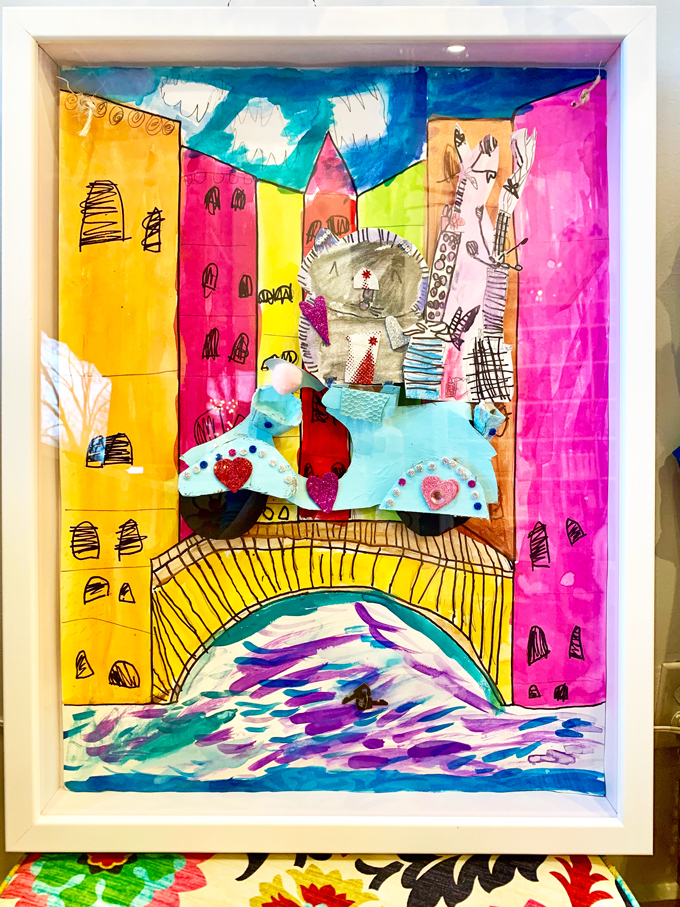
Absolutely love this precious piece that was created by one of our youngest artists and immediately framed by her lovely mama in a sweet shadowbox for showcase, sweetness, and safekeeping!
This is my current scooter of travel, but you’ll be the first to know if I take the leap to get my very own Vespa for vrooming & venturing the downtown streets of our little mountain town of Carbondale, Colorado!
Tag us on Instagram with your creations. We’d absolutely LOVE to see them! As always, thank you for following our artful adventure on Main Street in the heART of the Carbondale Creative District! Send us a note anytime! We’d love to hear what you’re thinking, dreaming, envisioning, and of course, our favorite ~ CREATING!
Much love and happiness creating in this creative + colorful world filled with collaboration + connection + community + arts & crafting! Happy Springtime from our studio!
Happy forever fall! October days in Colorado have been most beautiful, filled with sweet sunshine and warm weather! Our studio just wrapped up our first six weeks of a fresh + new school year and we’re excited to announce SESSION II STARTS THIS WEEK! We have just a few spaces in our art workshops offered on Tuesdays, Wednesdays, or Thursdays! Jump in and join us if you’re in the Roaring Fork Valley!
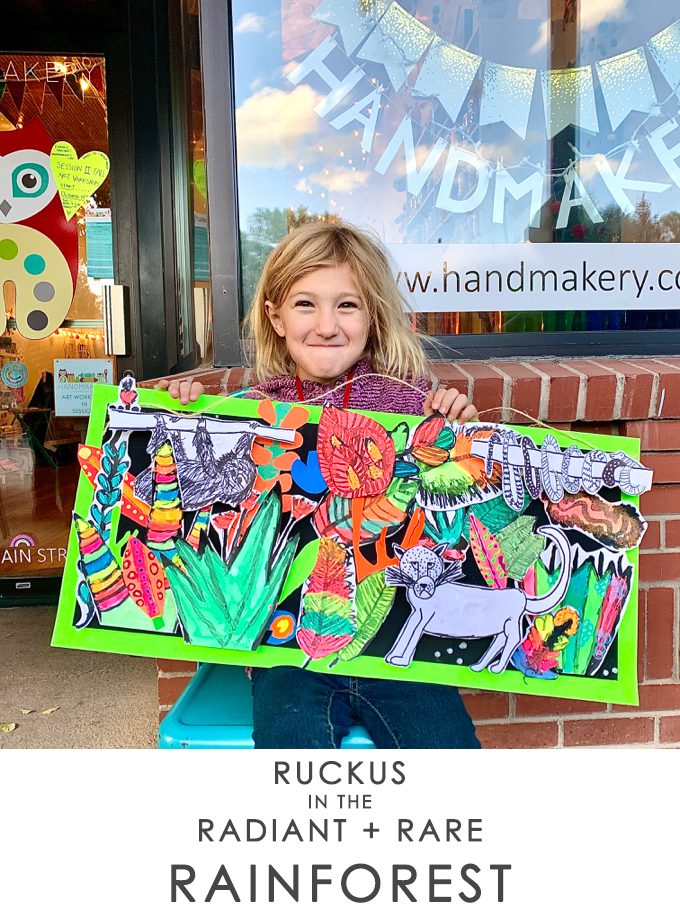
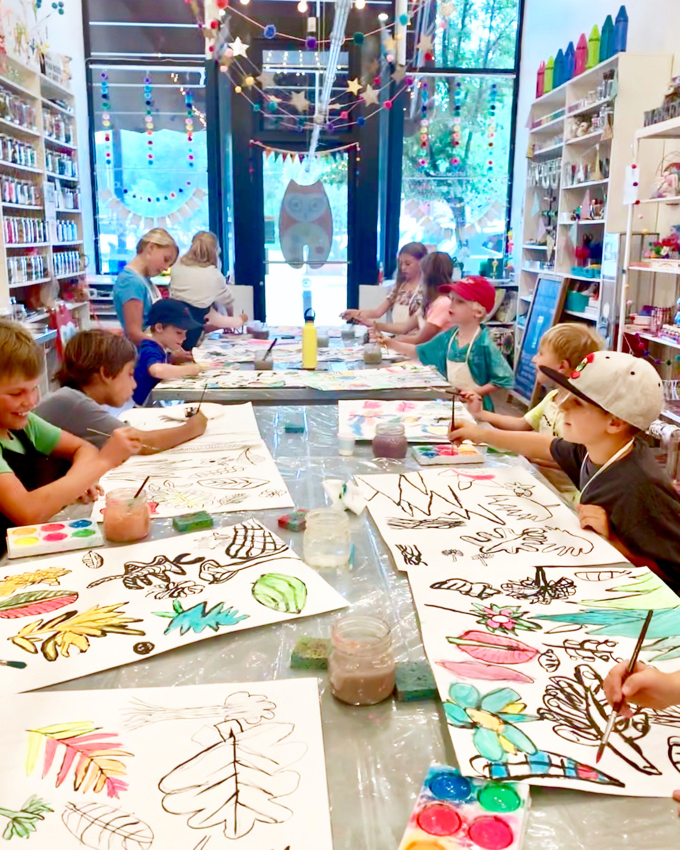
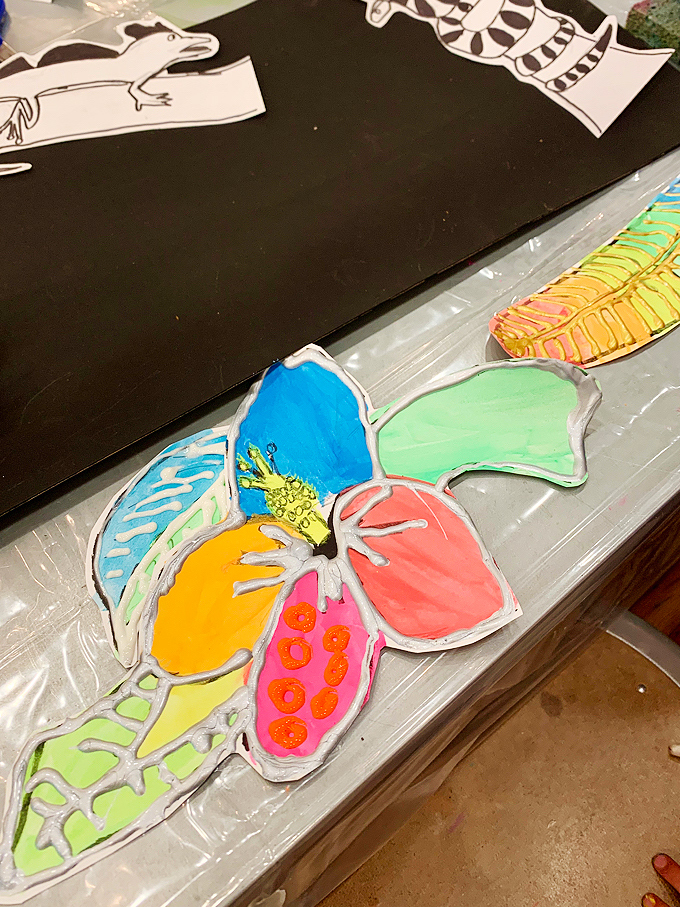
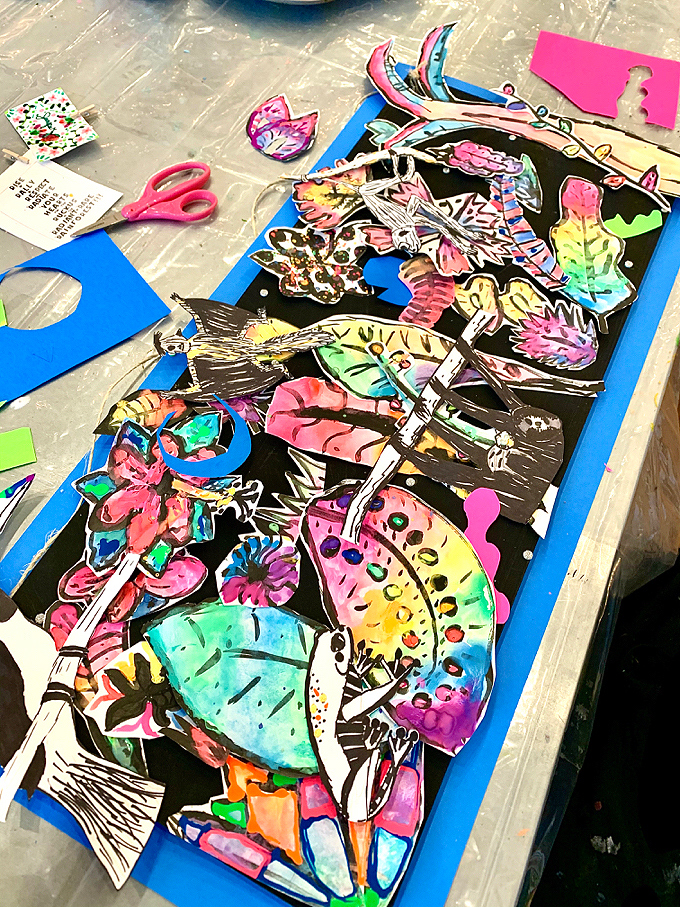
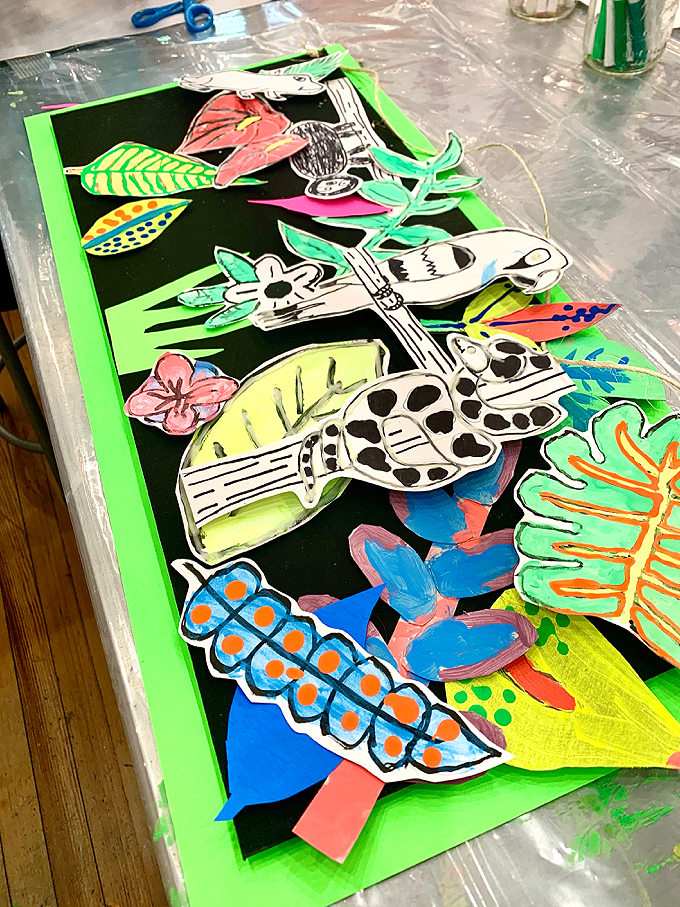
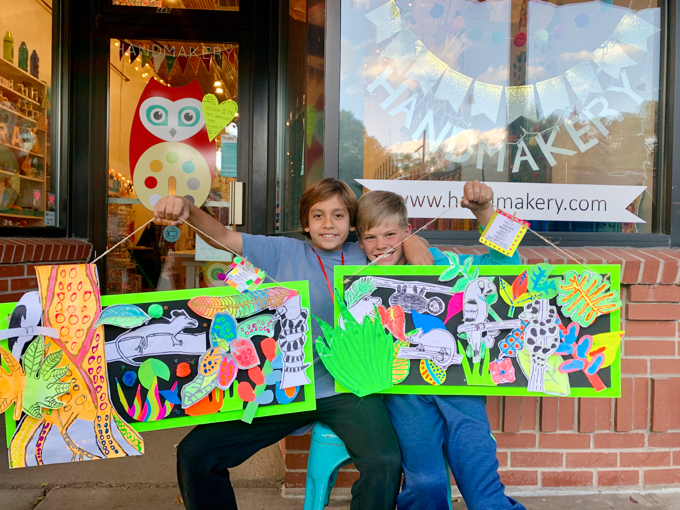
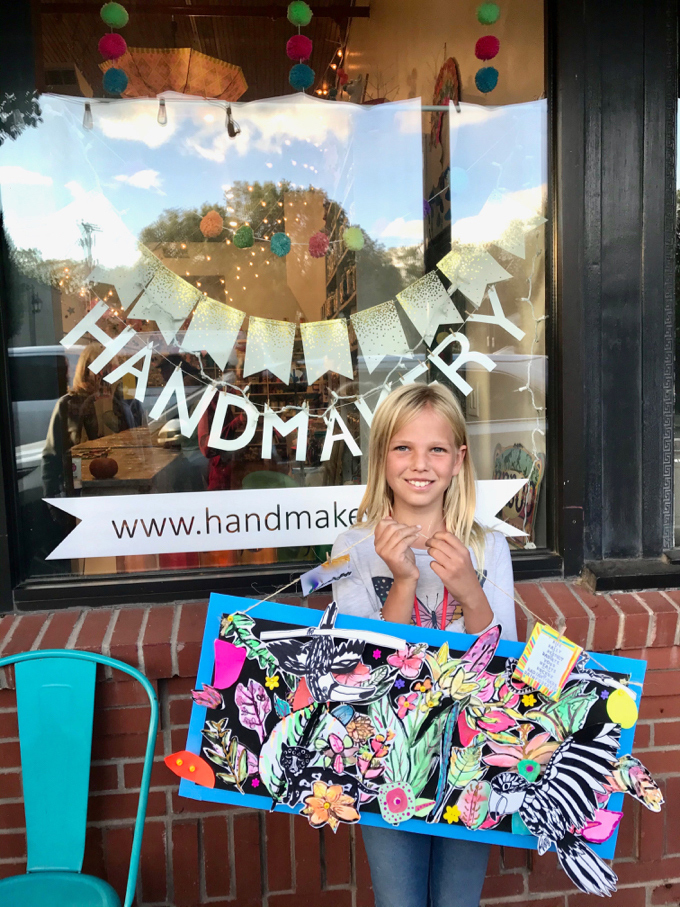
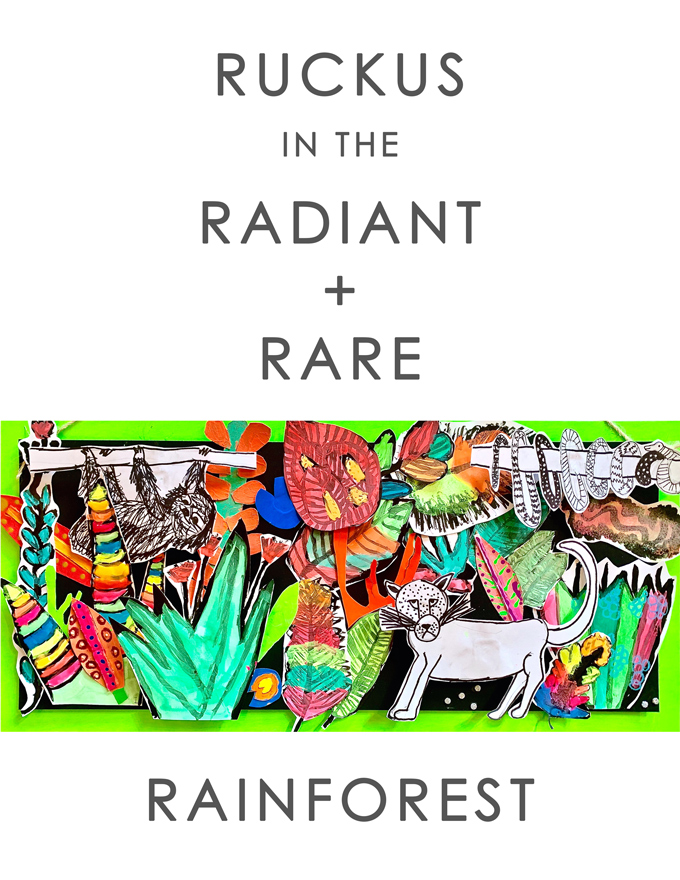
We’d love for you to peek at the most recent project dreamed up + designed + created by creative children in our workshop ~ Ruckus in the Radiant + Rare Rainforest! You might just be inspired to make your own! Tag your creations @handmakery on Instagram!
SUPPLIES FOR ~ RUCKS IN THE RADIANT + RARE RAINFOREST:
A SIMPLE PROCESS FOR ~ RUCKS IN THE RADIANT + RARE RAINFOREST:
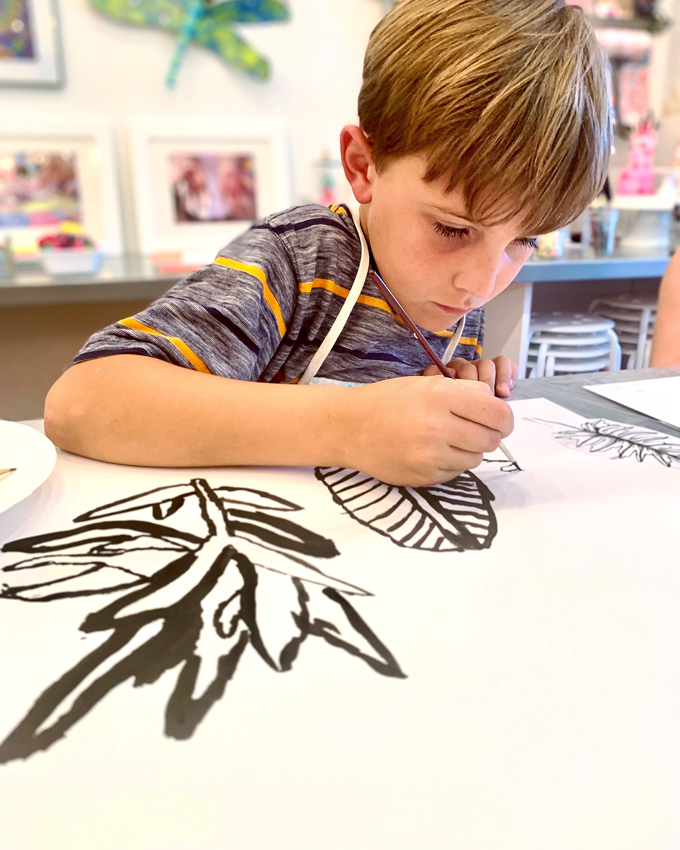
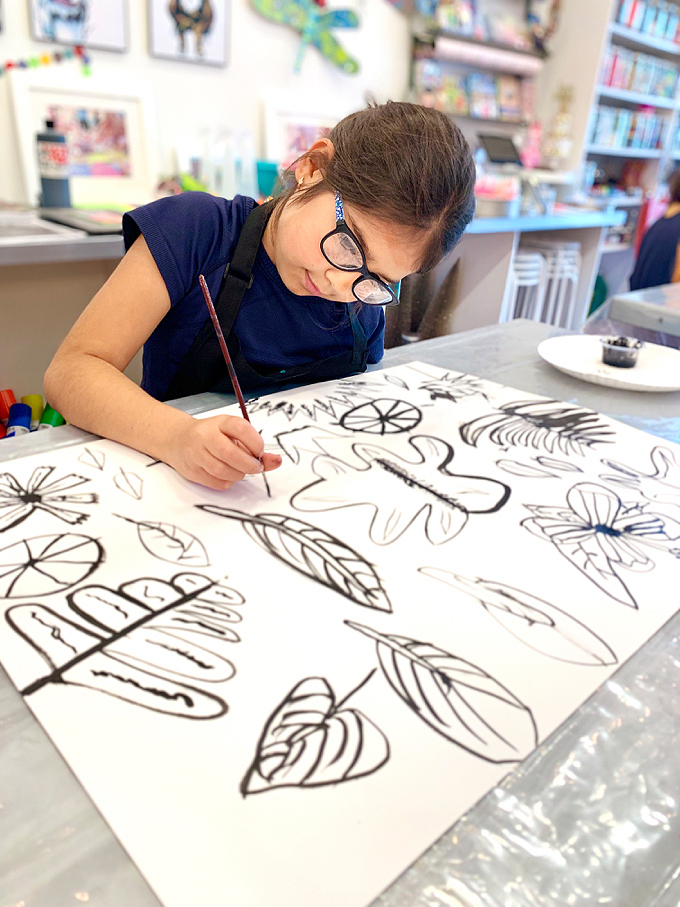
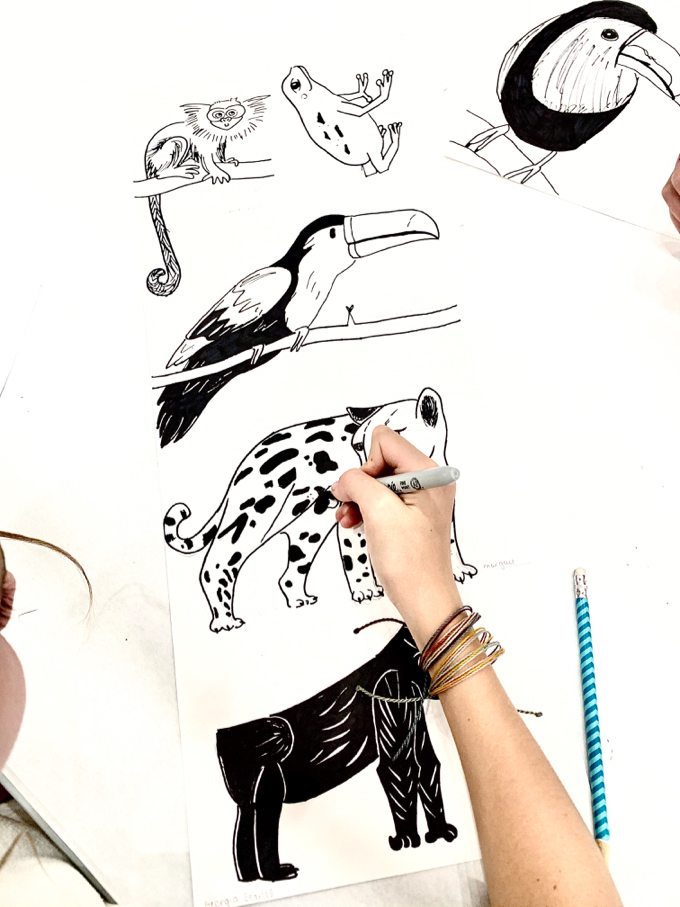
ONE Read The Great Kapok Tree: A Tale of the Amazon Rain Forest as a fantastic introduction to rainforests. Get inspired using simple black & white imagery for discovery, inspiration, and reference. Imagery may include rainforest plants, flowers, leaves, and trees. Use a thin brush and black India ink to “draw” on a large scale, filling a large paper with a variety of observed + organic habitat. Illustrations should remain separate so they can eventually be cut apart. Dry.
TWO Using tempera cake paints in neons and fluorescents to bring color into the rainforest habitat. This semi-transparent paint will allow the black lines to still shine through. Dry. Cut plantlife apart, leaving the exterior black line.
Early online enrollment at HANDMAKERY is highly encouraged as seating is limited! Start making + creating + connecting in a colorful community focused on a creative + collaborative childhood!
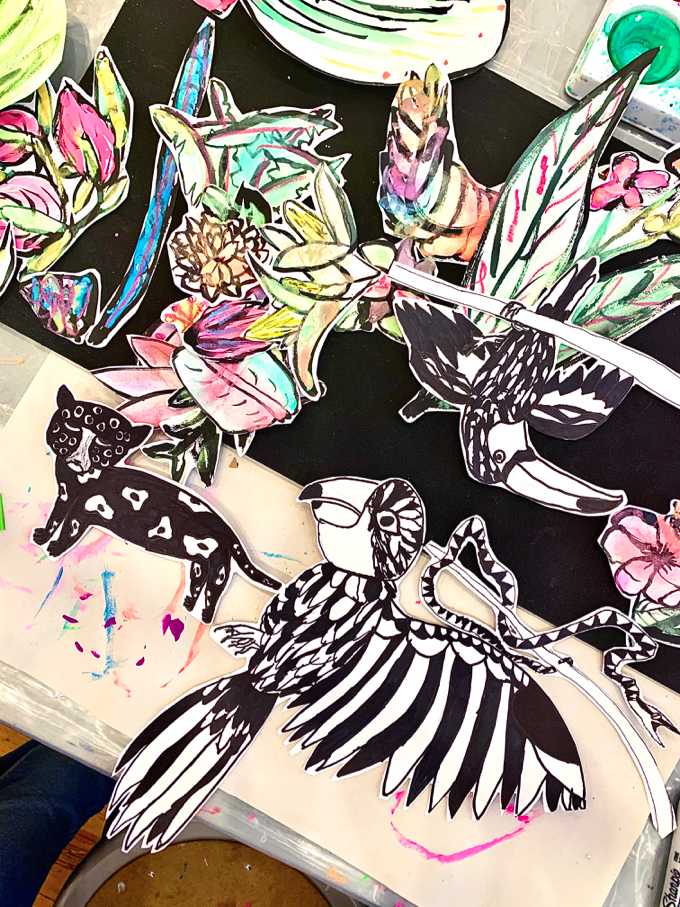
THREE Use pencil to lightly sketch rainforest creatures. Start with simple shapes like circles and ovals, eventually moving to smaller shapes and detail. Use simple black & white imagery for animal inspiration. Move to a permanent black marker to outline, detail, texture, and to bold each creature. Cut out each animal with scissors keeping the exterior black line. We did most of the cutting so young artists would have more time drawing and painting.
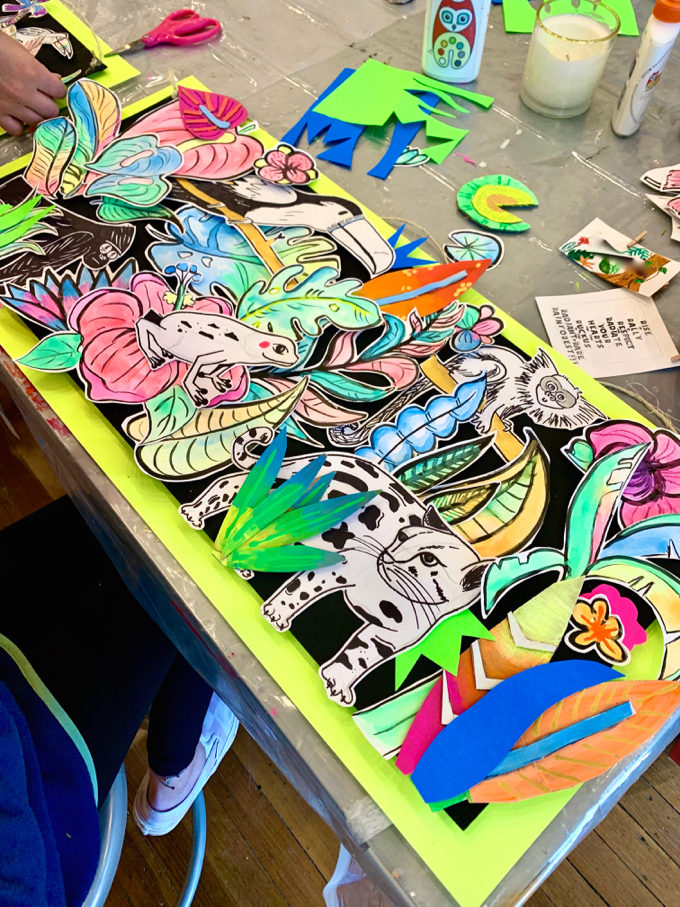
Each artist selected their own creature combinations to incorporate into their rainforest. Creatures included poison dart frogs, snakes, exotic birds, sloths, leopards, monkeys, and more! It was exciting to see the different combinations of animals each artist selected to personalize their piece.
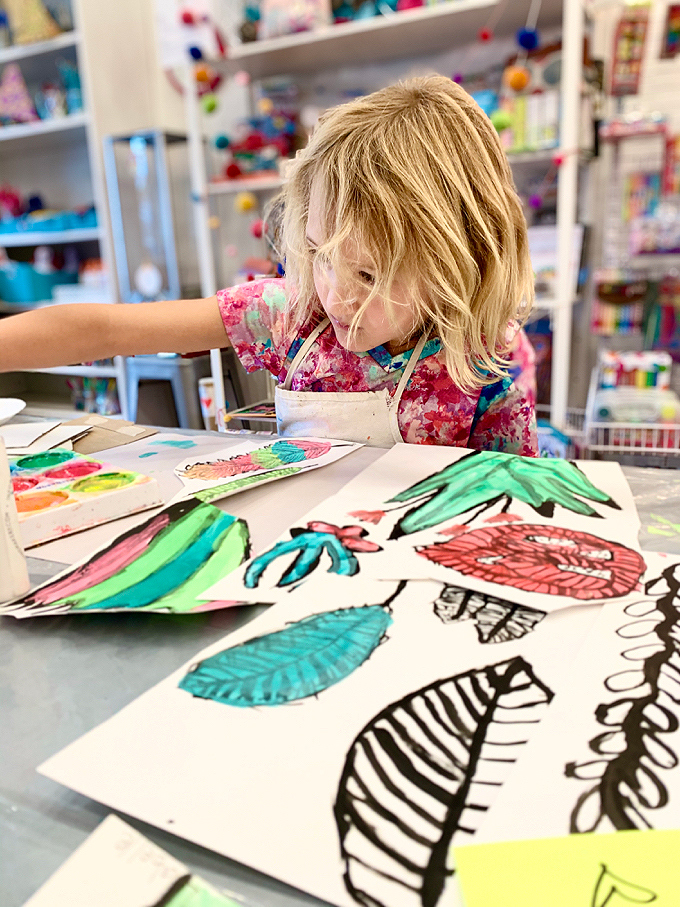
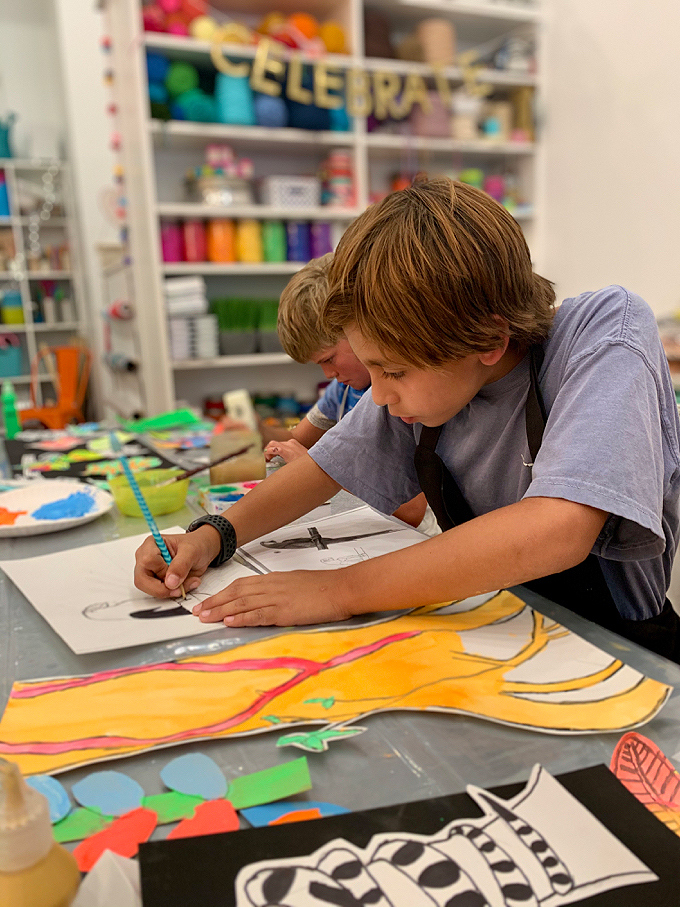
FOUR Explore lightweight cardboard and white glue construction for additional plantlife popouts and to add additional dimension. Paint cardboard pieces using solid body tempera paints in neons and accent with tempera paint pens.
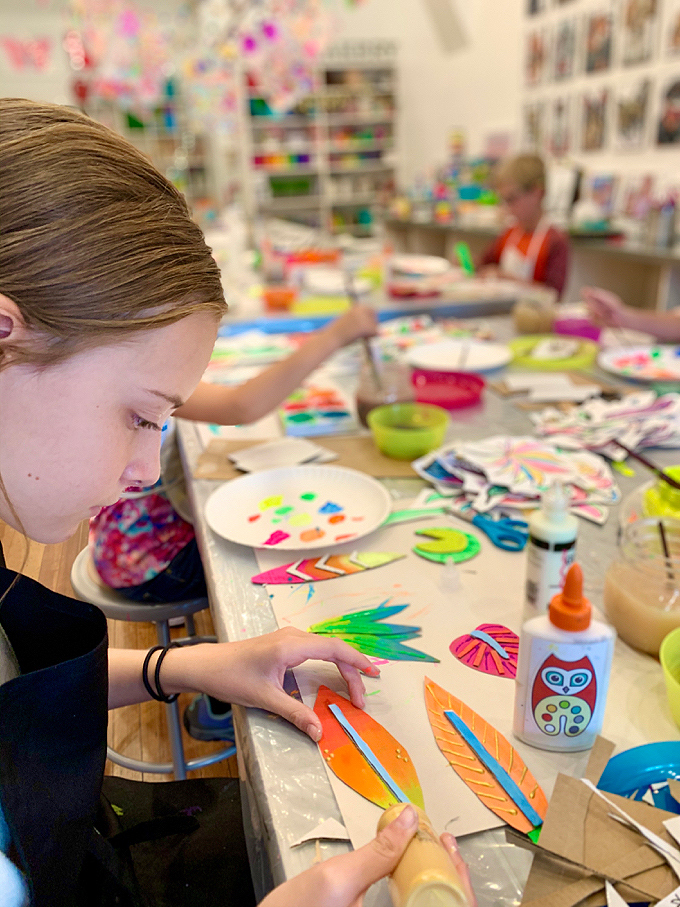
Detail dry painted cardboard pieces with glitter sticky foam or smaller mixed-media components such as pom poms, circle stickers, buttons, oil pastels, washi tapes, patterned papers, and more.
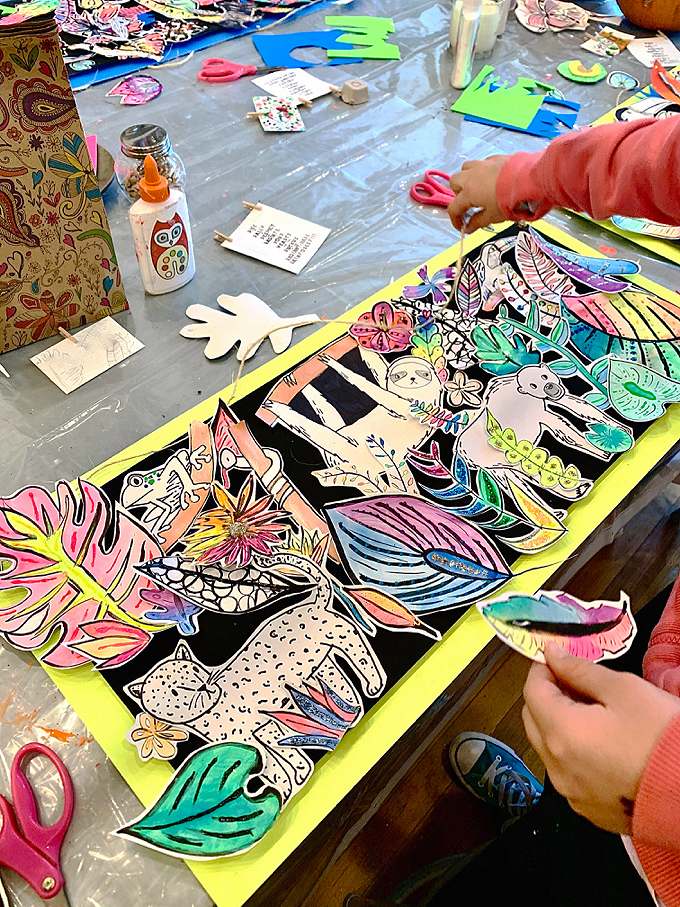
FIVE Layout the cutout “creative collection” of rainforest plants, black & white creatures, and dimensional habitat on a horizontal, pre-painted, black cardboard, backed with a smaller piece of foam core for strength and stiffness. Arrange pieces considering foreground, middle-ground, and background. Pieces can flow off the black cardboard to allow more space and to add dimension.
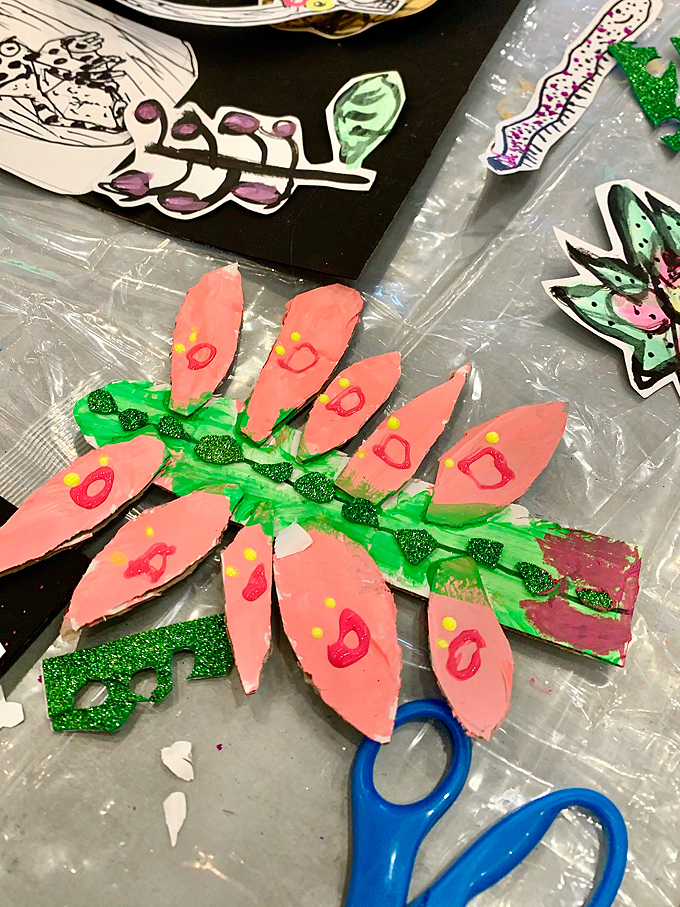
A beautiful rainforest flower painted in paint pen to popout.
A birds-eye-view of rainforest animals accented with eye catching patterns. Creatures remained in a black + white color scheme for a brilliant + bold + contrasting statement.
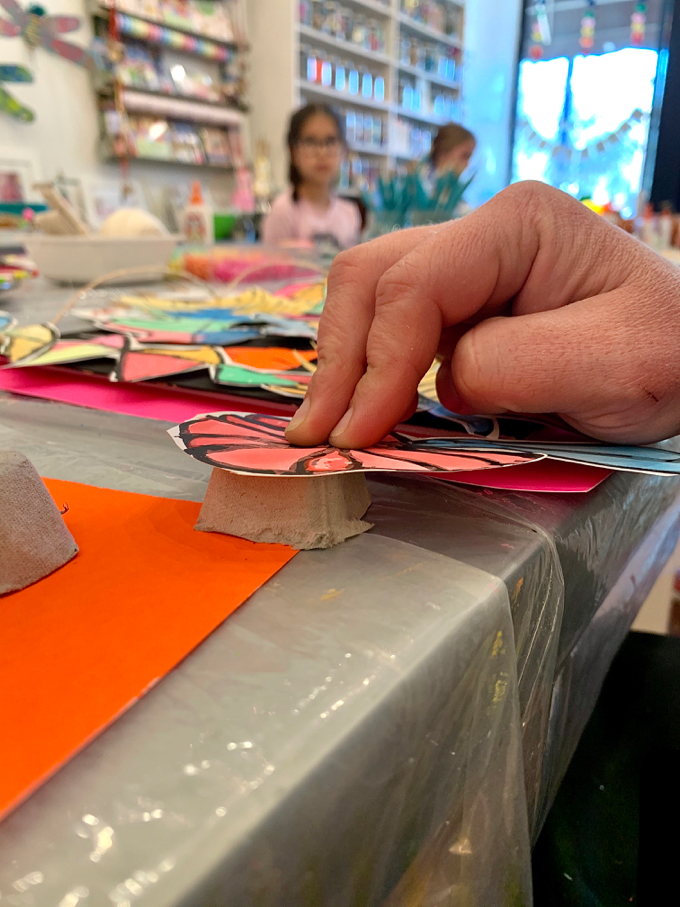
SIX Use three to five, precut egg carton pieces to pop out selected pieces. Use white glue to attach a low profile egg carton piece to add height and a bit of pop.
SEVEN Arrange finished pieces on the pre-painted black cardboard, again, that has been backed with foam core for added durability, flatness, and strength. Use a light amount of white school glue to tack down pieces so they’re not fully glued down, so pieces still have a flex & flow. Use a neon poster board to create a vibrant frame to finish off and showcase. Drill holes in the top two corners and add a piece of twine to display.
A peek at a few pretty pieces in progress as artists were planning and popping with a unique perspective, point of view, and of course a powerful punch, all part of the process and on point. Now say this three times!!!
Having a project with “several separate pieces” allowed artists to move around pieces to the puzzle, to build, and to layer their one-of-a-kind ~ Ruckus in the Radiant + Rare Rainforest so it was unique to each artist. Keeping all animals black & white created a wonderful contrast to the colorful habitat.
Every artist walked away with a one-of-a-kind creation with a collection of creatures they were proud of creating!
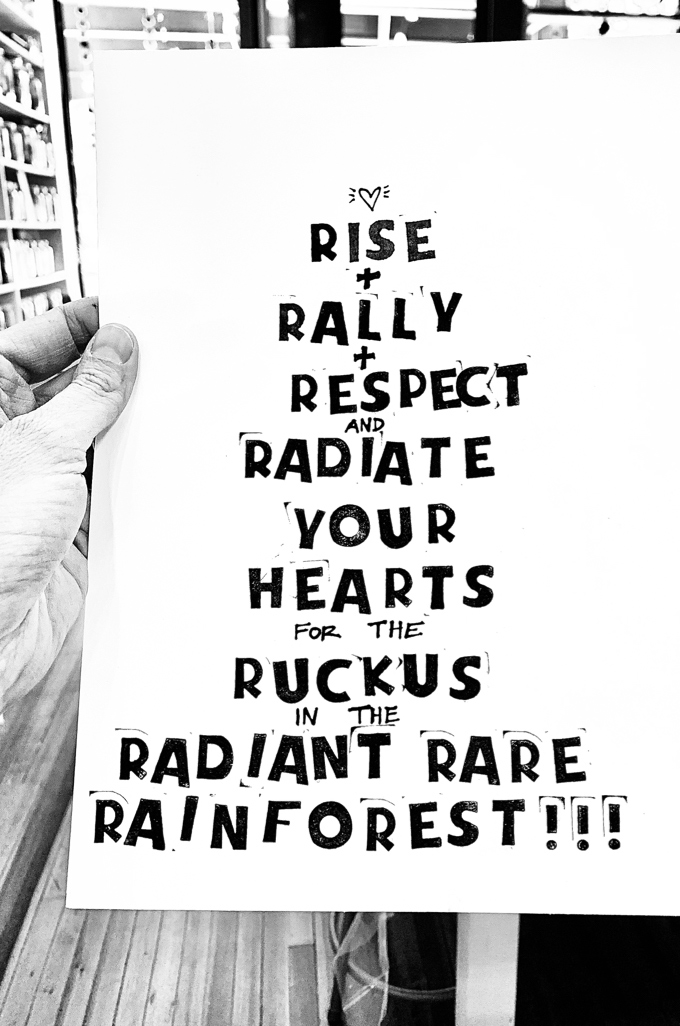
A little hand-stamped + black & white saying we printed for each artist to frame using materials of their choice. Little wooden clothespins were used to clip onto the twine of their projects. We discussed how this piece was truly an artist statement to ~ RISE + RALLY + RESECT + RADIATE YOUR HEARTS for the RUCKUS in the RADIANT + RARE RAINFOREST to remind humans to protect and preserve this special land!
The week wrapped up with our traditional recognition ceremony + mini art show as makers took home ~ a most marvelous mini-masterpiece on Main Street in the majestic mountains!
Tag us @handmakery with your creations on Instagram! Follow our blog for more inspiring process-based art projects! As always, thank you for following our artful adventure on Main Street in the heART of the Carbondale Creative District! Send us a note anytime! We’d love to hear what you’re thinking, dreaming, and envisioning! Much love and happiness creating in this creative + colorful world filled with collaboration + connection + community + arts & crafting! Ami
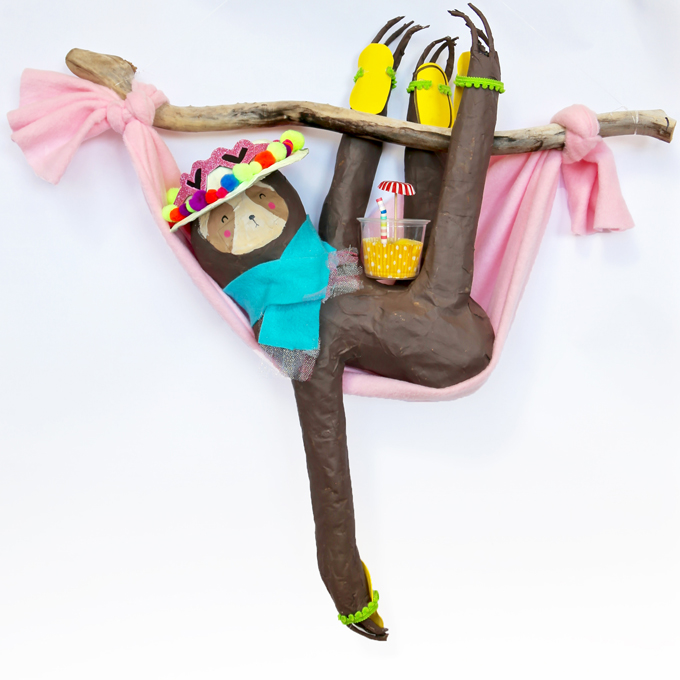
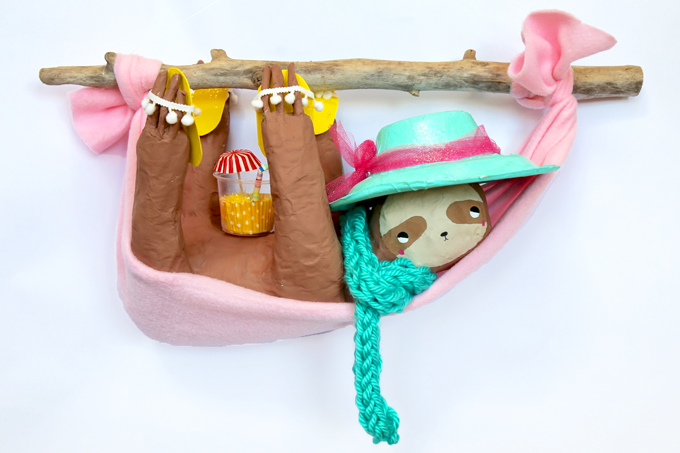
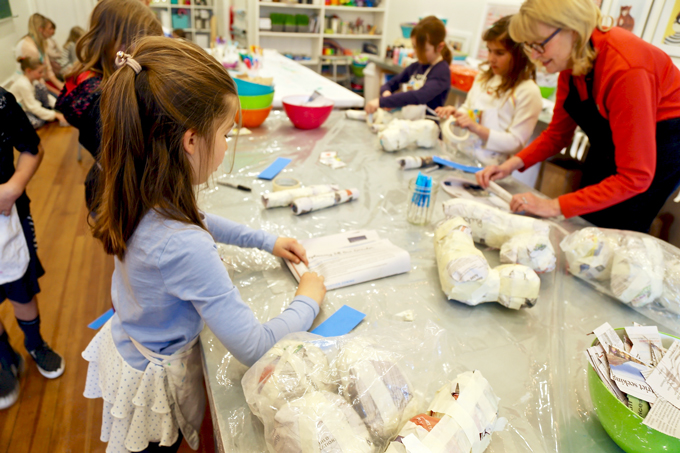
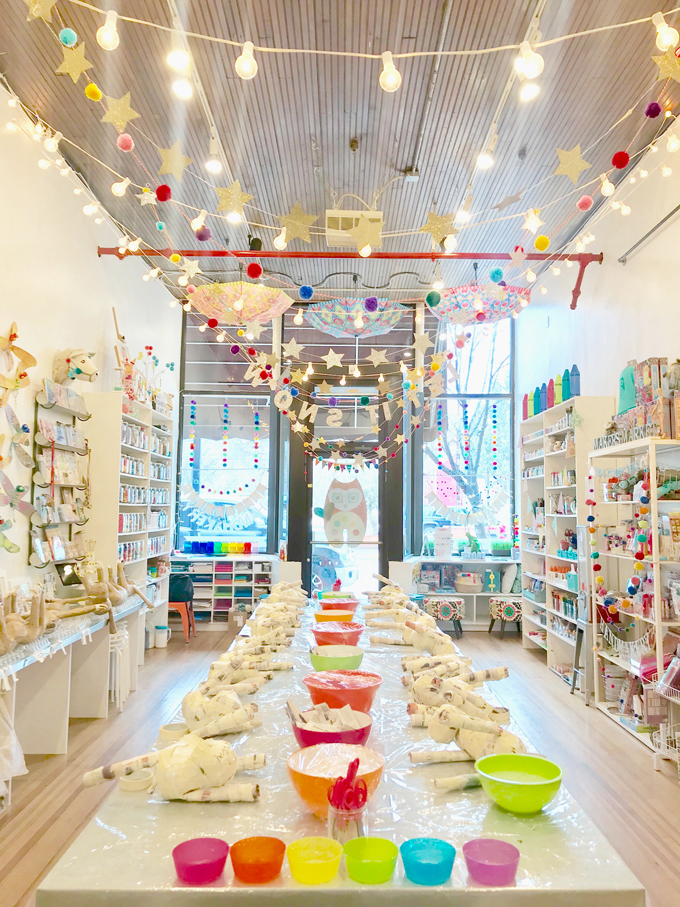
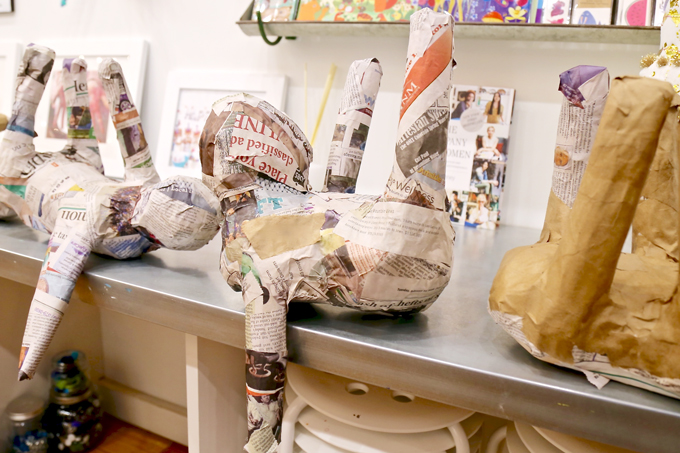
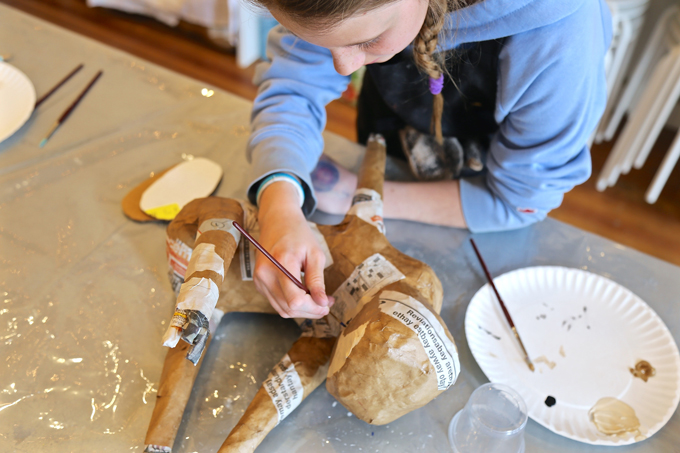
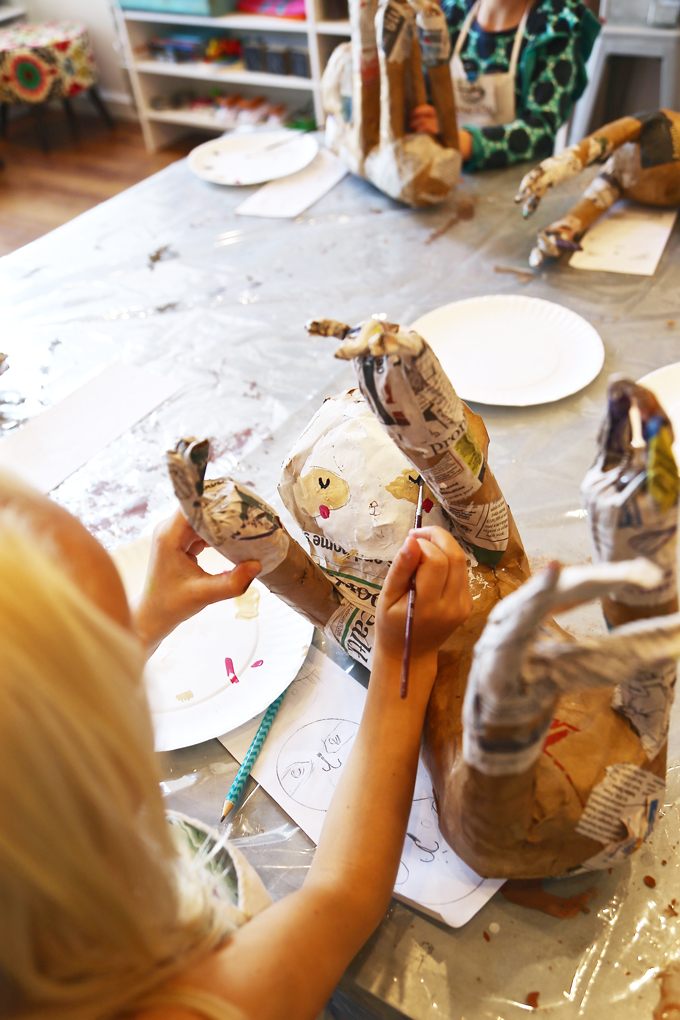
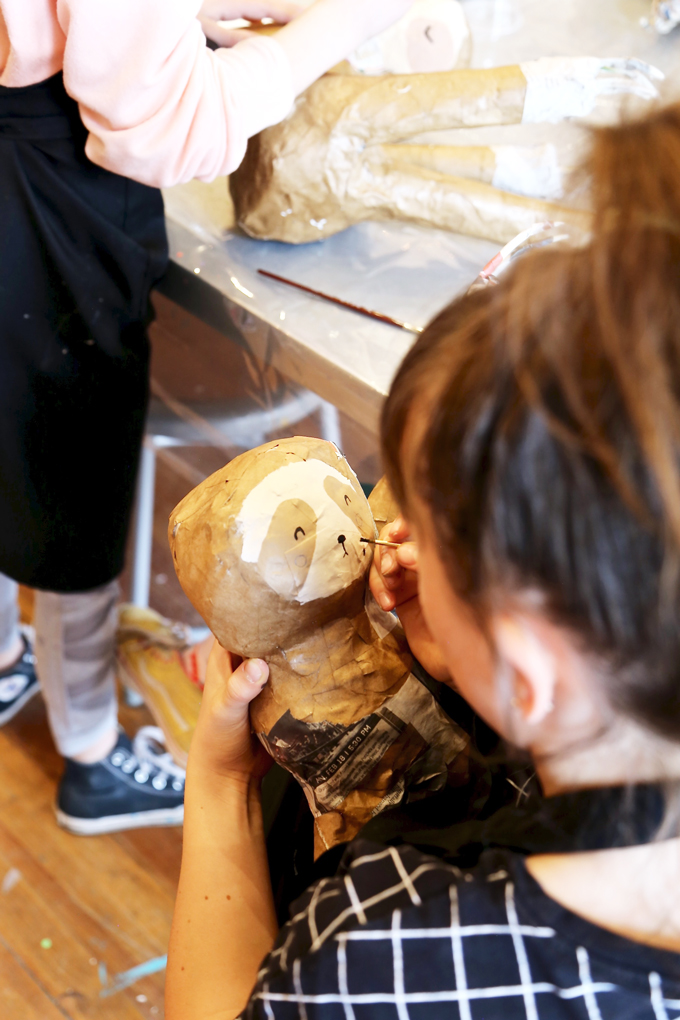
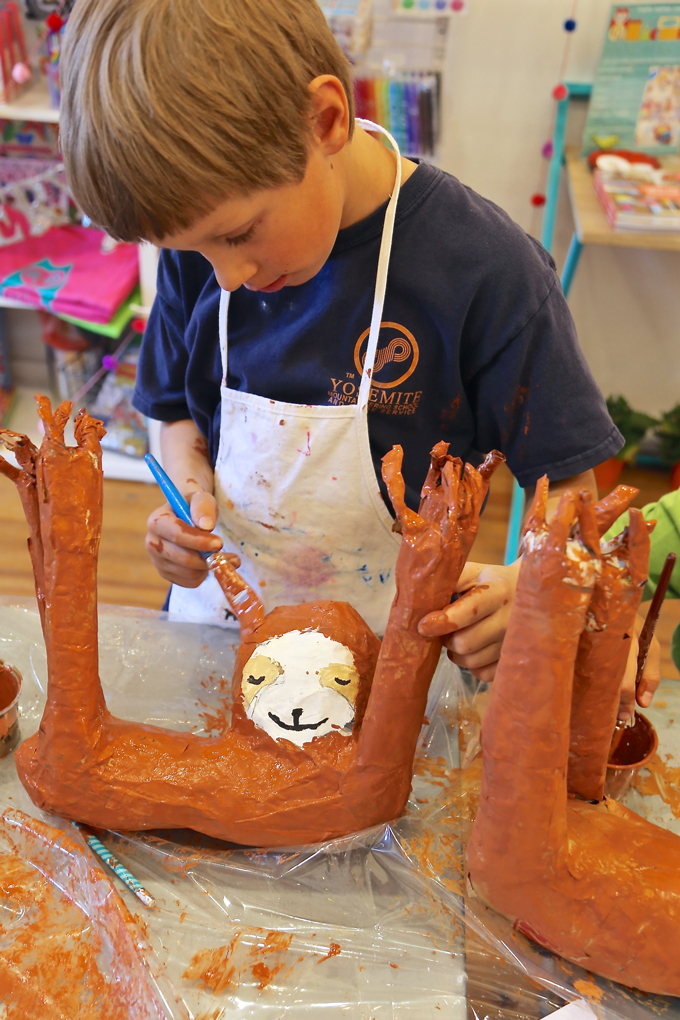
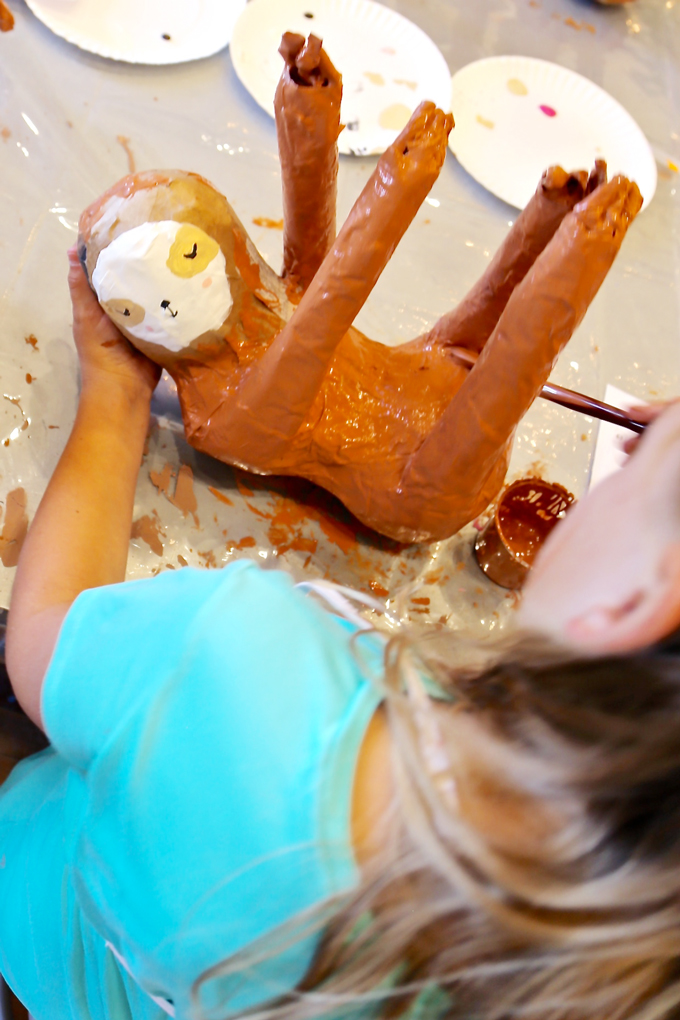
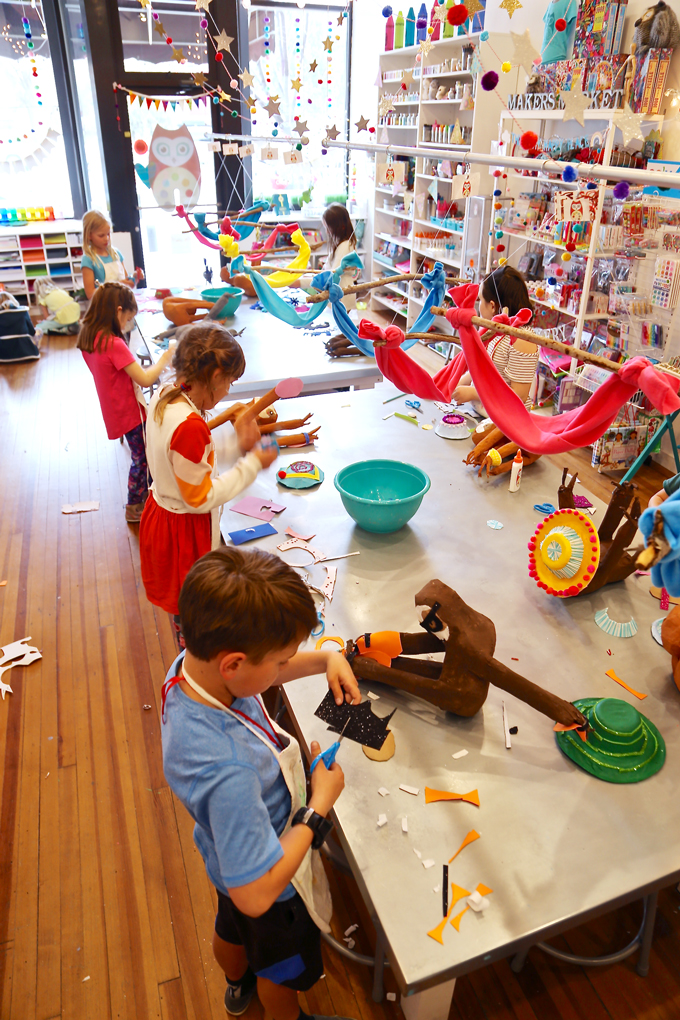
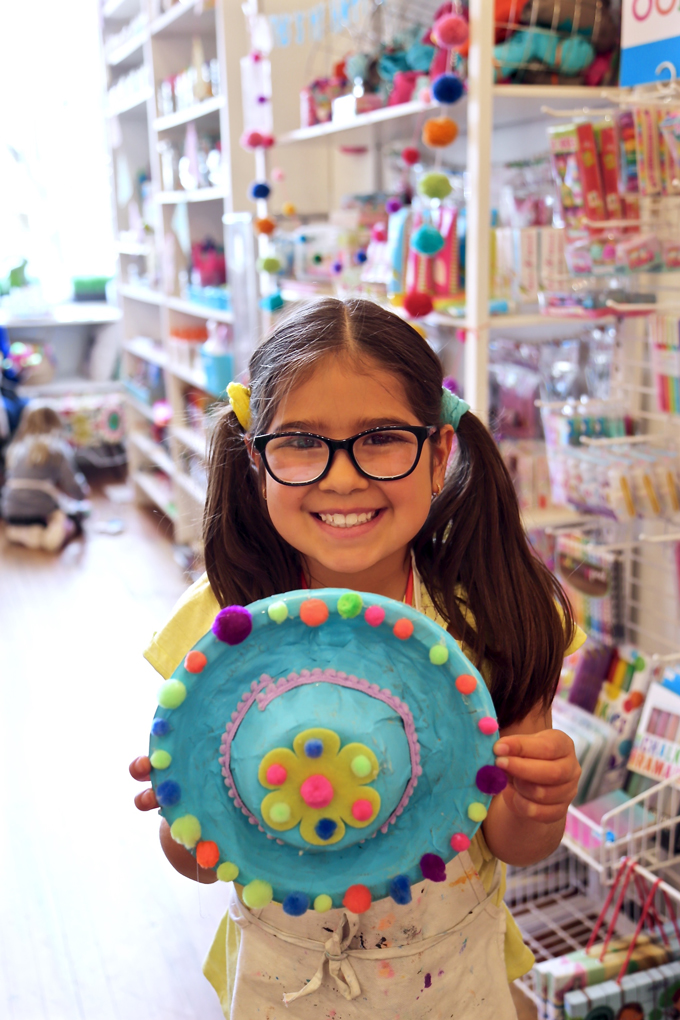
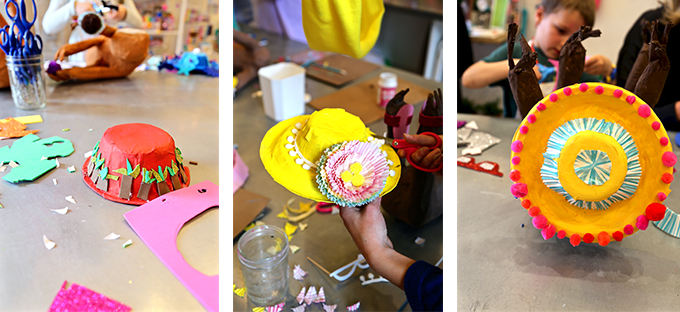
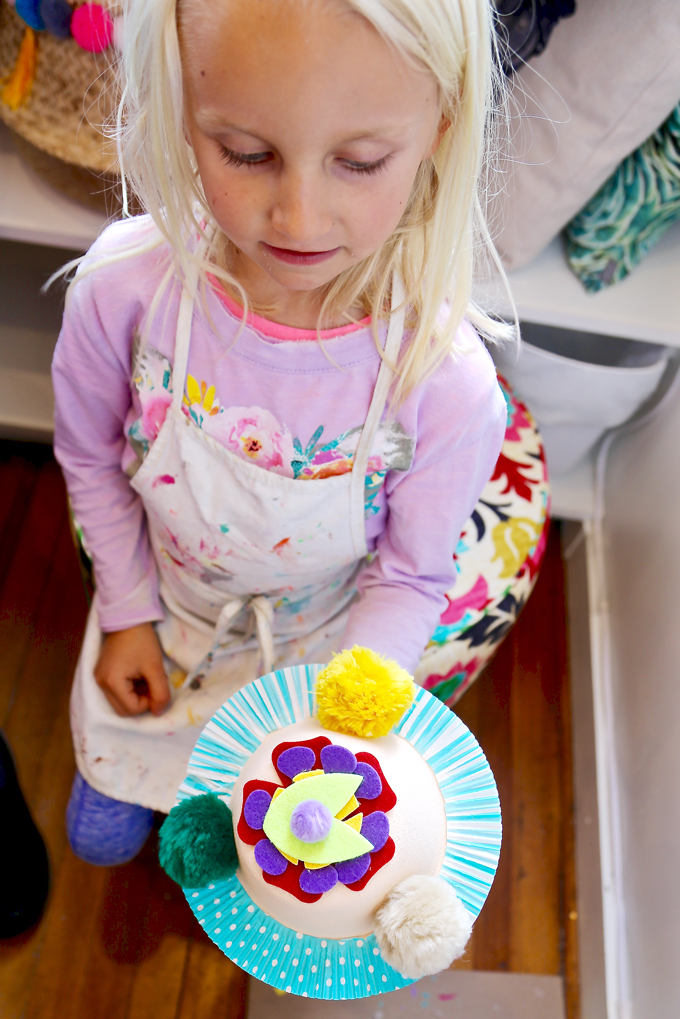
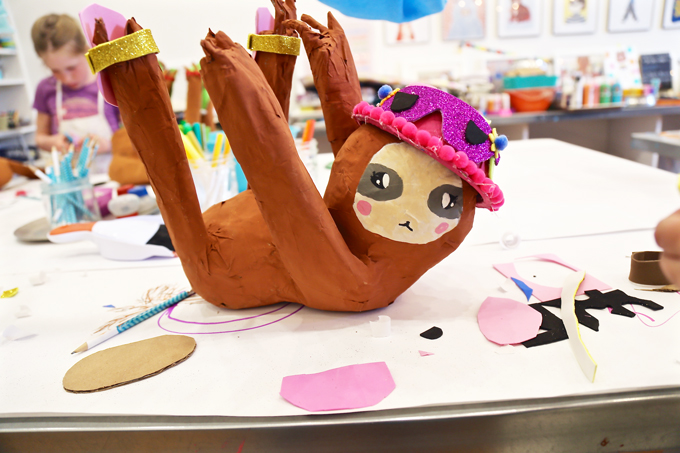
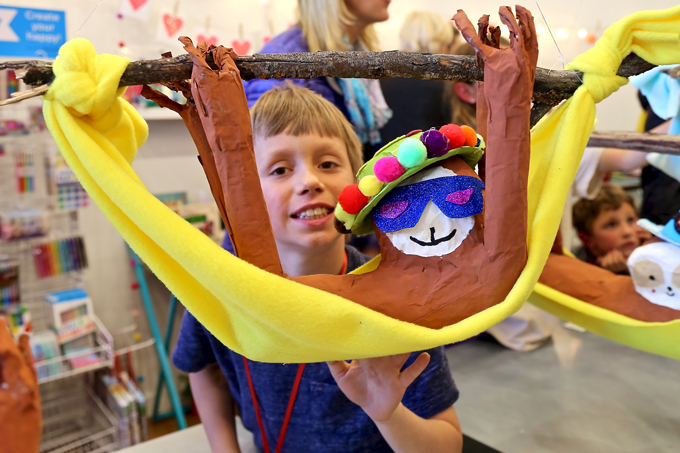
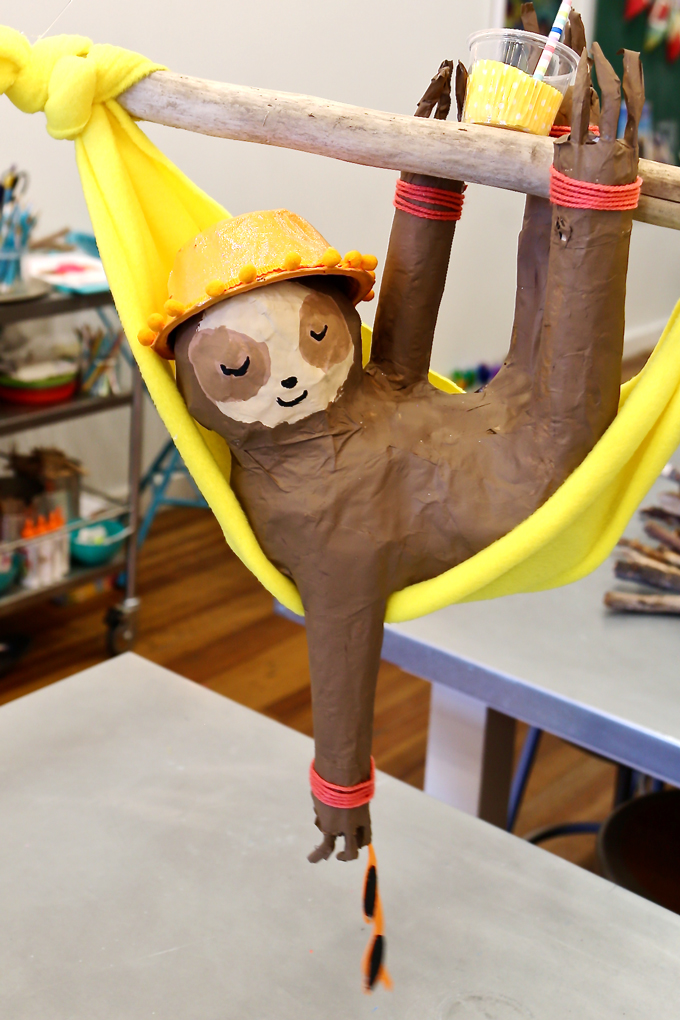
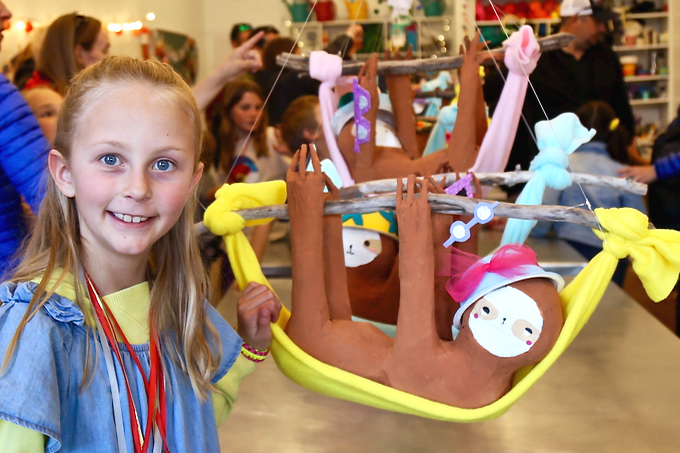
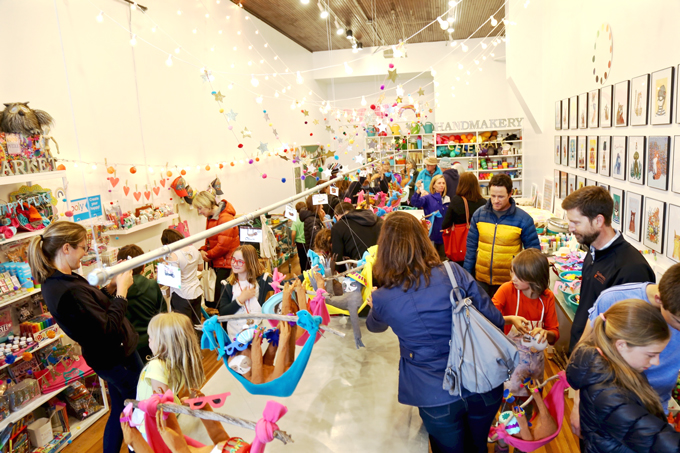
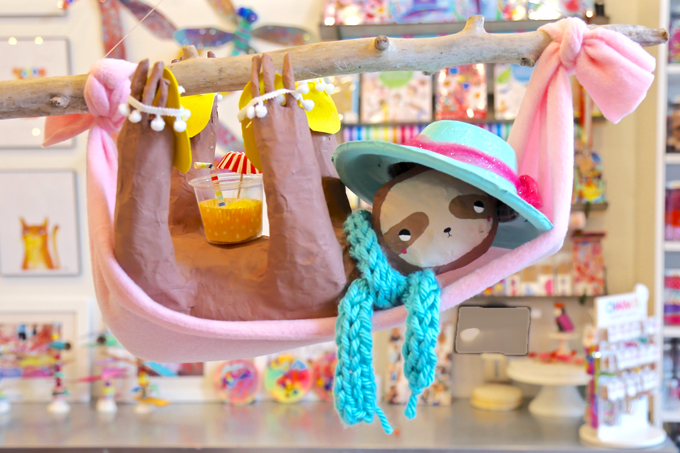
Hello there! Excited to give you a little springtime inspiration in your day! Our artists recently showcased their ~ SCULPTURAL SPRINGTIME SLOTHS in a sling, sporting stylish sandals + sunhats + sunglasses + scarves, while sipping & sun-basking in the sunshine in our early spring + six-week + school-year art workshops for ages 5 & up! We have a feeling these creatures will “slowly” steal your heart! Sharing a list of sweet-n-simple, go-to-supplies, to get your very own sloth started using several upcycled material you might already have on hand! Be sure to tag @handmakery on Instagram if you give this project a GO! Take a peek below!
SUPPLIES FOR ~ SCULPTURAL SPRINGTIME SLOTHS:
Newspaper {upcycled}
Paper bags {upcycled}
Tape- masking + duct tape
Scissors
Paper-mâché mixture + bowl
Paint + pallet + brush
Driftwood
Fabric- fleece
Fishing line
Embellishments for sandals, hats & sunglasses
A SIMPLE PROCESS FOR ~ SCULPTURAL SPRINGTIME SLOTHS:
Did you know sloths are the most trending animal of the year? Would you believe the sloth has replaced the unicorn!?! Indeed, it’s true! Read about their debut as “the most trending creature” of this year. Would you also believe a baby sloth was just born, right here in Colorado!?! If you’re looking for some amazing + simple sloth facts for kids, to go along with this DIY, take a look. Artists loved learning all about these cozy and trending creatures! We even hosted a sloth birthday party right in our very own sweet studio!
A sweet + sisterly + sloth-selfie sent in by one of our amazing HANDMAKERY families! Thank you for tagging #handmakery on Instagram with your creations!
SUN BASK, SIP, SIT BACK & RELAX INTO SUMMER:
TAKE A SPLASH & JOIN US THIS SUMMER:
1. JUMP IN AS SUMMER ART CAMPS ARE QUICKLY FILLING!
Early online enrollment is highly encouraged as seating is limited! Jump into summer making + creating + connecting in a colorful community focused on a creative + collaborative childhood, in the heART of the Carbondale Creative District on magnificent Main Street!
2. FAMILY BLOCK PARTY ~ FIRST FRIDAY MAY!
You don’t want to miss this event! If you’re local to the Roaring Fork Valley, be sure to join us for our 7th year hosting a ~ FREE art-making booth for ALL AGES! We’ll be making & creating in our outdoor art studio which will be located in downtown Carbondale |Colorado, at the heART of the Carbondale Creative District! Join us for the much-anticipated + annual + artful ~ FAMILY BLOCK PARTY!
3. LET’S CONNECT ON INSTAGRAM!
Tag us @handmakery with your creations on Instagram! Follow our blog for more inspiring process-based art projects! As always, thank you for following our artful adventure! Send us a note anytime! We’d love to hear what you’re thinking, dreaming, and envisioning! Much love and happiness creating in this creative + colorful world filled with collaboration + connection + community + arts & crafting! Happy Spring! xo Ami
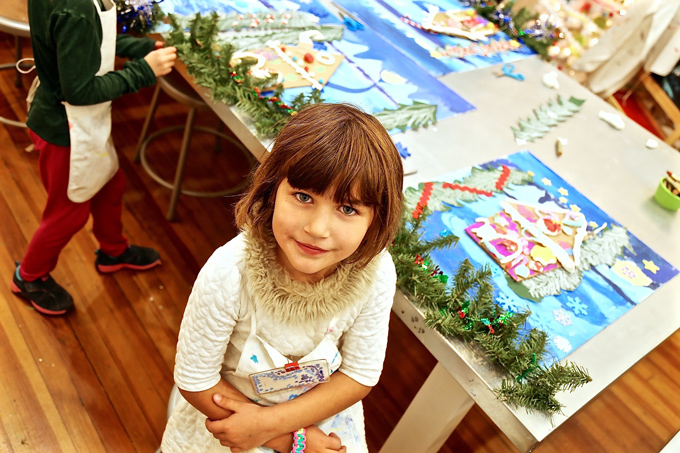
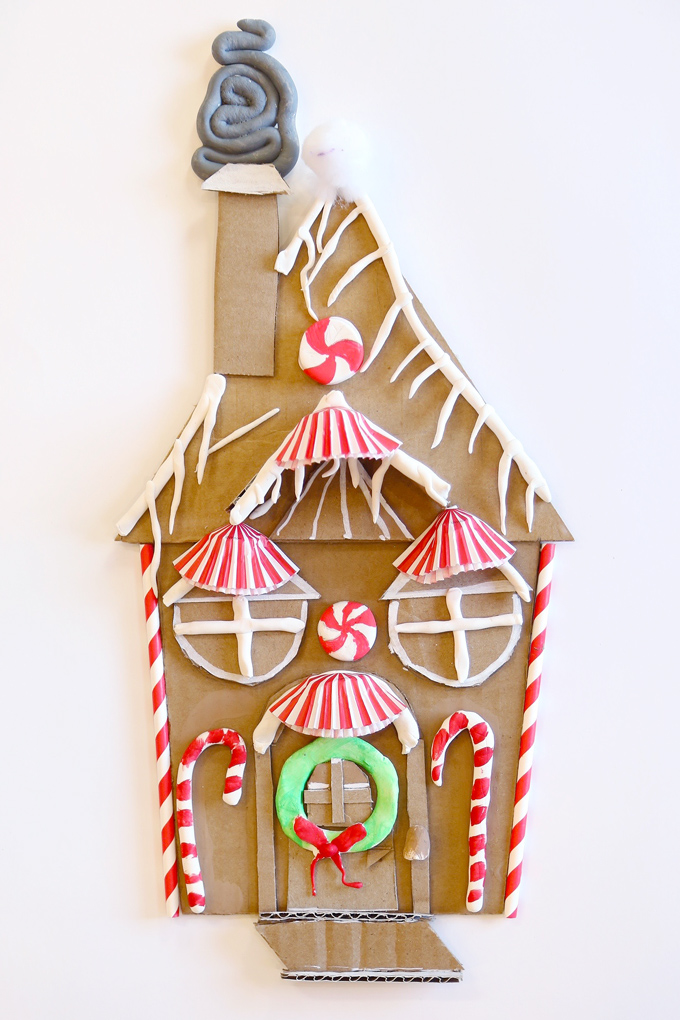
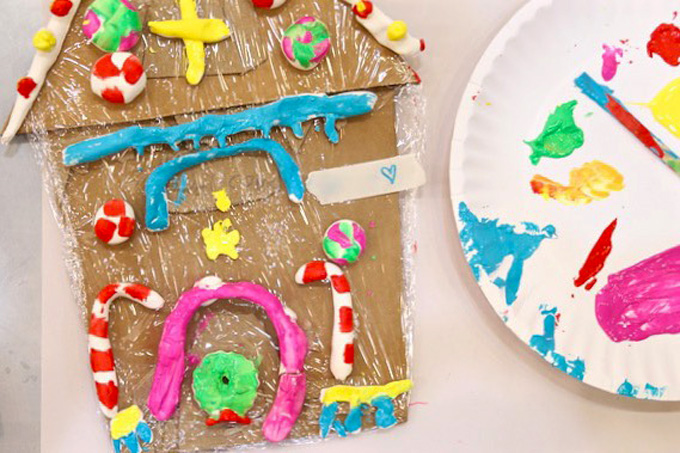
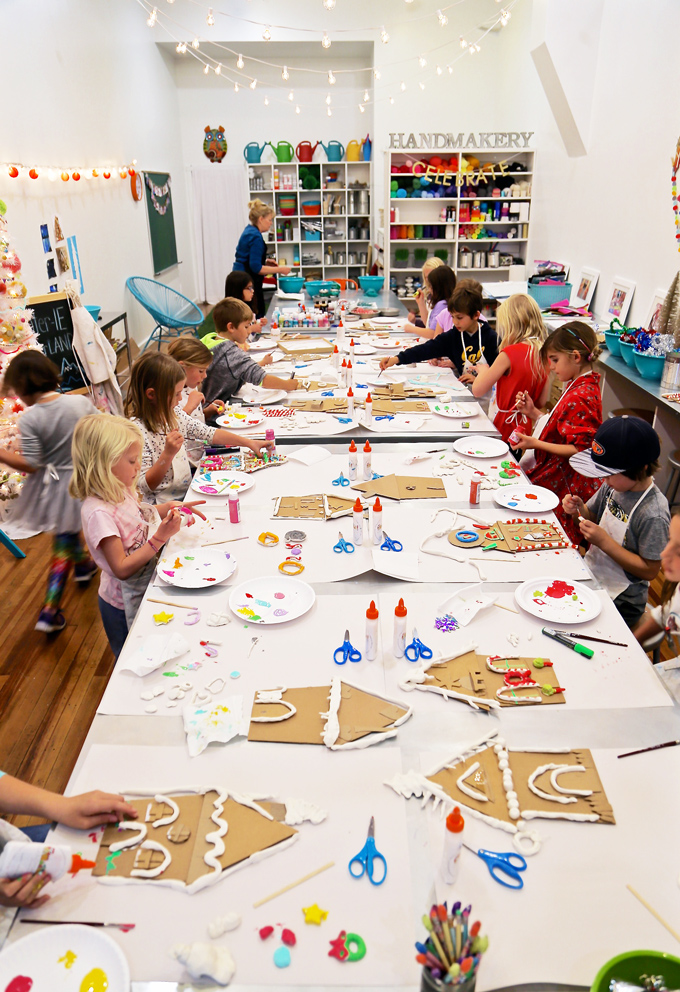
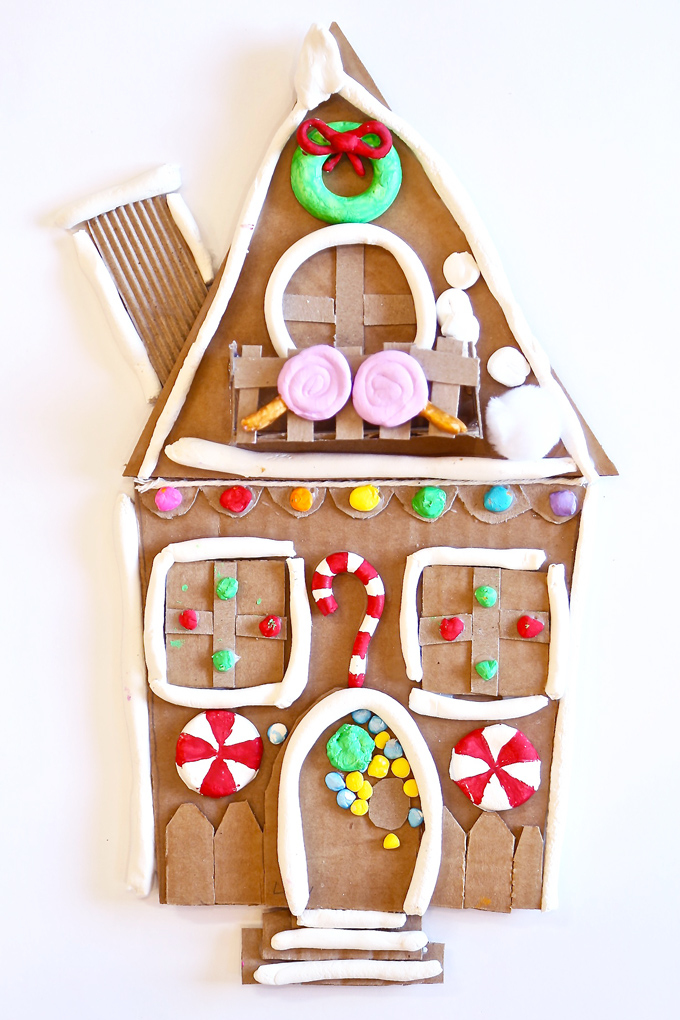
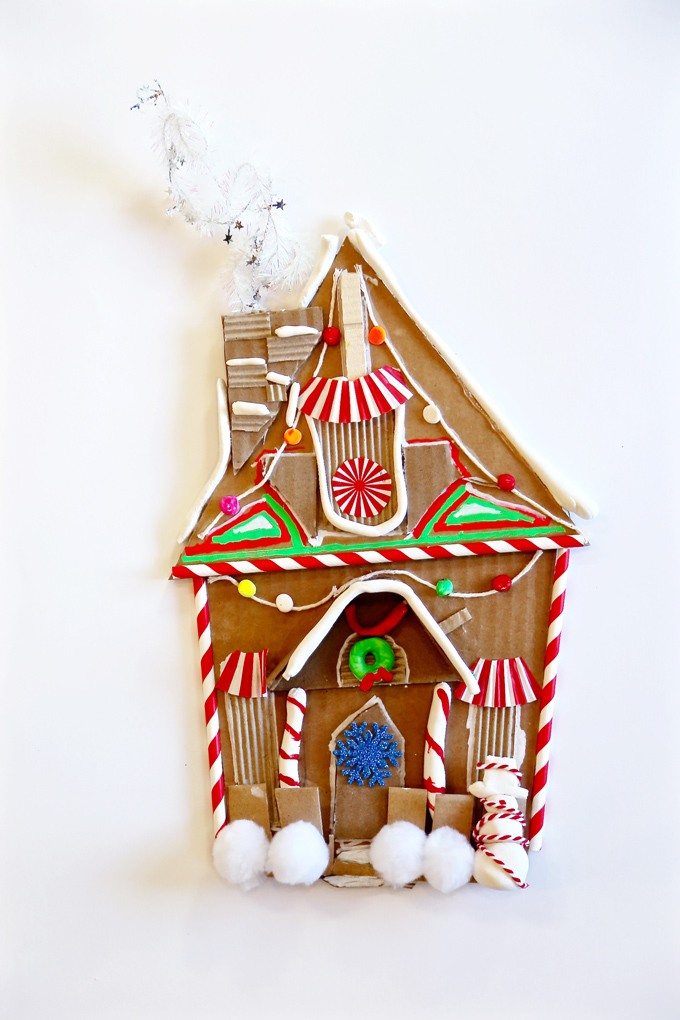
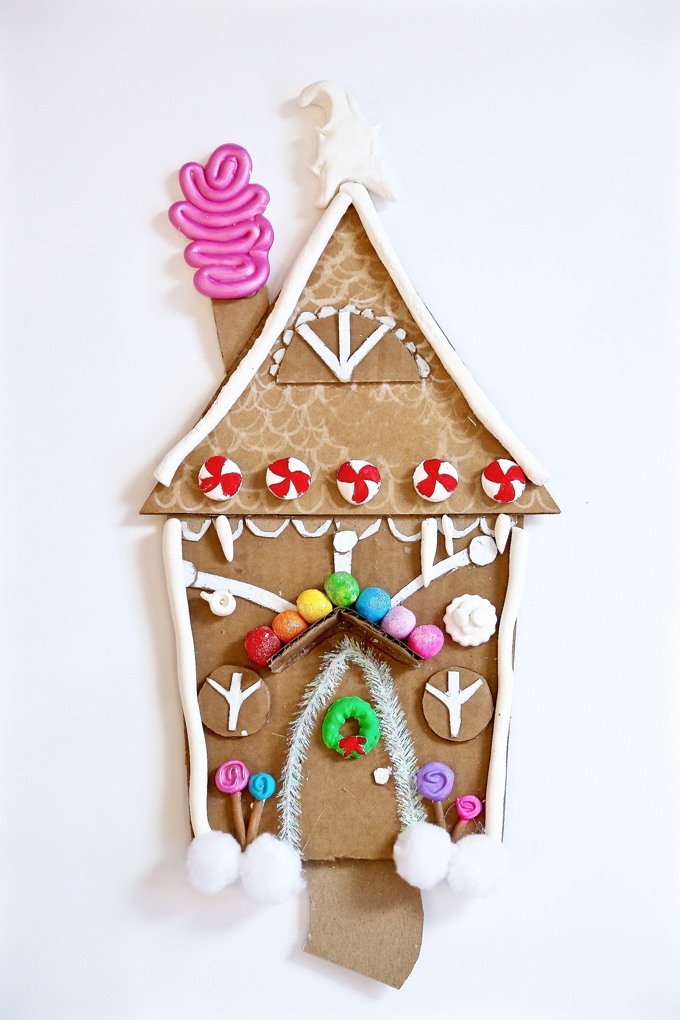
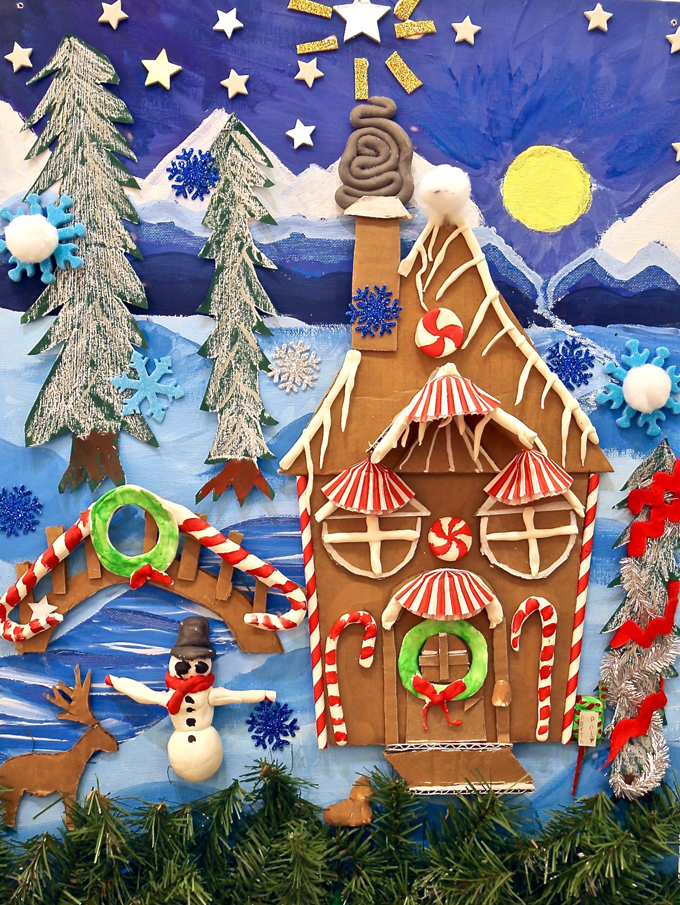
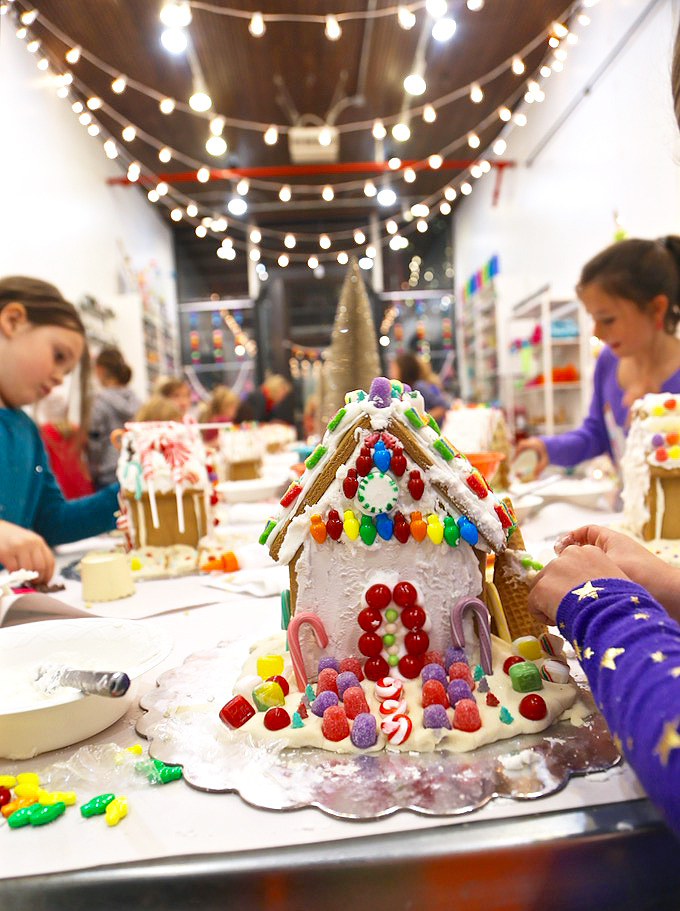
Happy December + Happy Holidays! Save yourself long hours in the kitchen spent mixing, rolling, cutting and baking gingerbread dough – use cardboard instead for a ~ DIY CARDBOARD “CANDY” COTTAGE!
This fantastic upcycled material is abundant and easy to use. Plus, you can avoid a sugar melt-down by skipping the temptation (and expense) of supplying bags of candy, sprinkles and royal icing – and sculpt your own candy cane columns and gumdrop windows using modeling dough.
This open-ended, creative process is fun for ages 5-12 (or, say, age 35+, if Mama is so inclined). These cottages can be used as holiday ornaments, wall hangings, or added as a 3D element to a canvas painting, as shown here. You can even make a village; a timeless, long-lasting heirloom, completely made by – hand from the heART!
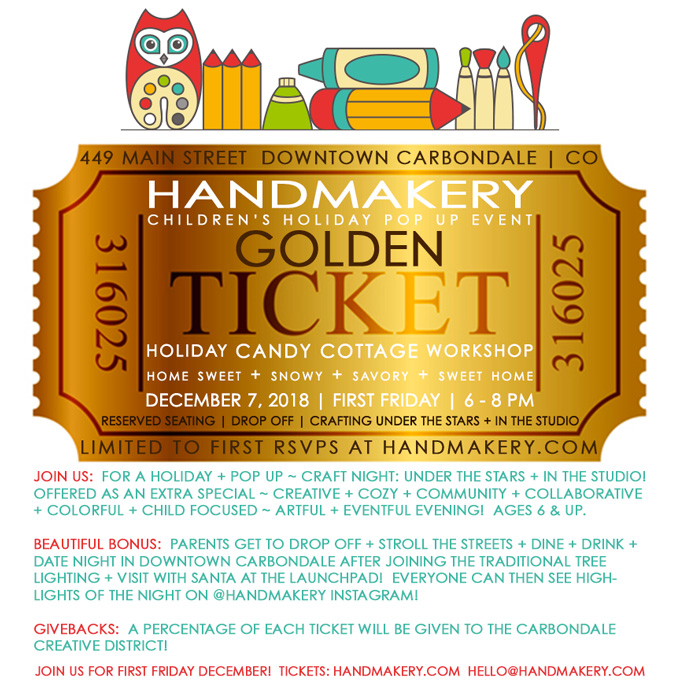
Traditionalists who want a classic edible gingerbread house (complete with candies galore) can skip the inevitable sticky cleanup at home, and instead, deliver their children to December’s FIRST FRIDAY ~ CANDY COTTAGE WORKSHOPat HANDMAKERY, where crumble-proof walls and every sweet adornment will be provided.
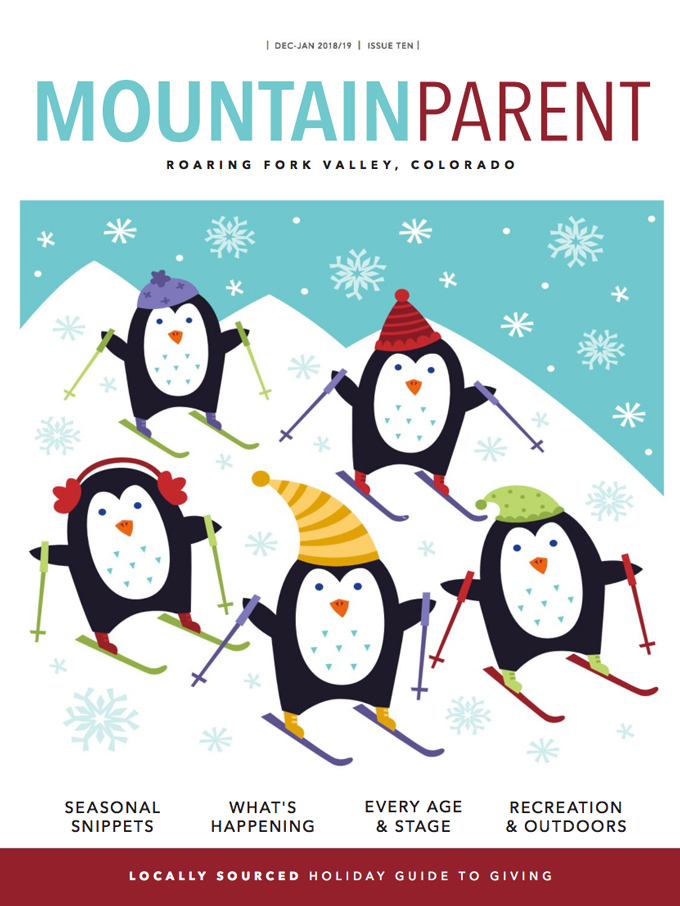
See the full CARDBOARD “CANDY” COTTAGE article in Winter Edition | Issue 10 of the MOUNTAIN PARENT magazine offered FREE throughout the Roaring Fork Valley in print (oh SO beautiful) and/or online throughout the world!
Embellishments- white pom-poms, red & white paper straws, striped cupcake papers, wire stars, & white string.
PROCESS FOR CARDBOARD “CANDY” COTTAGE:
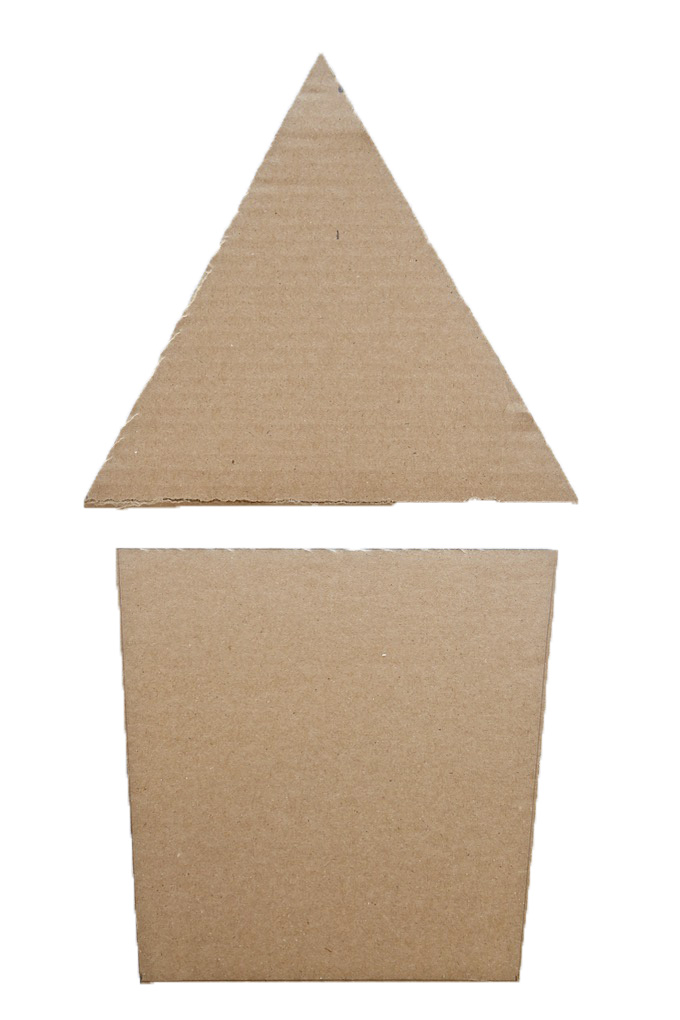
ONE Download a FREE printable template on handmakery.com/blog. Prepare a cardboard cottage cut-out ahead of time by cutting out two shapes: one will be the cottage, the other will be the roof. Using white glue, attach the cardboard cottage to the cardboard roof by overlapping just a bit and gluing in place. Dry.
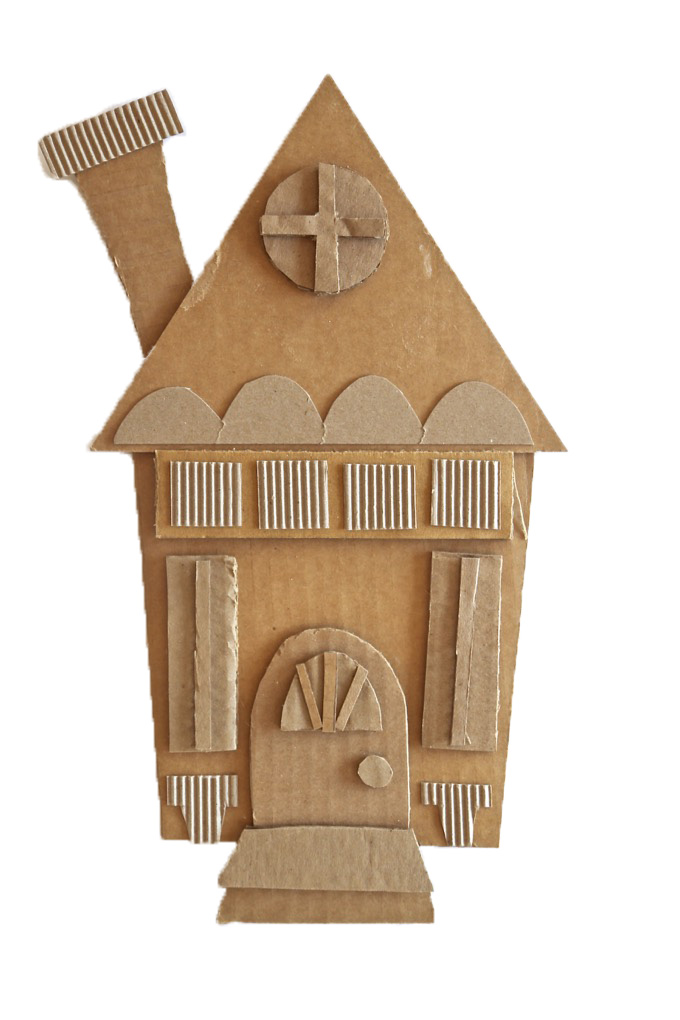
TWO Have a mixture of smaller pieces of cardboard scraps available that can be cut and used for pop out details. Lighter weight cardboard is ideal as it’s easier to cut. Corrugated cardboard adds a wonderful texture and is also easy to cut. Architectural pieces can be drawn and cut to create doors, windows, porches, fences, shed roofs, steps, a chimney, and more. Draw, cut, arrange, and glue down detail pieces using white glue. Dry. Cottages will become one-of-a-kind mini-relief sculptures!
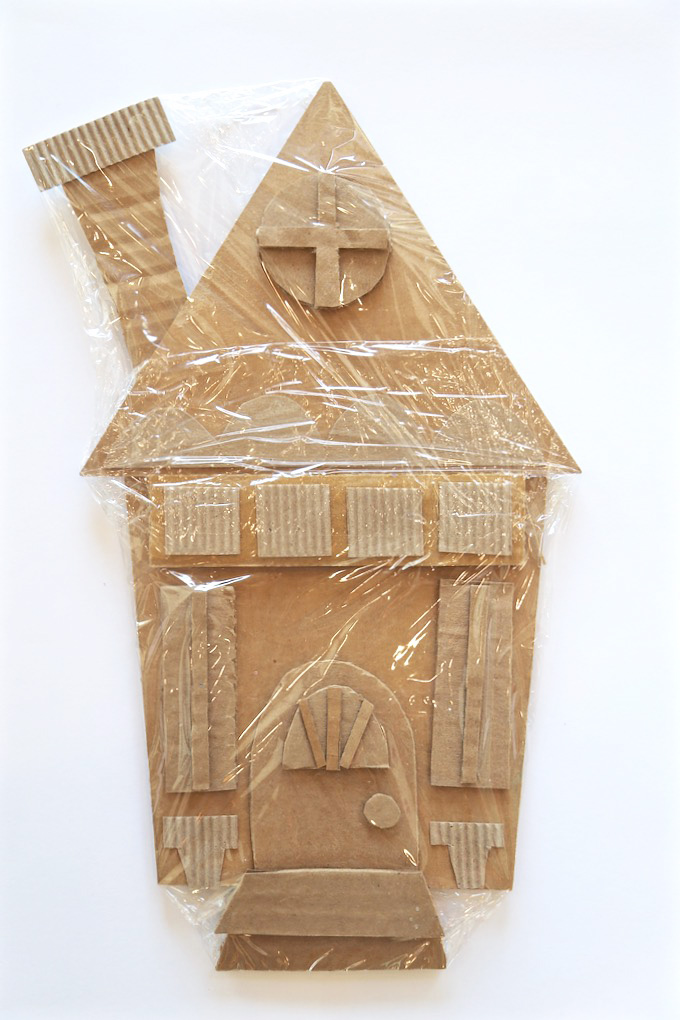
THREE Cover completed cardboard cottage with clear wrap and use masking tape on the back of the cottage to temporarily secure. This protected surface will allow modeling dough pieces to be placed on the house to dry without attaching to the cardboard cottage and will keep the cardboard protected from paint.
FOUR Keep cottage covered with clear wrap. Move into making accents using Crayola Model Magic which is a fantastic product for use, flexibility, and simple drying. Start by rolling coils to imply snow and icicles. These pieces will take on the look of white icing. These snowy details can run along the edges of the roof, cottage, above the door + windows, and atop the chimney. Use modeling dough to also make candies such as gumdrops, mints, candy canes, and other savory + sugary treats. Wreaths, snowballs, and snow piles can also be fun additions. Allow pieces to air dry in place, on top of the clear wrapped house.
FIVE Paint dry modeling dough candies using paint and a small brush. Allow painted pieces to dry on top of the clear wrapped cottage. Pieces that are to remain white are beautifully painted with white glue and sprinkled with fine white glitter for added sparkle. Dry.
SIX Carefully set all modeling dough piece aside and remove the clear wrap. Arrange pieces in place for gluing down onto cardboard. Most dough pieces can be glued with white glue. It can be helpful for an adult to hot glue fragile icing pieces for strength and a quicker dry time. Use chalk marker to add small details of color on the cardboard cottage. White chalk marker can imply small areas of icing and colored chalk marker can add vivid details to the cardboard pieces. Now, you can add your embellishments including, white pom-poms, red & white paper straws and striped cupcake papers, wire stars, and white string for lights. Most embellishments can simply be glued in place onto the cardboard.
Be sure to tag@handmakery on Instagram with your Cardboard “Candy” Cottage creations as we’ll be featuring your work on our feed! #candycottage
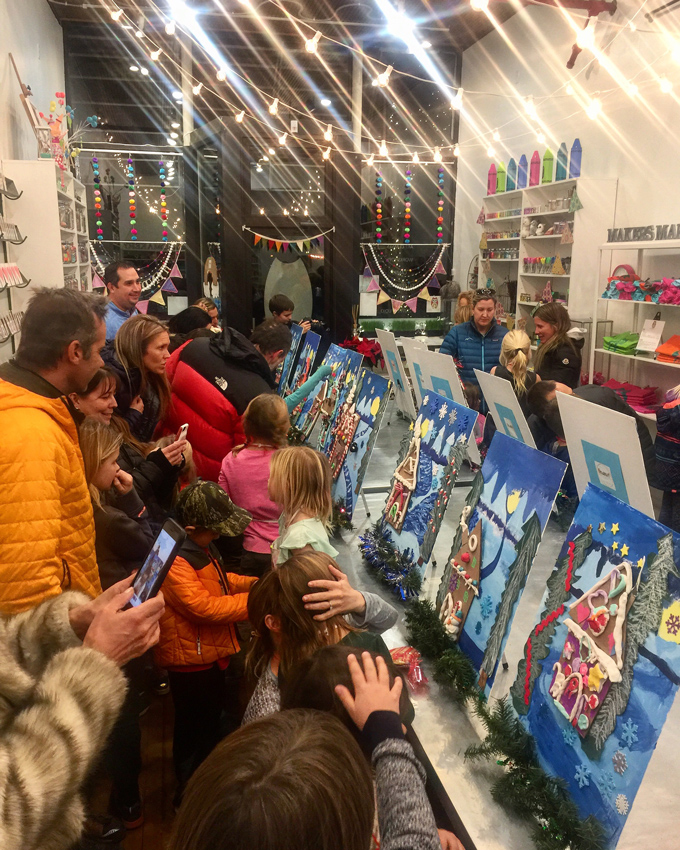
A peek inside the studio at a mini-exhibit + recognition ceremony for our Winter-IE Wonderland Workshop as family and friends gathered to celebrate Cardboard “Candy” Cottages atop a wintery landscape!
JOIN US IN THE STUDIO ~ FIRST FRIDAY, DECEMBER 7TH:
Happy Holidays! Tag us @handmakery with your creations on Instagram! Follow our blog for more inspiring process-based art projects! As always, thank you for following along on this artful adventure! Send us a note anytime! We’d love to hear what you’re thinking and dreaming! Much love and happiness creating in this creative + colorful world full of collaboration + connection + community!
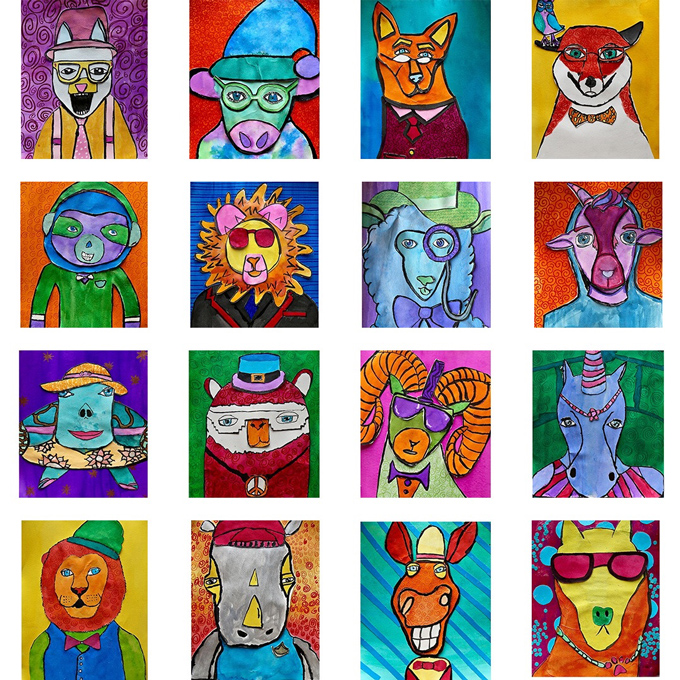
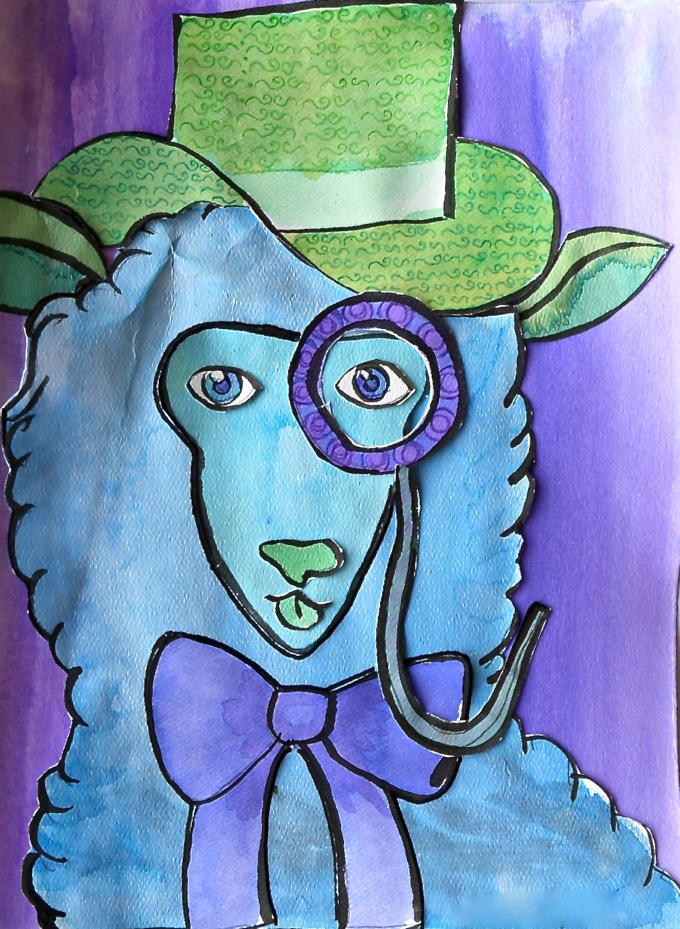
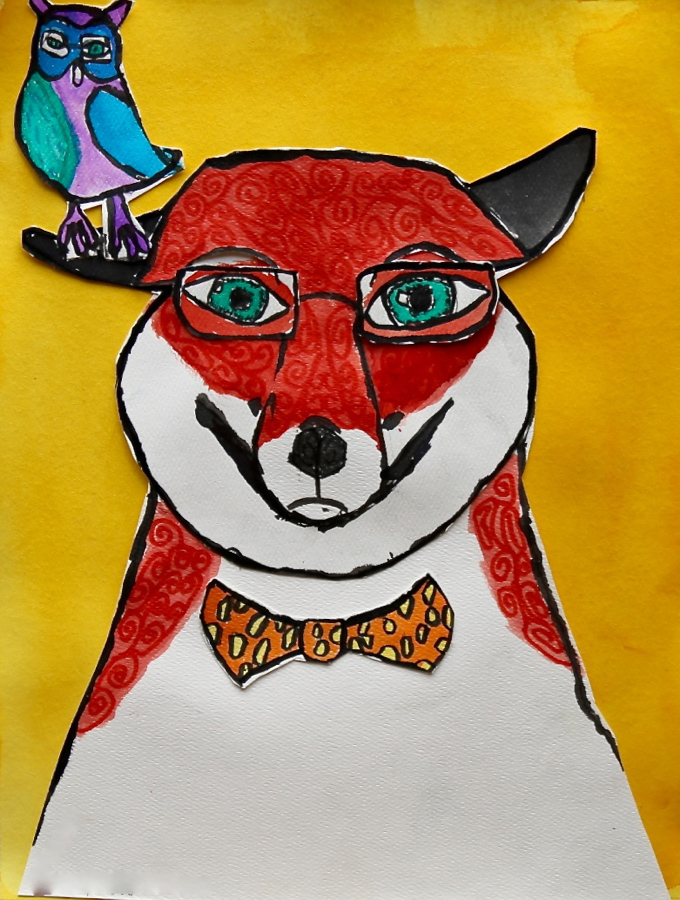
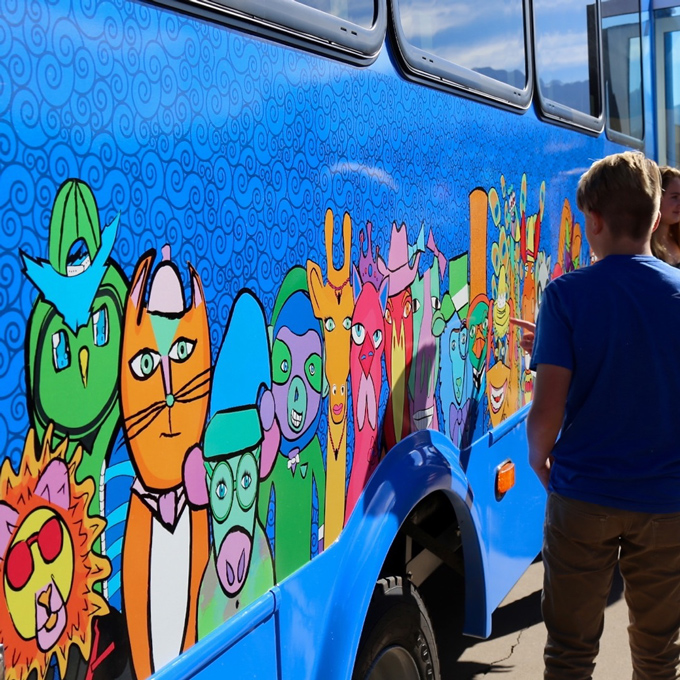
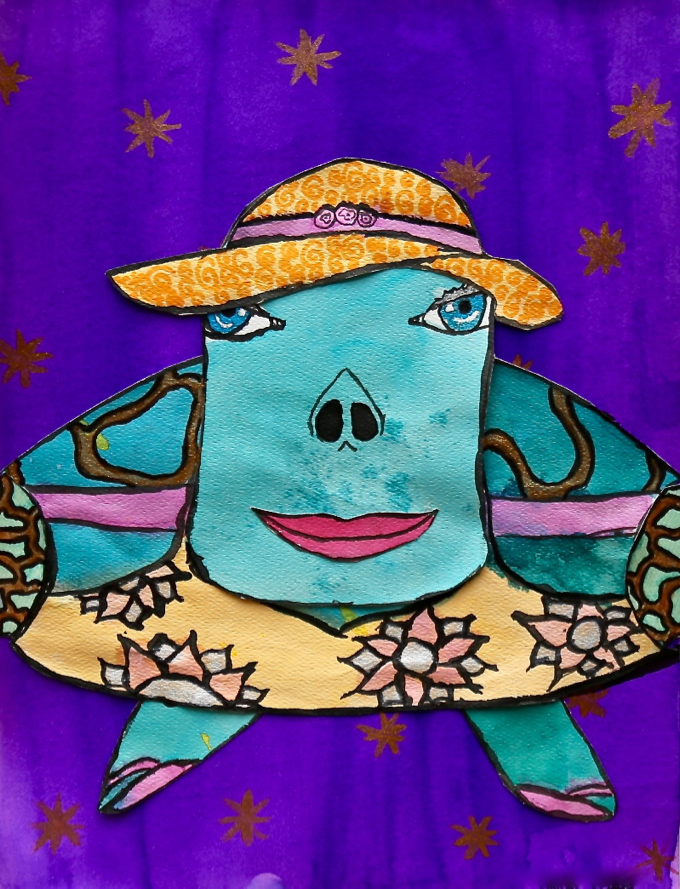
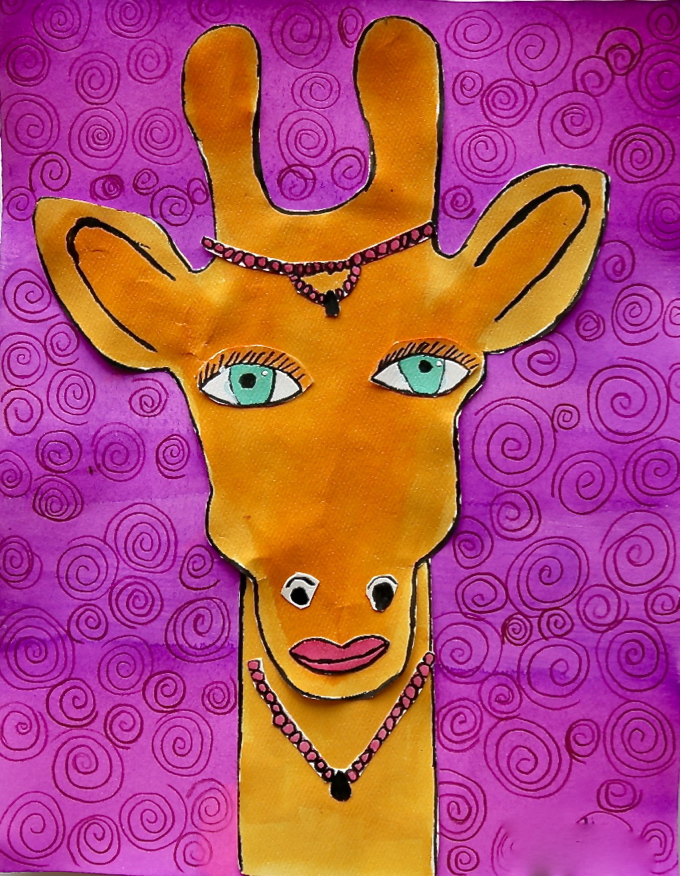
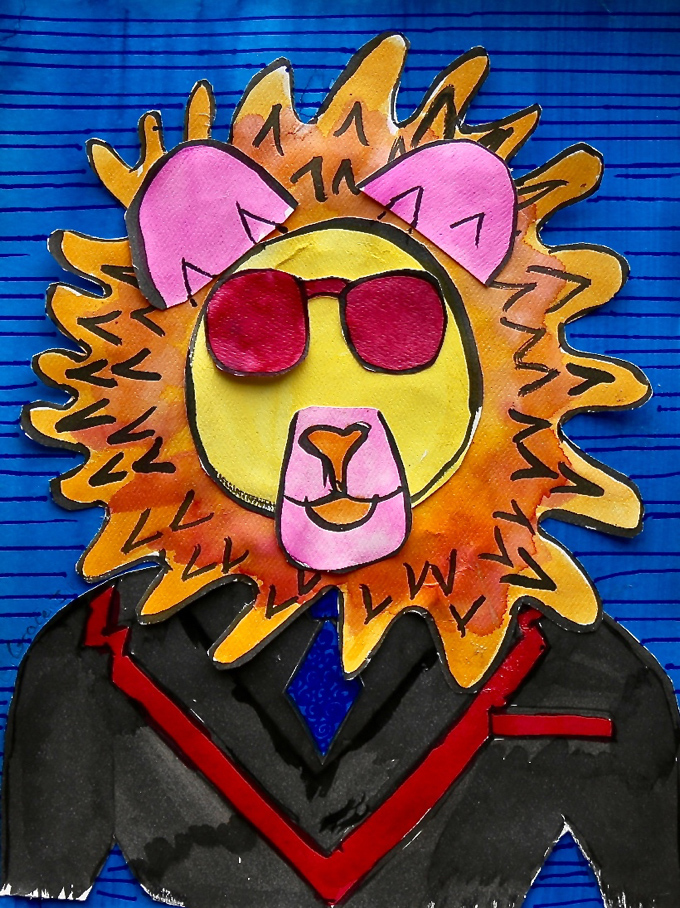
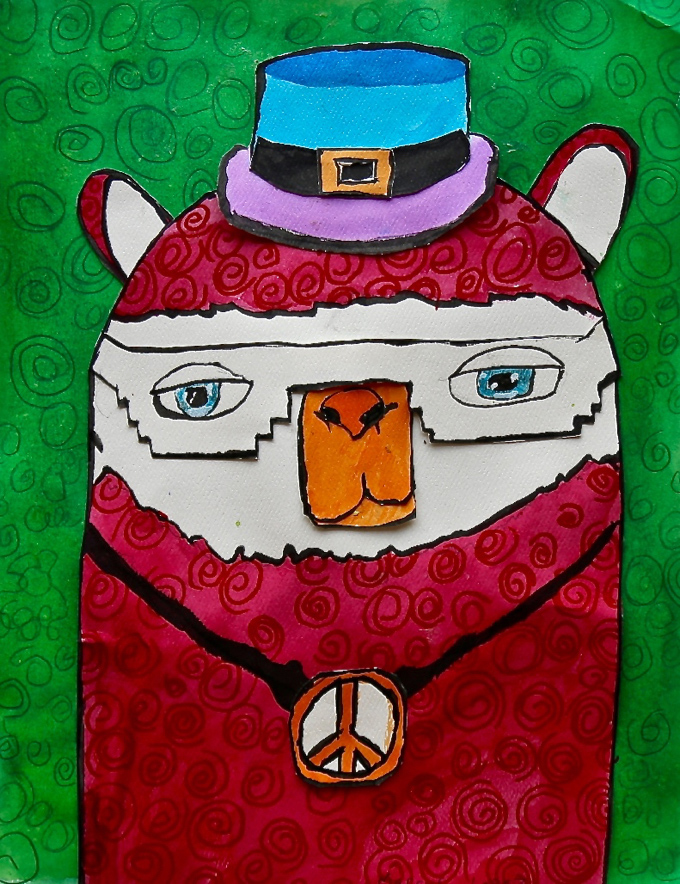
My fabulous art students created a project personally dreamed-up and designed called ~ Pet Portraits with Personality. With moving our studio to Main Street last summer, life got a little beyond busy so thank you for your patience with just getting this project out! With fall in the air and back to school really here, thought it would be the perfect time of year to share this fun favorite with you!
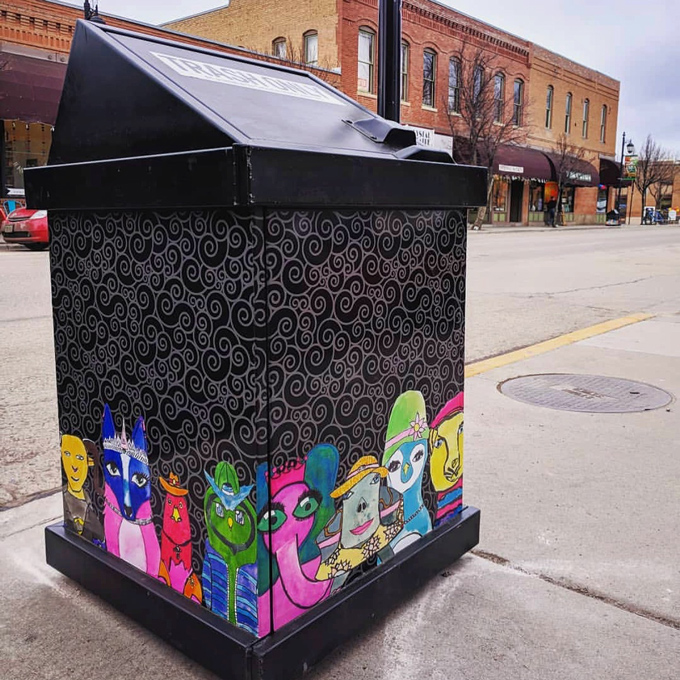
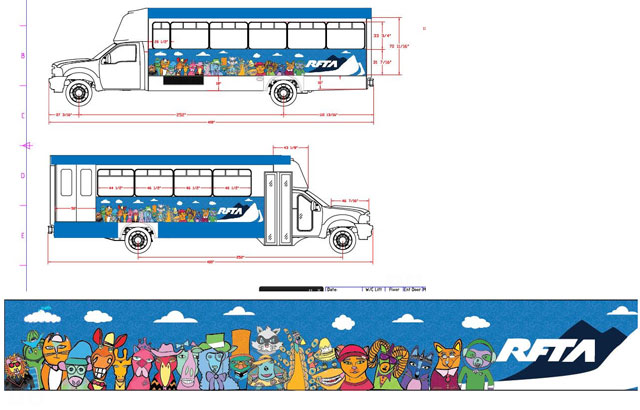
Pet Portraits with Personality was a huge project created with children ages 10 – 14! The artwork, 120 finished pieces, were then used for a local circulator bus (yes, a REAL BUS!!!) and a collection of 35+ community “bear-proof” cans. Both the bus and can projects were designed to bring more art to the heART of our historic downtown! So proud of each artist and their unique creation, contributed to both of these colorful community projects! So happy to see our community come together to support both kid-friendly + child-focused art projects! The artwork has brought a great deal of humor, color, and a whole lot of creativity to our community of Carbondale | Colorado at the heART of the Carbondale Creative District! Don’t you just love how childhood and creativity completely collide, to completely capture community and collaboration!?! Take a peek!
Read a fantastic article highlighting all the details about these upcycled Bear-Proof Cans wrapped with student artwork located throughout downtown! Would you believe there are over 35+ cans throughout our community!?! A huge thank you to the Town of Carbondale for taking on this project. This particular can is located right across from our studio at 449 Main Street! The day the install happened was just beyond exciting to watch out our windows!
SUPPLIES:
Pencil + eraser
Scissors
Gluestick
Realistic animal face photos for inspiration
Sketch paper + final paper + tracing paper + watercolor paper cut to size
India Ink
Watercolors including both liquid and traditional pallets
Watercolor brushes + water container
Lightbox or window
Colored pencils, permanent markers, acrylic paint, colored paper for additional details!
PROCESS:
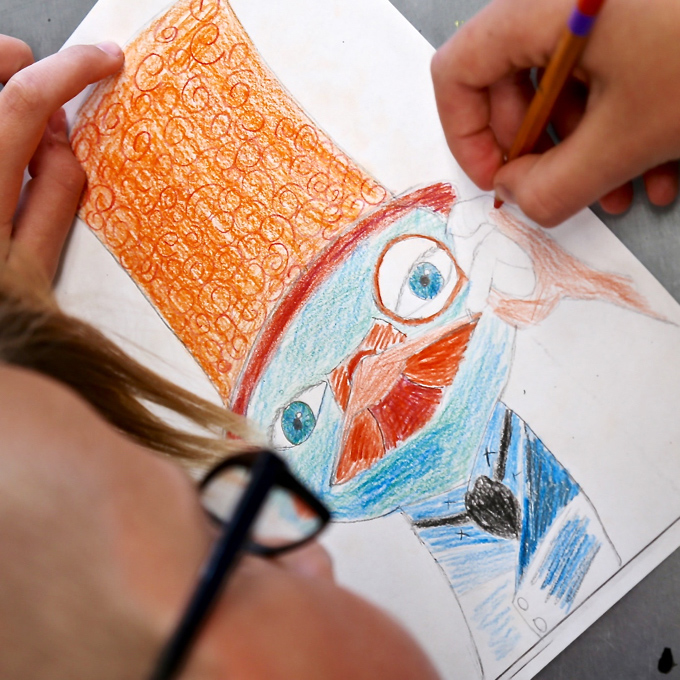
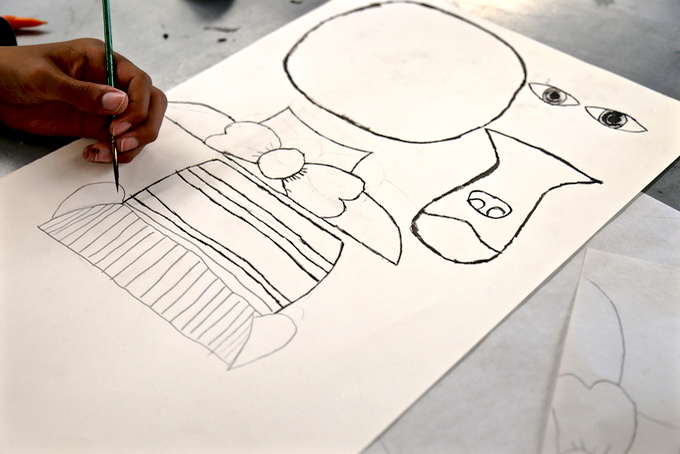
ONE Select a realistic animal and dream up your animal’s expressive personality. Create several mini sketches focusing on the face, head, and shoulders.
TWO Finalize your favorite sketch selection into a drawing, again with a focus on the face or upper body. Humanize your animal by adding human-like features, ex. eyes, mouths, shoulders, costuming and fun accessories, yet keeping a bit simplified, as individually drawn pieces will need to be drawn and cut out.
THREE Finalized your favorite animal drawing to a specific vertical paper size, fill the space by going big and focused in.
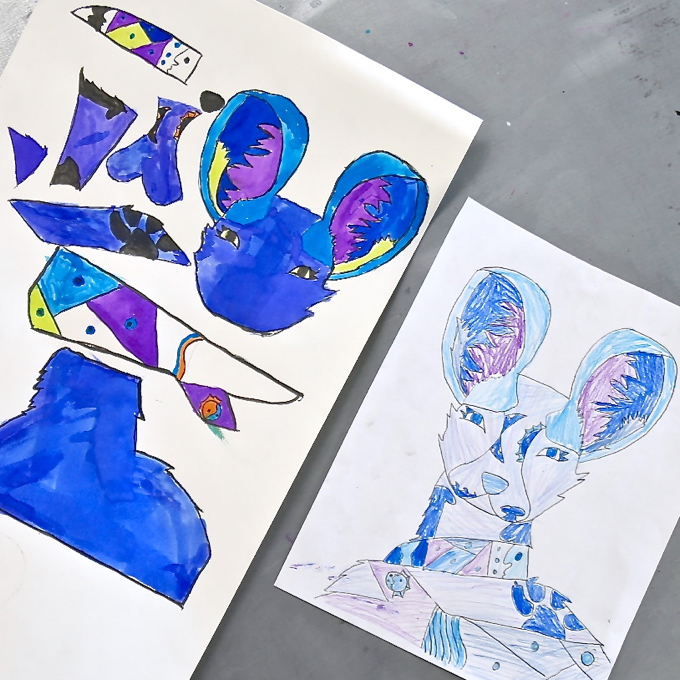
FOUR Trace each section of your drawing onto tracing paper at a window or lightbox. Separate out each layer. For example, the glasses would be a separate “drawn and cutout piece” from the face, to then overlay on top of the face. Start with the largest shapes first, such as the face, neck, and shoulders. It is very helpful to create bigger shapes to smaller shapes, working background to foreground.
FIVE Place the tracing paper shapes behind the final watercolor paper at the window or lightbox. Trace images onto heavy-weight watercolor paper in pencil. Again, all individual pieces that make up the complete animal, will be all drawn as separate pieces. The photos, above and below, should help with the visual understanding.
SIX Before cutting apart, use India Ink and a small brush to outline all the separate pieces. Remember to vary the line quality to keep your pieces more painterly so they capture both thick and thin for a more handcrafted flair. Dry.
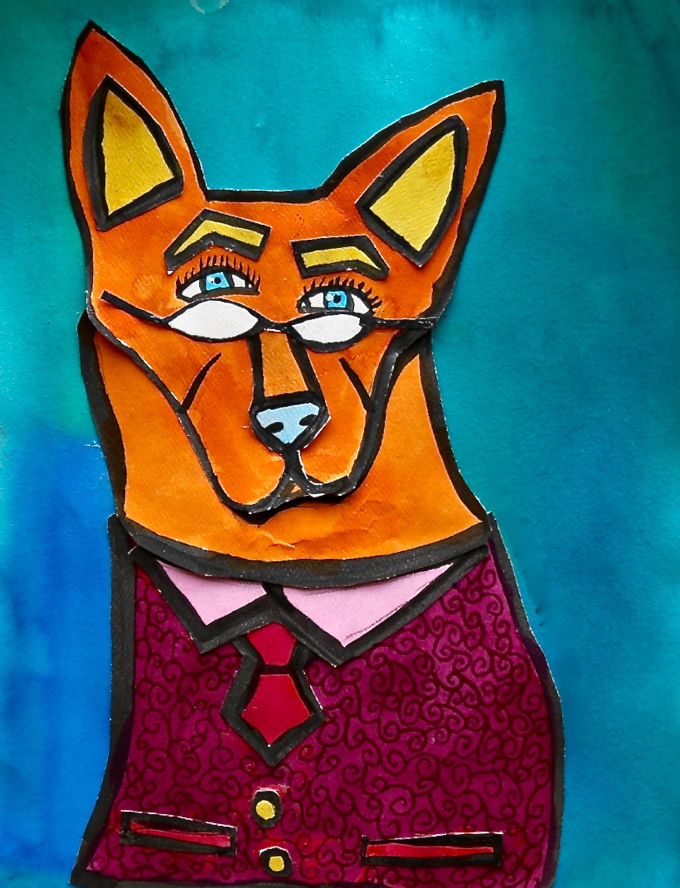
SEVEN Plan out a color scheme- complementary, analogous, warm or cool, intermediate, triad, or monochromatic for the overall piece. The color scheme should include the background.
EIGHT Using watercolors, which could be liquid or traditional pallets style, paint each piece remembering to dry between colors. Dry all pieces. Cut apart all individual pieces following the outer edge ink so the varied edge lines are preserved. Use a heavier weight watercolor paper to create a vibrant wash for the background. Dry.
NINE Assemble all the separate cutout/painted pieces using a heavy duty glue stick.
TEN Onto delightful details! Add highlights in eyes using white acrylic paint. Add swirls using colored pencil or permanent marker by using a similar color. Add texture and additional delightful detail. Use cut paper shapes, ex. stripes or polka dots to create a contrasting background to pop the creature! Most importantly, create a pet with personality and humor that comes to life with color, contrast, and human-like features!
… for making these two community projects, completely focused on kid art, come together for our community!
Tag us @handmakery with your creations on Instagram! Would love to see your ~ Pet Portraits with Personality! Follow our BLOG for more inspiring process-based art projects! As always, thank you for following along on this artful adventure in beautiful Carbondale | CO at 449 Main Street! Send us a note or contact us anytime at hello@handmakery.com! Much love and happiness creating! xo Ami
Happy New Year!!! Looking back, one of our most favorite workshops for children included ~ wee Wondrous Weavings on Wooden Looms! Oh my, the possibilities of textile design! These mini-masterpieces were created by 6 – 10-year-old artists! Our NEW ~ 2018 Winter Art Workshop Brochure is hot-of-the-press! Workshops start early January, yes this week and they’re filling up fast, just hop on over to our simple SIGN UP! If you’re looking for hands-on + mixed media + creative expression + an artful highlight to each week + a chance to meet new families and friends JOIN US + ENROLL TODAY! You can also connect with us on Instagram @handmakery to keep an eye on what we’re creating in the studio from special art events to birthday parties, and of course everything in between at our NEW art studio located at 449 Main Street in Carbondale | CO in the heart of the Carbondale Creative District!
Excited to share with you our original, Myself the Elf Christmas Countdown! A project dreamed up for our Modish Mini Makers art workshop ~ On Holiday: making + creating to give! A handmade treasure that can be used year-after-year for a traditional holiday countdown and also for teeny-tiny treasures! Love how they look so much like their mini makers! Take a peek!
This week I’m guest judging the KIDSCRAFTS101 WEEKLY CHALLENGE over on Instagram! Simply tag all your kid crafts, #kidscrafts101. Just follow @kidscrafts101, co-hosts @redtedart + @incredibusy, and guest judge @handmakery over on IG! Tag all your #kidscrafts101 throughout the week and I’ll feature a collage collection and highlight the makers on Sunday! Truly hope you’ll join us, such a fabulous way to celebrate creativity + craftiness + childhood + a colorful life + connection thru community! It’s absolutely a fantastic + fun-filled + fabulous adventure! If you haven’t yet joined Instagram, it’s incredibly easy! I’ve met so many wonderful people locally and throughout the world on this platform. Here’s a peek at a few inspiring IG feeds to follow to get you started!
SUPPLIES
3D countdown calendar with 25 mini drawers
Patterned papers
Clear packaging tape
Light chipboard and single ply cardboard
Pencil + Scissors + Ruler + Utility knife for adult use
Warm weather brings childhood memories of an ice cream truck sounding and strolling neighborhood streets. In our recent workshop ~ BEEP BEEP! SWEET TREATS, artists created ~ Ice Cream Truck Sculptures! Love that we still have a few days to celebrate and soak up summer! The workshop week was spectacular and our mini makers were beaming to exhibit their one-of-a-kind creations. Along with an ice cream truck, each artist also created a mini picnic table and handmade sweet treats for imaginative + interactive play! Turn it up and take a peek at our short + sweet clip to an ice cream truck melody, highlighting the wondrous week!
You may have seen our Collaged Ice Cream Cones created with children in our outdoor art studio for a recent downtown event. My friend Bar Rucci, over at Art Bar Blog was a huge inspiration in creating these paper sprinkled + cherry topped cones. Take a look at her fantastic process creating Paper Mache Ice Cream Sundaes and Cardboard Ice Cream Cones! Here’s a little secret, Barbara has a beyond inspiring book coming out this fall which I’ve had the opportunity to preview (cover to cover) and preorder ~ Art Workshop for Children: How to Foster Original Thinking with more than 25 Process Art Experiences. All I can say is reserve your copy today, it’s truly one of the BEST BOOKS for creating with children that’s ever hit the printing press. Personally promise it will be a studio go-to and gem that you’ll open again and again!
On a side note, Handmade Charlotte just shared the cutest + tiniest + tastiest treat, Gingerbread Ice Cream Trucks! Maybe you’ve also seen Hello Wonderful’s DIY Pretend Play Ice Cream Cones using plaster? Just a wee bit in love with both ideas!
Enrollment is currently underway and filling quickly for our 2016/17 School Year {mixed-media + hands-on} Art Workshops. Follow our artful adventure on Instagram and Facebook, would absolutely love to connect, collaborate, and create community through children + creativity!
Happy Summertime! Hope you’re enjoying some much deserved outdoor time with family and friends venturing in the GREAT outdoors! We’re definitely soaking up and savoring summer and heading into the mountains for camping getaways! Excited to share with you these outdoor + camping + canvas + landscape paintings created in our recent children’s workshop, SPRING IS IN THE AiRTIST! This mixed-media painting was inspired by one of our favorite wanderlust painters, Katie Daisy and her beautiful piece, Let’s Sleep Under the Stars! Take a peek at Katie’s inspiring paintings and our painting process with children! Thank you @katiedaisy for your painterly inspiration, adore your style, whimsical spirit, and passion for the outdoors!
Excited to share with you~ SPRINGTIME OWLETS, recently handcrafted in our 6-10-year-old workshop: STITCH + SEW! Over on our Instagram, we’ll be sharing with Red Ted Art’s @Kidscraft101, as they’re featuring #fabriccrafts for their weekly theme! Anyone can enter, simply tag your weekly themed photo #kidscrafts101 over on Instagram. Then the dream team trio- @redtedart + @babbledabbledo + @incredibusy, along with a special surprise guest, will then judge and announce the winners! This project was definitely a fabric favorite, as each artist designed, constructed, and hand stitched one-of-a-kind soft sculptures. Take a peek at our creature collection of springtime owlets that just hatched in our studio!