Basalt Colorado
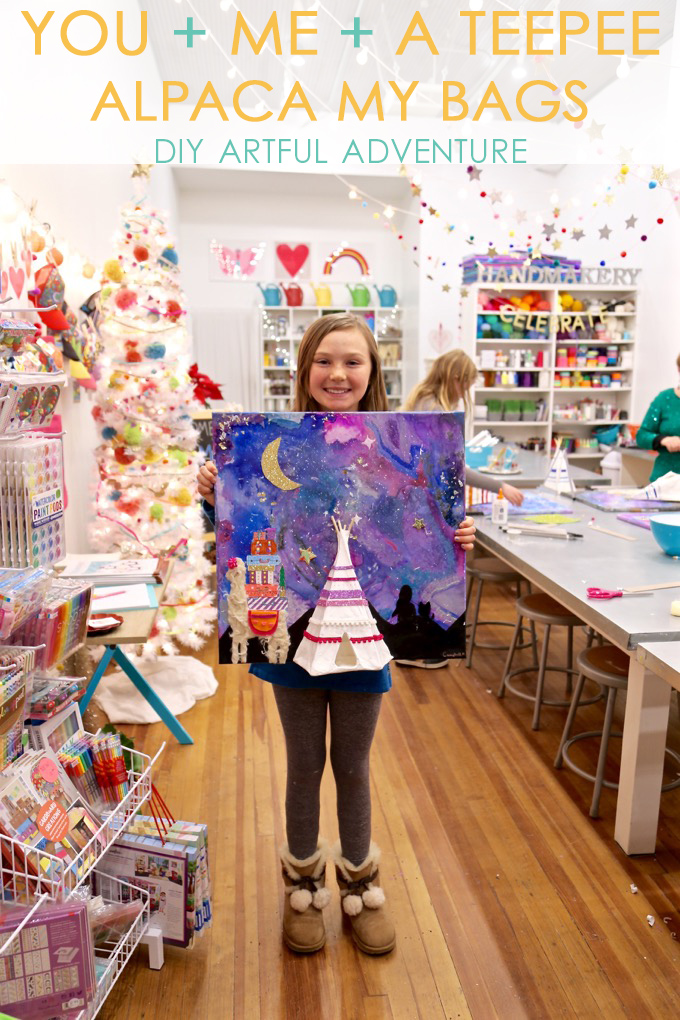
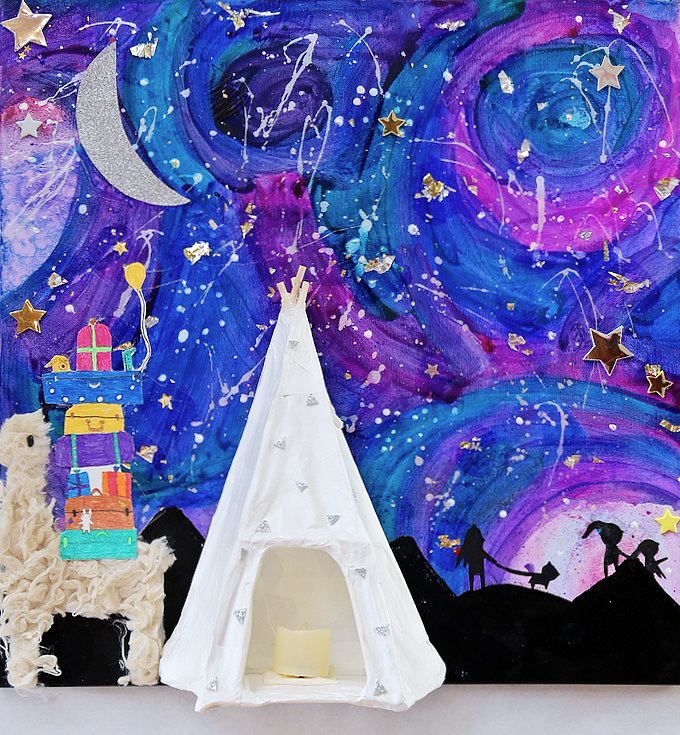
HAPPY NEW YEAR! We’re onto 2019, hip hip hurray! Excited to share with you our latest workshop ~ You + Me + a Teepee ~ Alpaca My Bags ~ DIY Artful Adventure a project dreamed up in the studio and created with children, ages 5 – 13, over an 8-week session! The best part of this project you ask? It’s multi-layered, dimensional, full of exploration + experience, completely artful + action-packed, personalized, and even A-G-L-O-W to light up a stargazing night! Take a peek!

NEW ART WORKSHOPS BEGIN JANUARY 8TH!
JUMP IN AS WORKSHOPS ARE QUICKLY FILLING!
SIMPLY ENROLL: WORKSHOPS + CLASSES + CAMPS
Early online enrollment is highly encouraged as seating is limited! Start a new year making + creating + connecting in a colorful community focused on a creative + collaborative childhood!
STAY CONNECTED @handmakery ON INSTAGRAM!
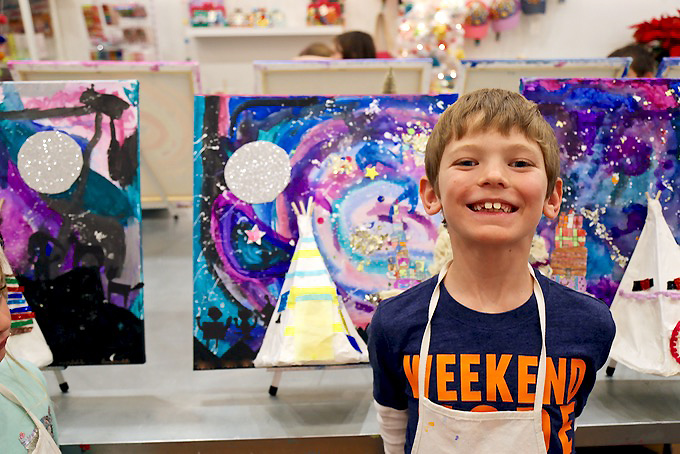
A proud + confident artist feeling aglow and over the moon with a stargazing smile!

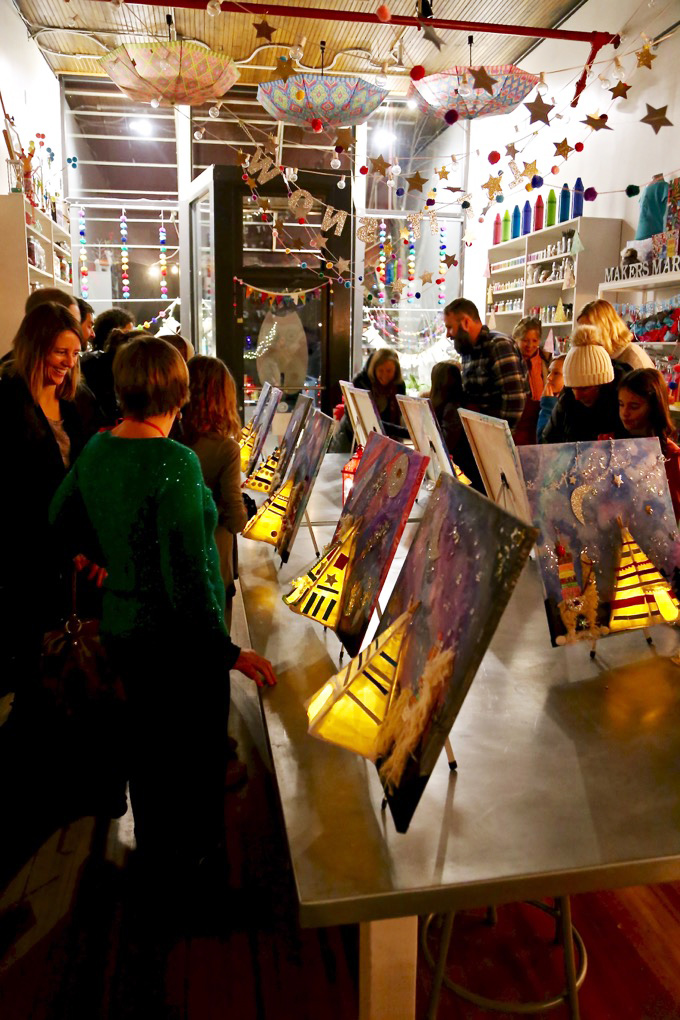
Mini-exhibits were truly aglow. It was our first show with gallery mood lighting, definitely the best ambiance of the year! Artists were anxious and animated to show off their colorful creations to family and friends.
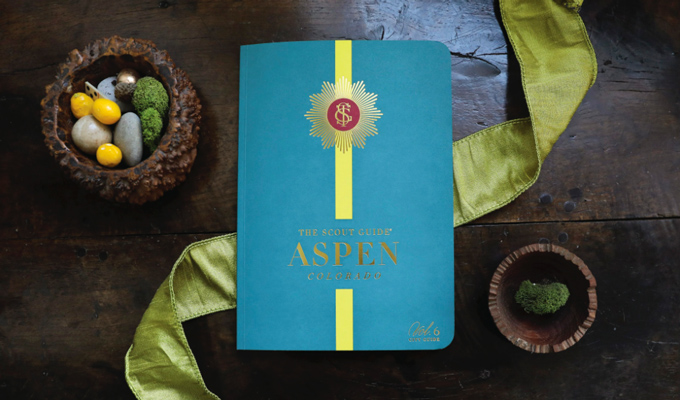
On a little side note: Be sure to find us all around the Roaring Fork Valley in The Scout Guide Aspen, Volume 6! A beautiful + NEW publication just launched! THANK YOU for featuring HANDMAKERY in ~ Ones To Watch Aspen, via Amy Groom & Erin Jones | Owners/Editors of The Scout Guide Aspen! Pick up your very own copy of this beautiful guide in our art studio, around the Roaring Fork Valley, or even read online!
SUPPLIES FOR ~ You + Me + a Teepee Alpaca My Bags DIY Artful Adventure:
- Pencil + eraser
- Canvas- stretched/framed
- Watercolor pallet
- Liquid watercolors + brush + sponge + water container
- Salt
- Tempera paint + brush + pallet
- India ink
- Glitter + metallic confetti flakes, metallic circles & stars + metallic sticker stars + snowflakes
- White school glue
- Gluestick
- Modge Podge
- 1″ utility paint brush
- Black construction paper
- Scissors
- Wooden skewers and tiny wooden dowels
- Masking tape
- Papier-mâché + white light-weight paper + plastic cloth
- Tealight candle (battery/non-flame)
- Heavy-weight watercolor paper
- Fine-point permanent marker
- Gel pens- shimmer, metallic, brights
- Faux alpaca fur
- Googly eye
- Peel + stick glitter foam sheets
- Hot glue (adult use)
- Embellishments- pom-poms, pom-pom ribbon, felt, tissue circle confetti, and more!
PROCESS FOR ~ You + Me + a Teepee Alpaca My Bags DIY Artful Adventure:

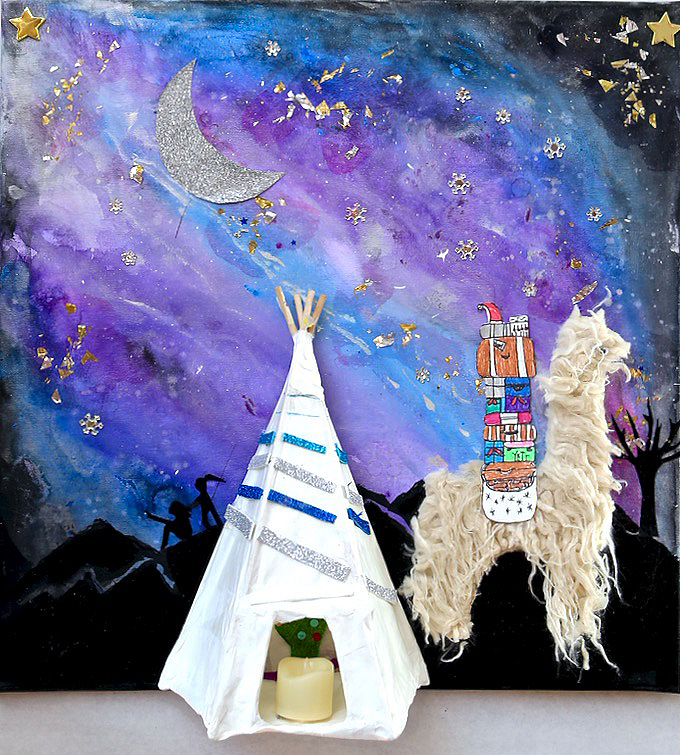
ONE Begin with a galaxy sky on a stretched framed canvas. Focus on using cool colors to stain the bright white canvas. Work light to dark. Experiment with staining, dripping, splattering, movement, and layering techniques using a paintbrush, a watercolor pallet, liquid watercolors, and even build up to adding a tempera paint layer. Use salt for additional experimentation and effects. Dry. Relayer to go darker. Eventually, even incorporate some black. Dry. Splatter using metallic liquid watercolor and dip a tiny wooden stick with white tempera to stamp for distant stars in the galaxy sky.

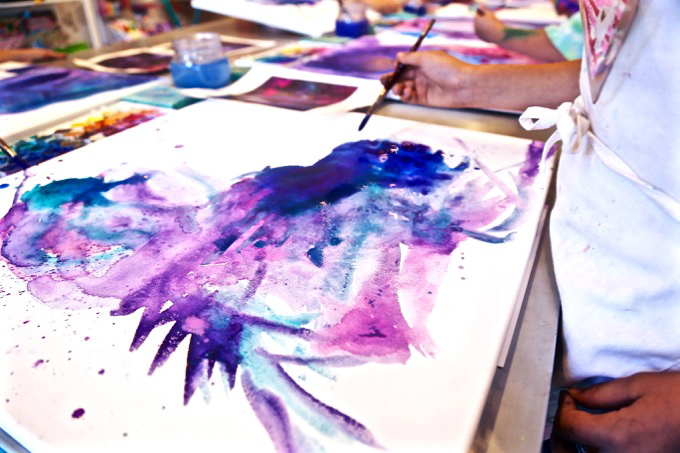

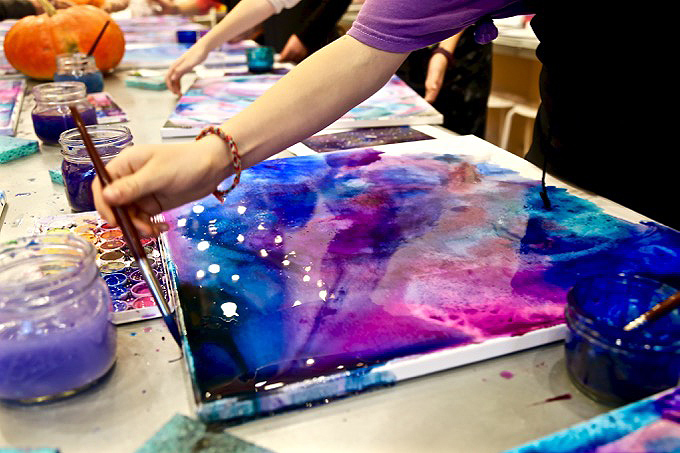
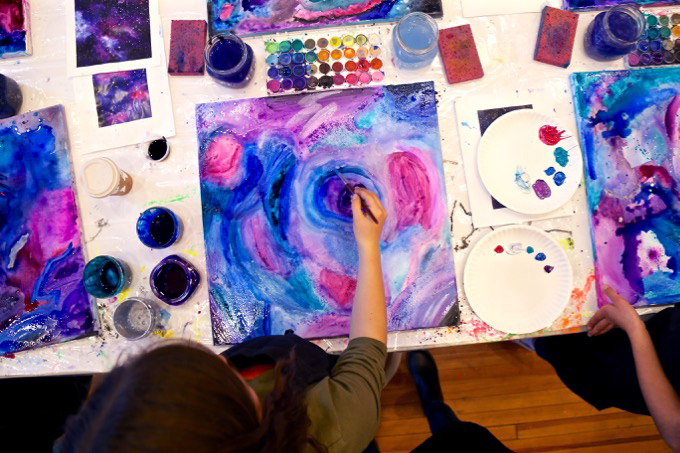
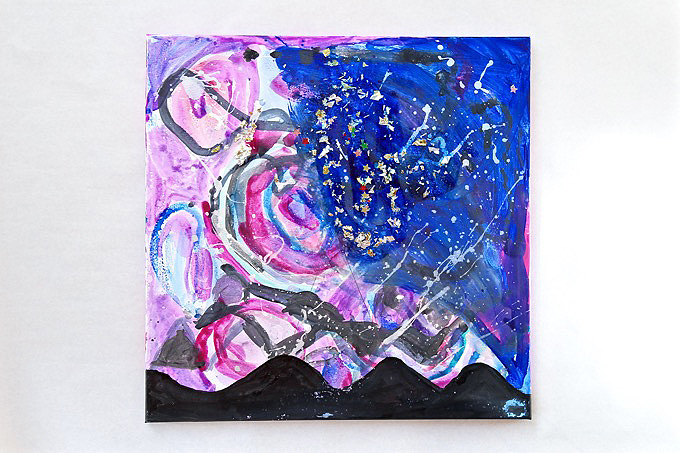
TWO Fully dry canvas. Draw mountains using a pencil in the lower half. Paint in mountains using India ink. Dry. Embellish sky with glitter, metallic confetti flakes, metallic circles and stars, metallic sticker stars, and even tiny snowflakes. Attach using gluestick and/or white school glue. Use matt Modge Podge to lightly seal embellishments with a 1″ utility brush.
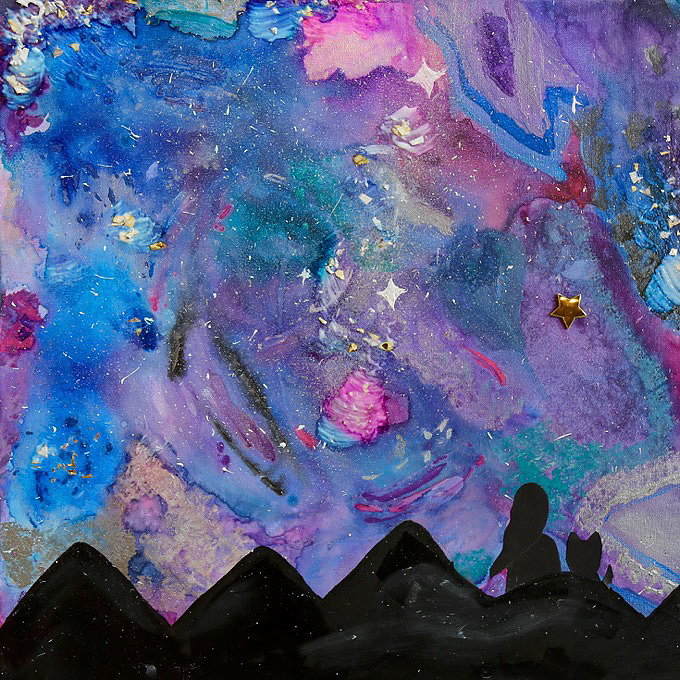
THREE Draw and cut a small + simple paper silhouette which will become the “you + me” of this piece. The silhouettes may include people, animals, trees, or even the combination. Attach silhouette and seal with Modge Podge.

FOUR Use wooden skewers to form a simple teepee frame with a flat back. Assemble using masking tape and partners.
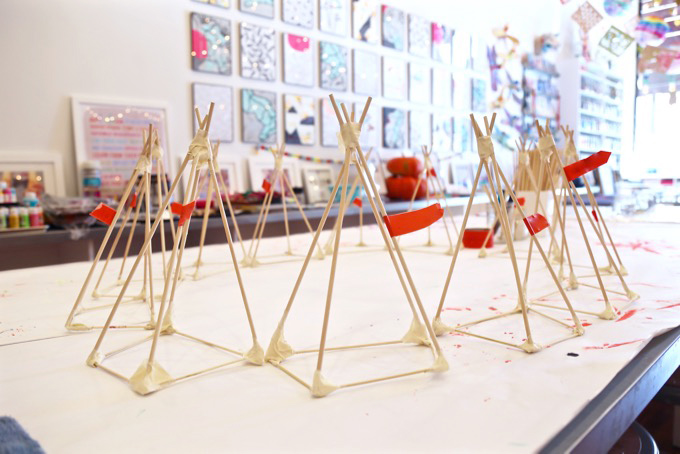
A peek at teepee armatures ready for a doorway and then a single layer of papier-mâché.
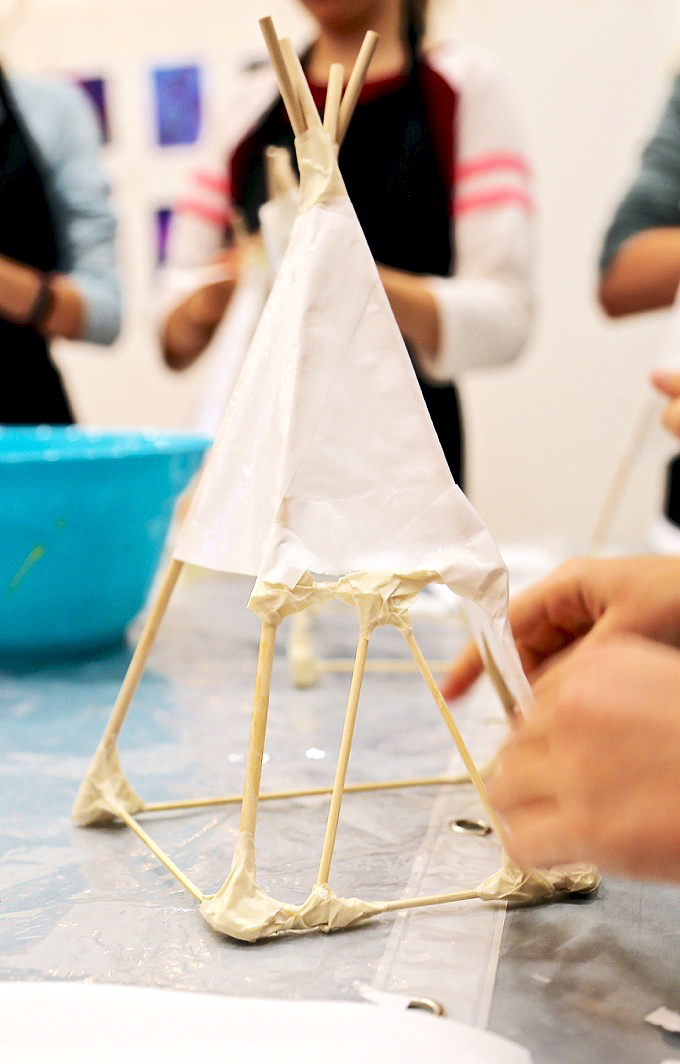
FIVE Move onto adding a doorway that is front-facing with a horizontal crossbar and two lower sticks running verticle made out of tiny wooden dowels. The doorway is a great addition to personalize the teepee but be sure it’s large enough for a battery tealight candle to be placed inside. Doorways can be triangular, square, or even arched!
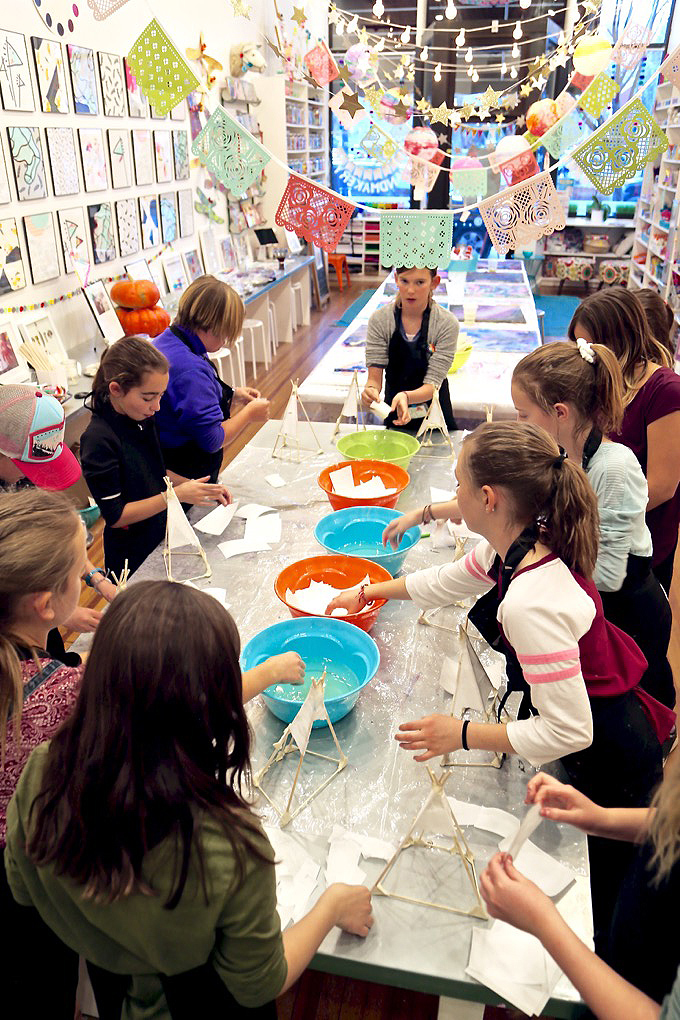
SIX Papier-mâché the teepee armature using light-weight paper similar to copy or butcher paper, so the finished teepee will glow when the tealight candle is inside.
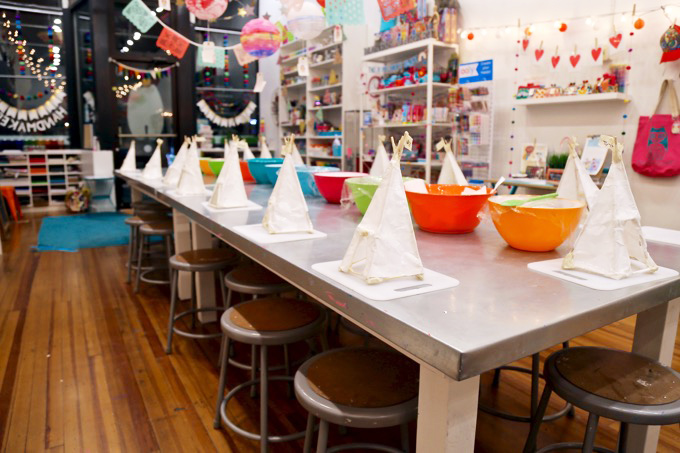
Dry teepee overnight.
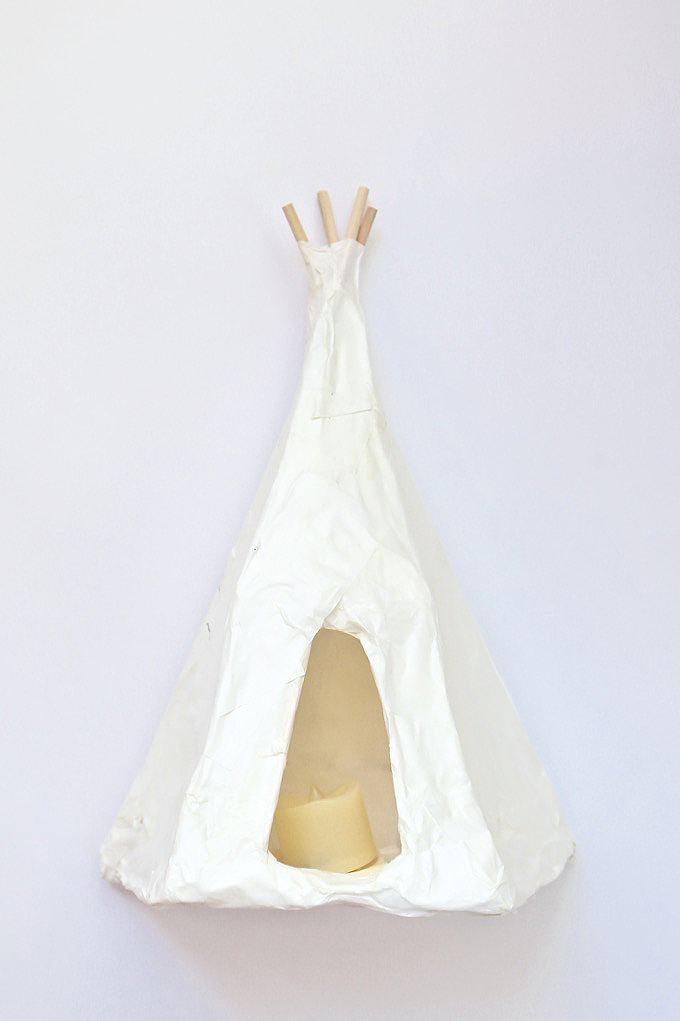
A completed teepee just before being embellished. Add a tealight candle for a lovely nighttime glow.
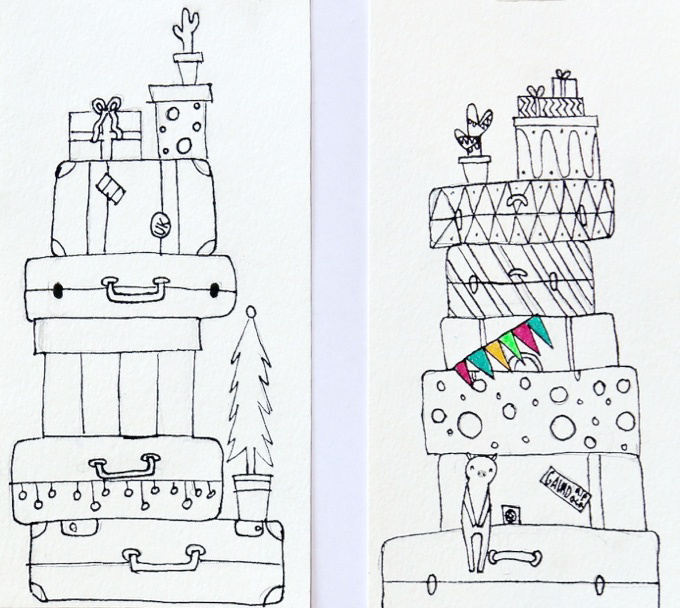
SEVEN Sketch out bags for travel on watercolor paper. Did you get the workshop title? Alpaca my bags… I’ll pack my bags! Gear for travel may include suitcases, stuffies, plants, firewood, gifts, coolers, and more! Once sketched, outline with a fine point permanent marker and color using sparkle gel pens. Carefully cut out.

EIGHT The much-loved alpaca is smaller than a llama. Simply sketch and cut an alpaca from faux alpaca fur. The alpaca is best drawn from a side-view and embellished with a bag using fabric felt, pom-poms, and any other exciting decor. The fabric alpaca can be attached to the canvas using white school glue or hot glue.

If you like alpacas, you’ll also love our DIY Llamas in Pajamas!
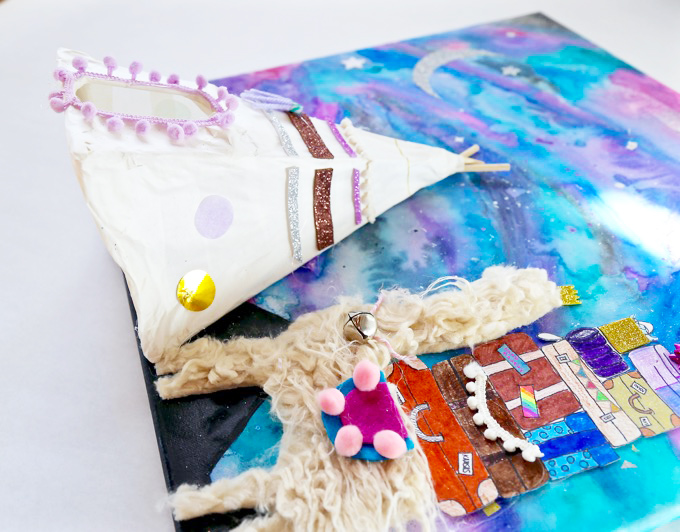
NINE Attach the teepee to the canvas using hot glue or Gorilla Glue (adult use). Dry. Artists can then embellish their attached teepees using glitter sticky foam pieces, pom-poms, pom-pom ribbon, large tissue paper confetti circles, felt, yarn tassels, and more! Repeat a design around the three sides of the teepee sculpture to create a little radial symmetry.
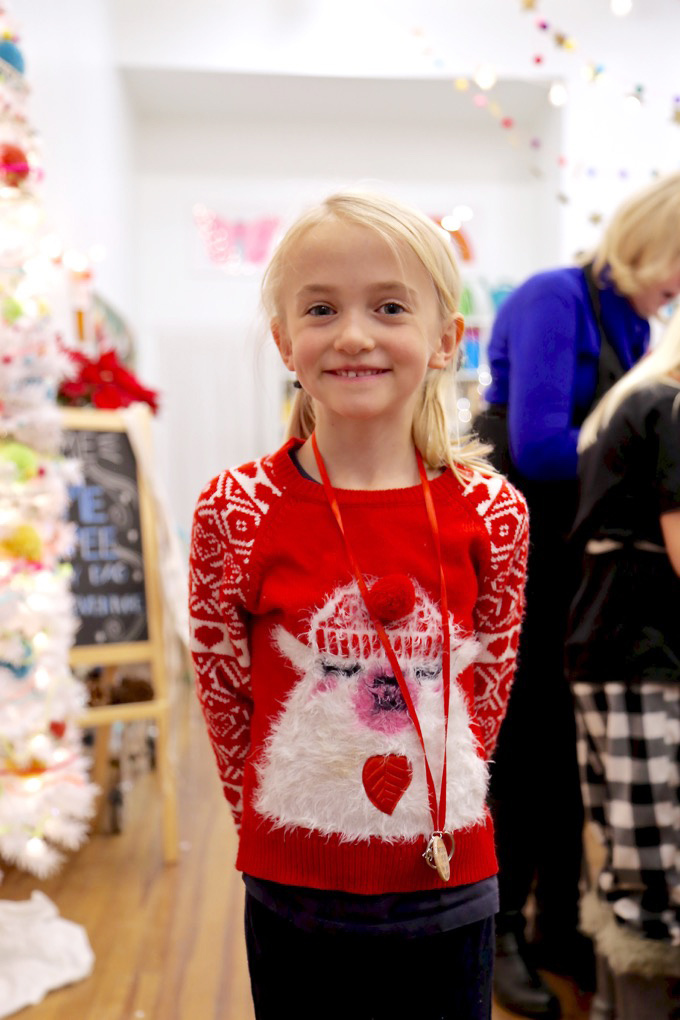
An alpaca artist at our mini-exhibit! Love at “furry” sight!

“Oh là là”… the nighttime glow just before the mini-exhibit + recognition ceremony. All lights were on deck.
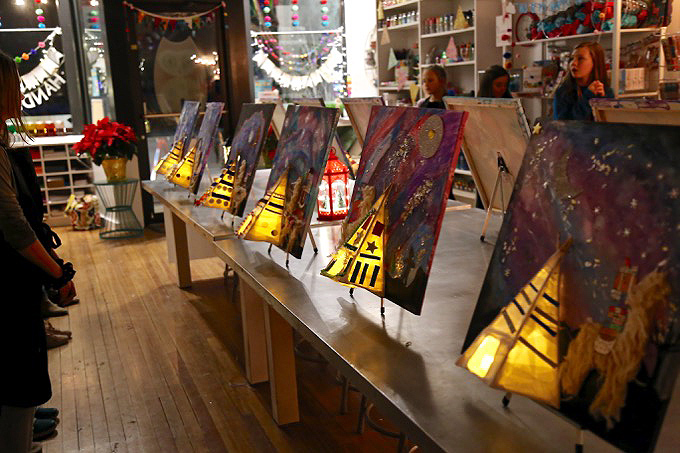
Probably one of our favorite exhibits with an amber glow and all-round ambiance into the night.
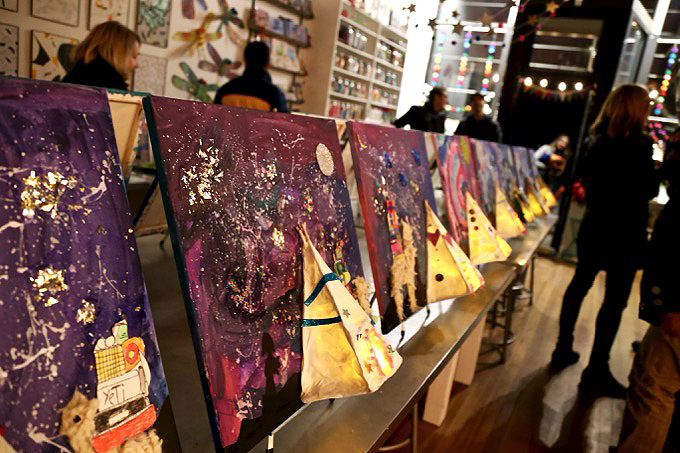
Galaxy skies aglow…

… a night to celebrate and remember!
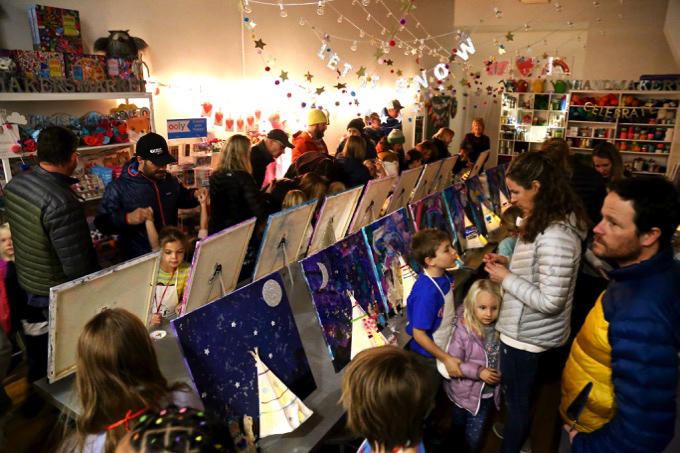
THANK YOU to everyone for joining us in the studio for an artful evening to celebrate!
Are you yet following @handmakery on Instagram?
Tag us @handmakery with your creations on Instagram! Follow our blog for more inspiring process-based art projects! As always, thank you for following this artful adventure! Send us a note anytime! We’d love to hear what you’re thinking and dreaming! Much love and happiness creating in this creative + colorful world full of collaboration + connection + community + arts & crafting! Happy New Year!
xo Ami

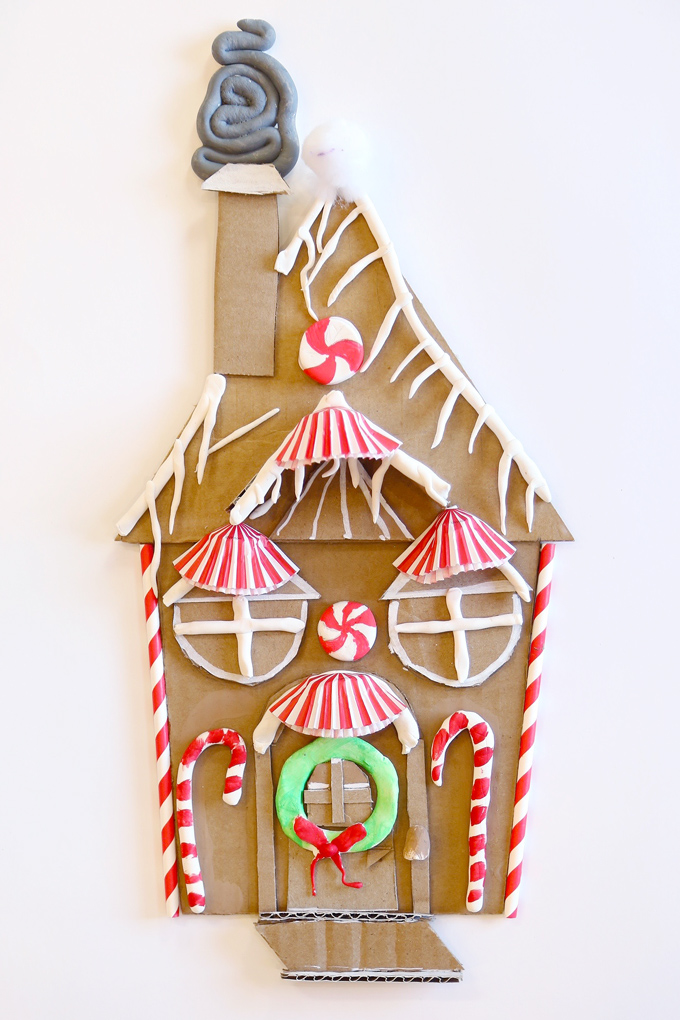
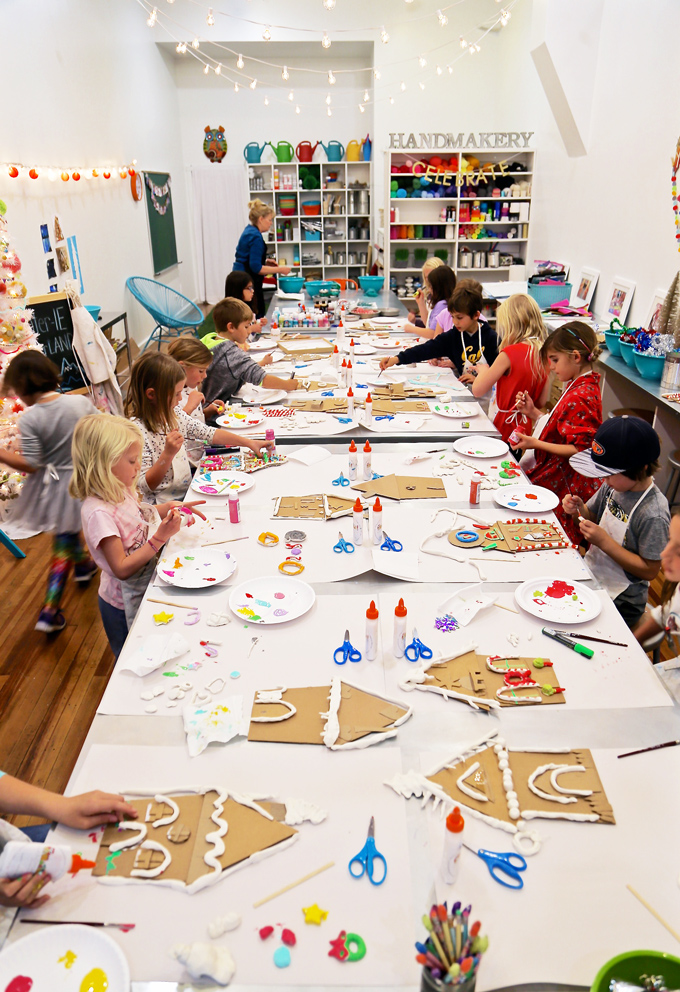
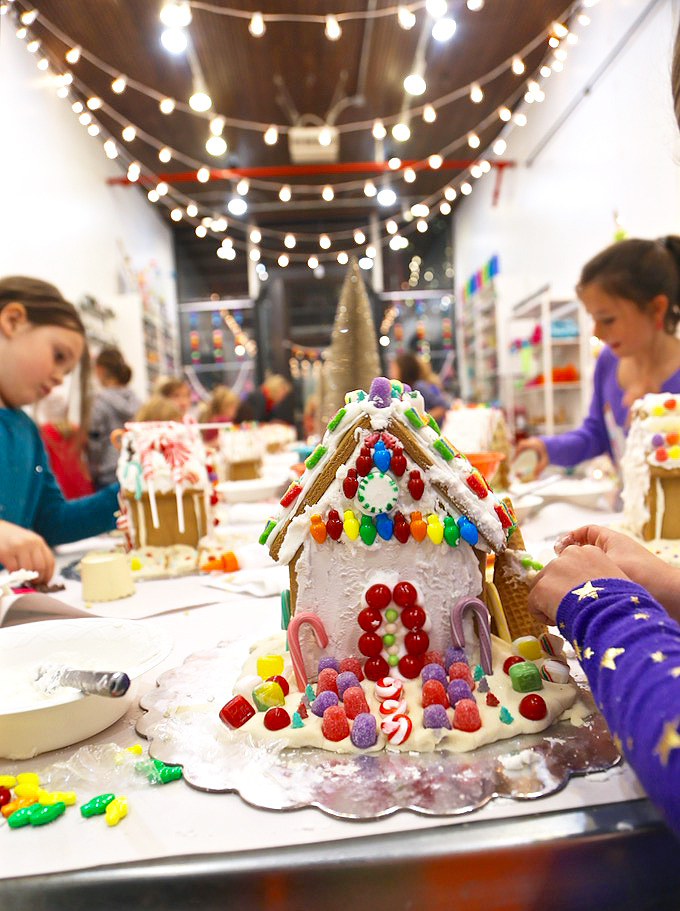
Happy December + Happy Holidays! Save yourself long hours in the kitchen spent mixing, rolling, cutting and baking gingerbread dough – use cardboard instead for a ~ DIY CARDBOARD “CANDY” COTTAGE!
This fantastic upcycled material is abundant and easy to use. Plus, you can avoid a sugar melt-down by skipping the temptation (and expense) of supplying bags of candy, sprinkles and royal icing – and sculpt your own candy cane columns and gumdrop windows using modeling dough.
This open-ended, creative process is fun for ages 5-12 (or, say, age 35+, if Mama is so inclined). These cottages can be used as holiday ornaments, wall hangings, or added as a 3D element to a canvas painting, as shown here. You can even make a village; a timeless, long-lasting heirloom, completely made by – hand from the heART!
Traditionalists who want a classic edible gingerbread house (complete with candies galore) can skip the inevitable sticky cleanup at home, and instead, deliver their children to December’s FIRST FRIDAY ~ CANDY COTTAGE WORKSHOP at HANDMAKERY, where crumble-proof walls and every sweet adornment will be provided.
See the full CARDBOARD “CANDY” COTTAGE article in Winter Edition | Issue 10 of the MOUNTAIN PARENT magazine offered FREE throughout the Roaring Fork Valley in print (oh SO beautiful) and/or online throughout the world!
SUPPLIES FOR CARDBOARD “CANDY” COTTAGE:
- Printable download
- Pencil + eraser
- Cardboard
- Scissors
- White school glue
- Hot glue (adult use)
- Clear wrap
- Masking tape
- Modeling dough: Crayola Model Magic (white)
- Tempera paint + brush
- Glitter (fine white)
- Chalk markers (optional)
- Embellishments- white pom-poms, red & white paper straws, striped cupcake papers, wire stars, & white string.
PROCESS FOR CARDBOARD “CANDY” COTTAGE:
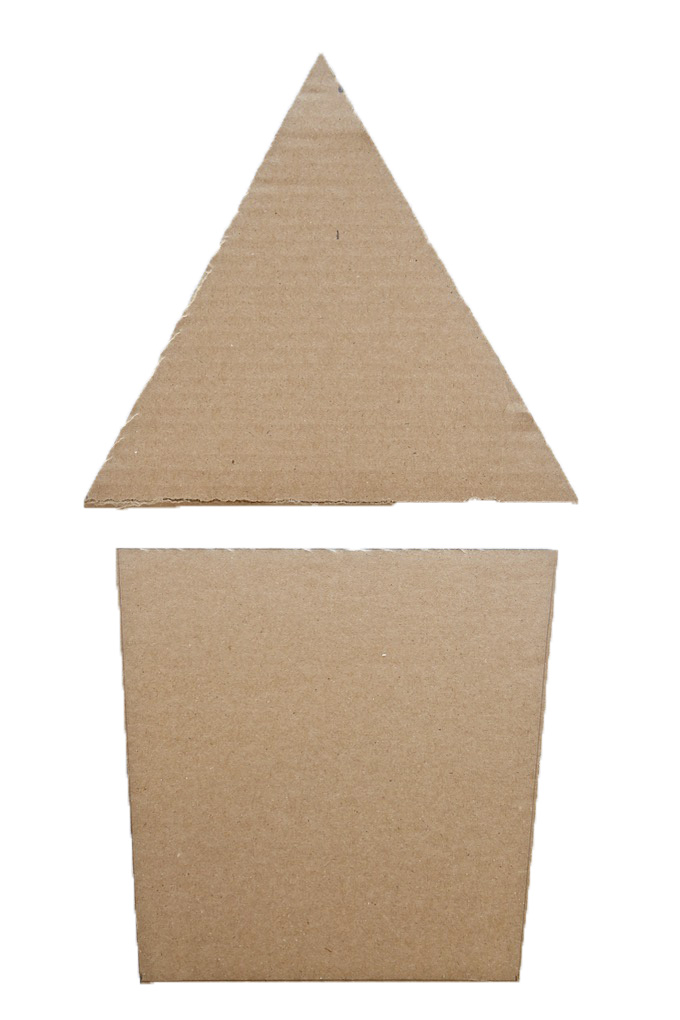
ONE Download a FREE printable template on handmakery.com/blog. Prepare a cardboard cottage cut-out ahead of time by cutting out two shapes: one will be the cottage, the other will be the roof. Using white glue, attach the cardboard cottage to the cardboard roof by overlapping just a bit and gluing in place. Dry.
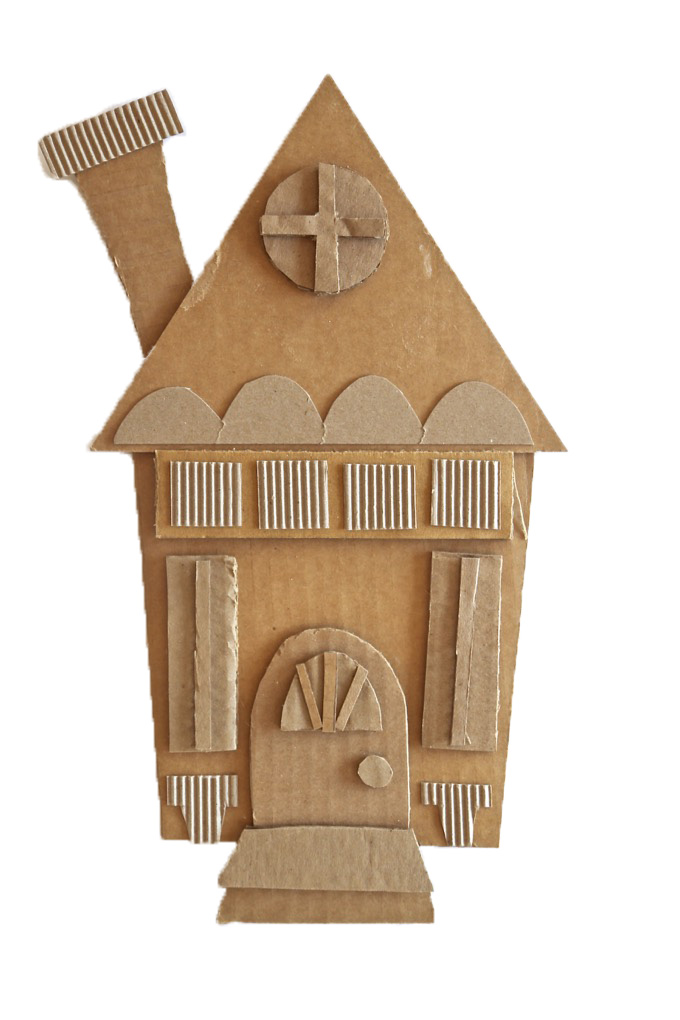
TWO Have a mixture of smaller pieces of cardboard scraps available that can be cut and used for pop out details. Lighter weight cardboard is ideal as it’s easier to cut. Corrugated cardboard adds a wonderful texture and is also easy to cut. Architectural pieces can be drawn and cut to create doors, windows, porches, fences, shed roofs, steps, a chimney, and more. Draw, cut, arrange, and glue down detail pieces using white glue. Dry. Cottages will become one-of-a-kind mini-relief sculptures!
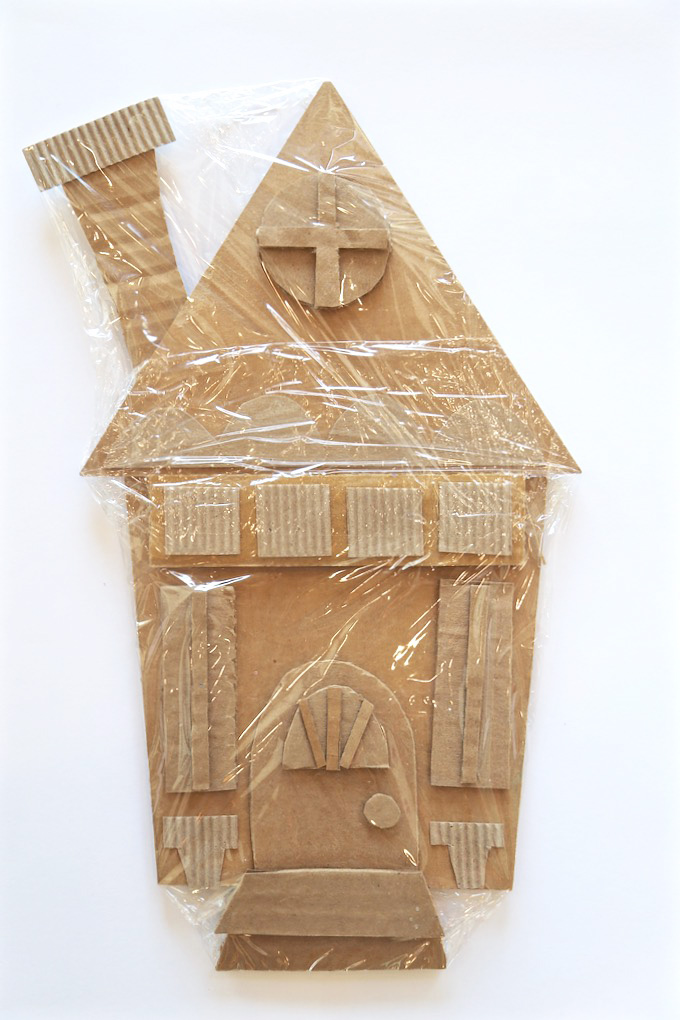
THREE Cover completed cardboard cottage with clear wrap and use masking tape on the back of the cottage to temporarily secure. This protected surface will allow modeling dough pieces to be placed on the house to dry without attaching to the cardboard cottage and will keep the cardboard protected from paint.


FOUR Keep cottage covered with clear wrap. Move into making accents using Crayola Model Magic which is a fantastic product for use, flexibility, and simple drying. Start by rolling coils to imply snow and icicles. These pieces will take on the look of white icing. These snowy details can run along the edges of the roof, cottage, above the door + windows, and atop the chimney. Use modeling dough to also make candies such as gumdrops, mints, candy canes, and other savory + sugary treats. Wreaths, snowballs, and snow piles can also be fun additions. Allow pieces to air dry in place, on top of the clear wrapped house.
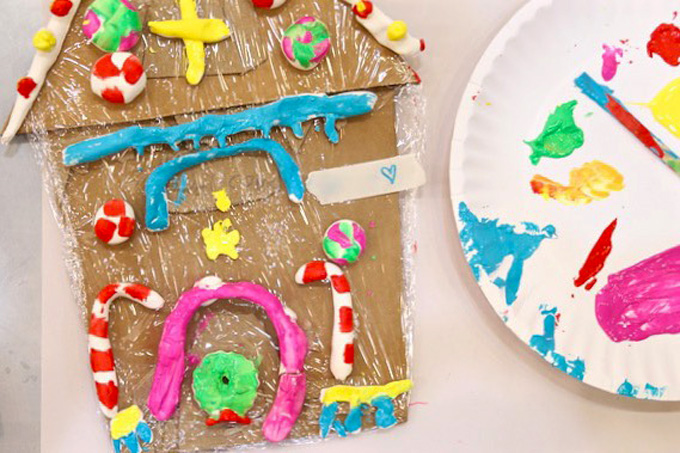
FIVE Paint dry modeling dough candies using paint and a small brush. Allow painted pieces to dry on top of the clear wrapped cottage. Pieces that are to remain white are beautifully painted with white glue and sprinkled with fine white glitter for added sparkle. Dry.
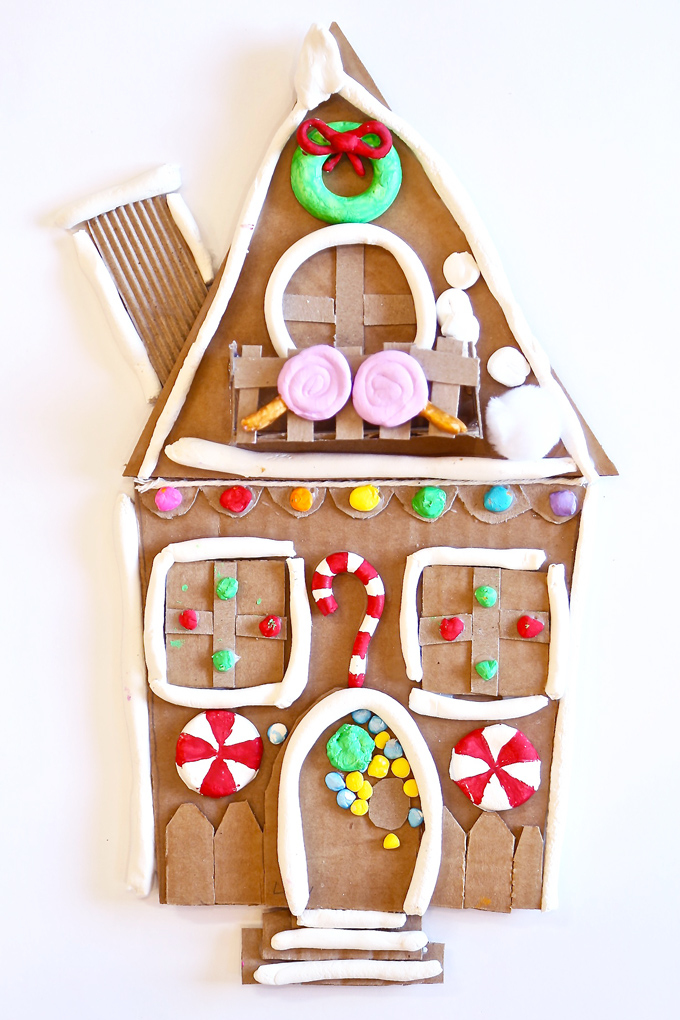
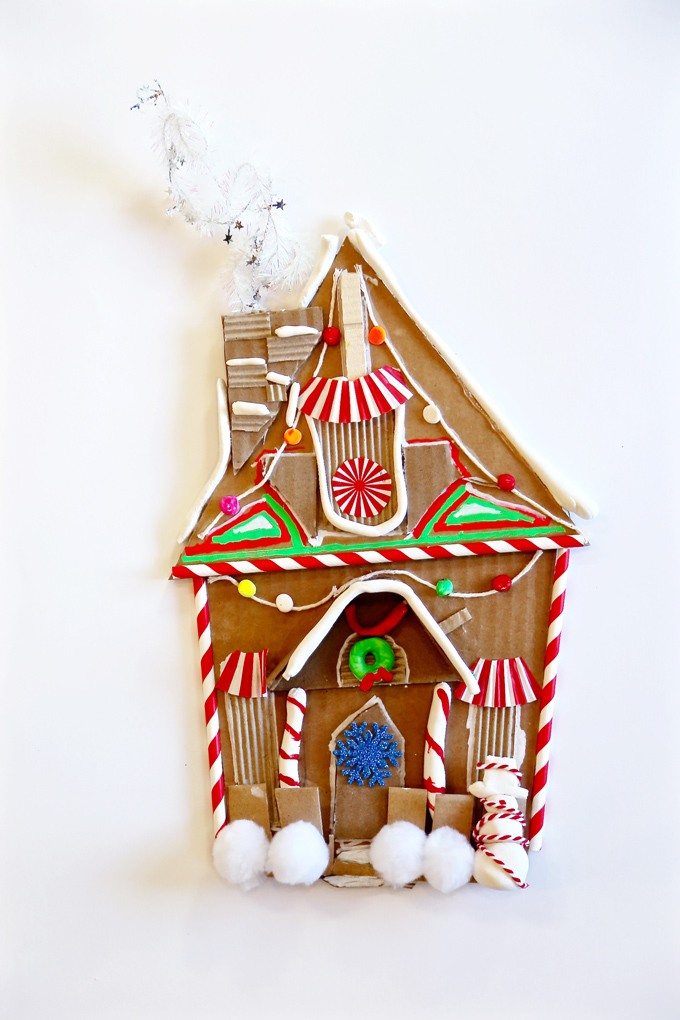
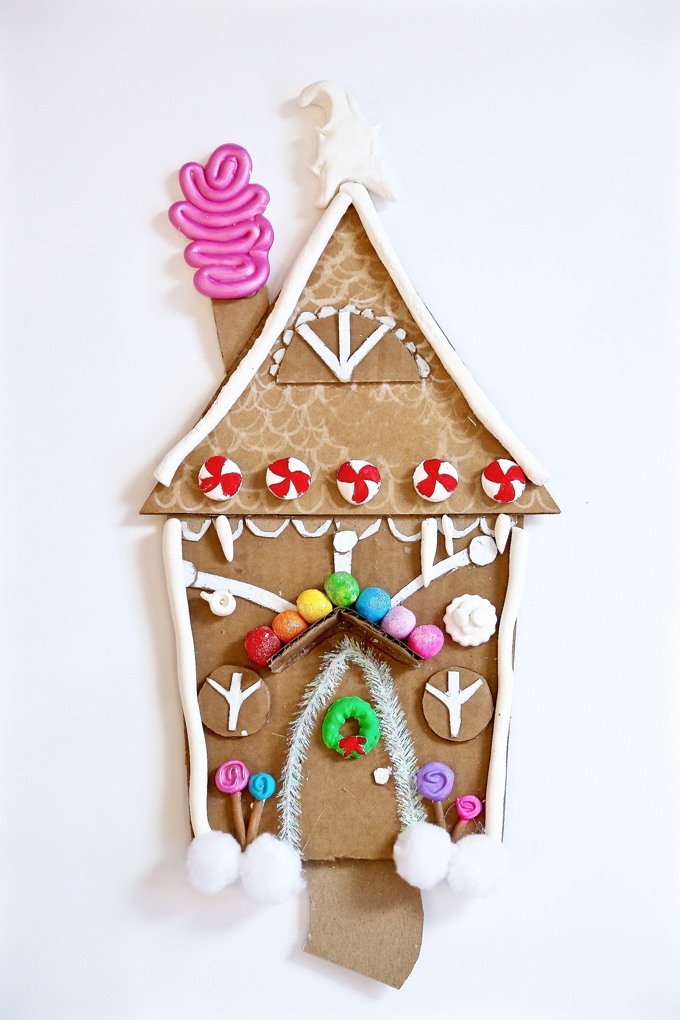
SIX Carefully set all modeling dough piece aside and remove the clear wrap. Arrange pieces in place for gluing down onto cardboard. Most dough pieces can be glued with white glue. It can be helpful for an adult to hot glue fragile icing pieces for strength and a quicker dry time. Use chalk marker to add small details of color on the cardboard cottage. White chalk marker can imply small areas of icing and colored chalk marker can add vivid details to the cardboard pieces. Now, you can add your embellishments including, white pom-poms, red & white paper straws and striped cupcake papers, wire stars, and white string for lights. Most embellishments can simply be glued in place onto the cardboard.
Be sure to tag @handmakery on Instagram with your Cardboard “Candy” Cottage creations as we’ll be featuring your work on our feed! #candycottage
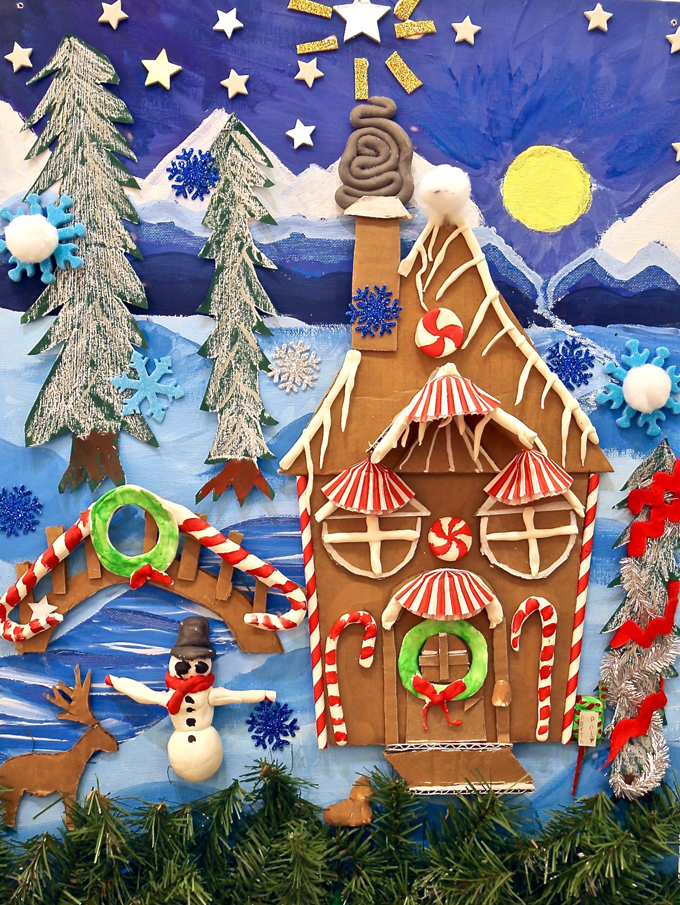
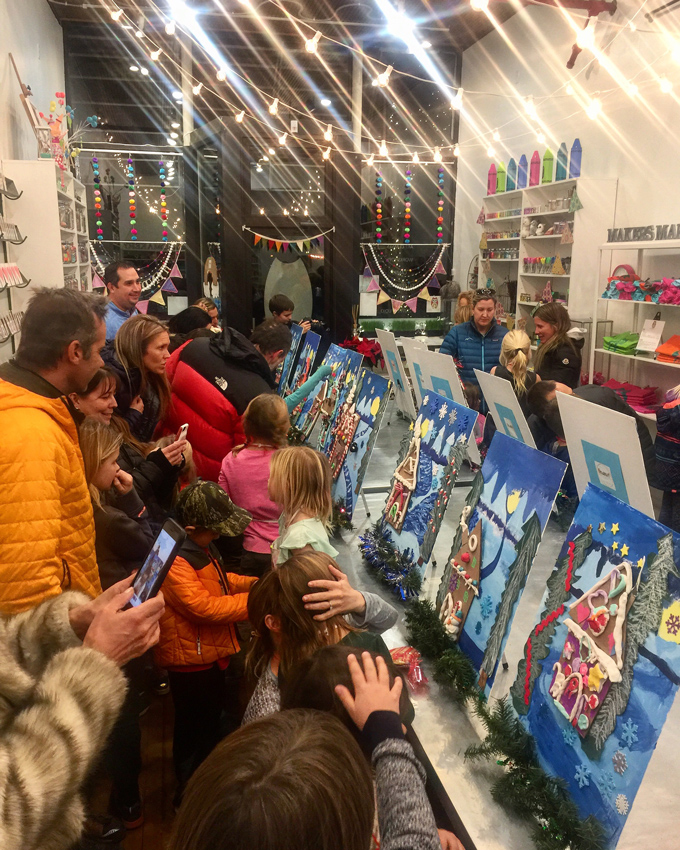
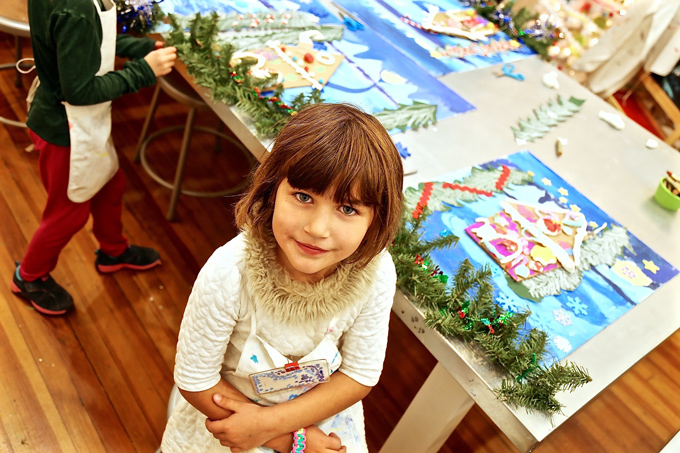
A peek inside the studio at a mini-exhibit + recognition ceremony for our Winter-IE Wonderland Workshop as family and friends gathered to celebrate Cardboard “Candy” Cottages atop a wintery landscape!
JOIN US IN THE STUDIO ~ FIRST FRIDAY, DECEMBER 7TH:
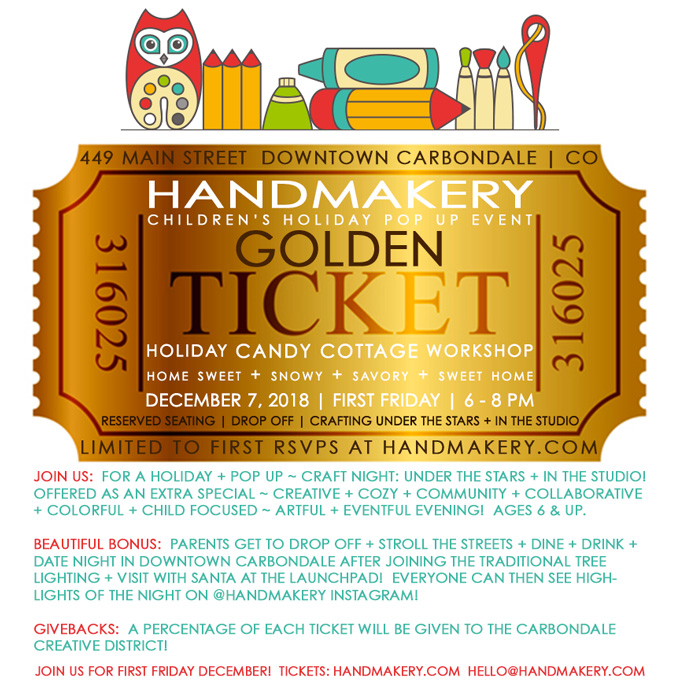
>>>>> RESERVE TICKETS for DECEMBER 7TH!
Happy Holidays! Tag us @handmakery with your creations on Instagram! Follow our blog for more inspiring process-based art projects! As always, thank you for following along on this artful adventure! Send us a note anytime! We’d love to hear what you’re thinking and dreaming! Much love and happiness creating in this creative + colorful world full of collaboration + connection + community!
xo Ami
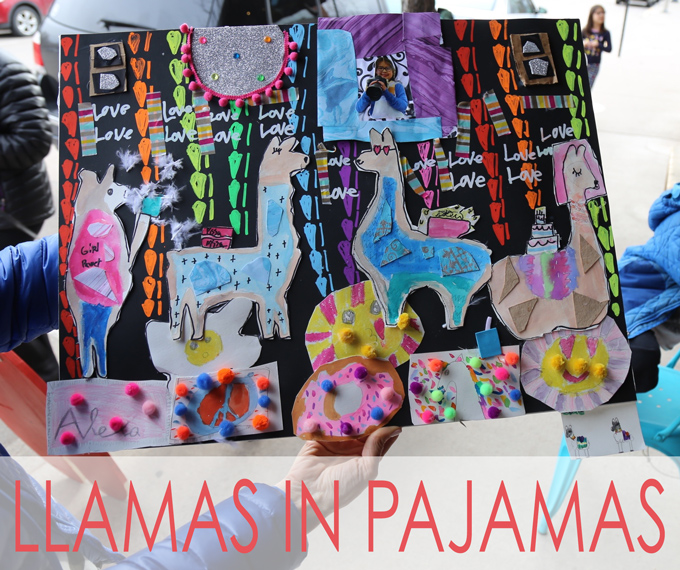
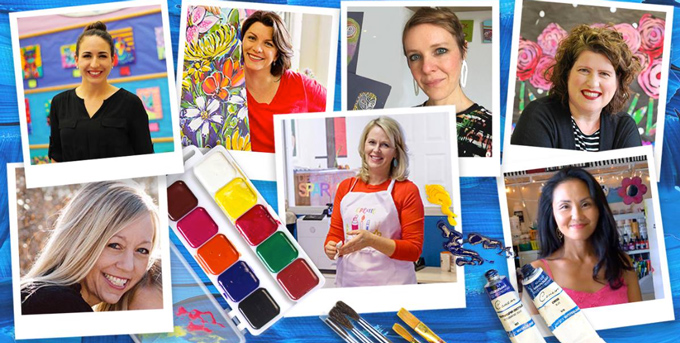
Happy Summertime + July 1st! Excited to announce we’re partnering with Deep Space Sparkle as an art presenter in their Draw, Paint, Make online workshop this Saturday, July 7th! Learn more about this incredible art workshop, the art teachers involved (pictured below), and all the amazing techniques, processes, and projects featured! In this artfully amazing workshop, we’ll be demonstrating all the steps + secrets + special techniques used to create our recent ~ Lil’ Llamas in Pajamas Party Project! Designed, dreamed up, and created with mini-makers in our very own downtown studio! Within the workshop, we’ll also be giving a tour of our NEW art studio (click for a sneak peek) and its organization for creating with children! Join HANDMAKERY + six other art teachers to jazz up art projects with inspiring, yet easy, processes, plans & techniques this Saturday!
Our Lil’ Lamas in Pajamas Project focuses on painted pillows, poufs, ottomans, and wallpaper as interior design elements. It also highlights lovely lil’ llamas, a pajama party a-poppin’, the artist as a photographer peeking into the party, a masterpiece mix of techniques using sketching, drawing, painting, collaging, photography, interior design, expressive color, a unique + exquisite color scheme, patterns, layering, humor, a fun storyline based on the letter P, and more! Did we mention, in our six-week workshop creating with children, we topped it off with our very own pajama party plus mini-exhibit for our mini makers!?! Would love for you to join us this Saturday for Draw, Paint, Make! We’ll definitely be there chatting and chiming in! See below, photos highlighting one of our favorite projects we’ve designed for kids! Be sure you’re following us @handmakery on Instagram for the latest and greatest creative happenings!
(Continue Reading…)

The art studio was filled with mini maker exhibits and recognition ceremonies as ALL six-week workshops wrapped up last week! We celebrated our fifth exhibit, an end of the week highlight, hosting a FIRST FRIDAY “kid at heART exhibit” showcasing my 88-year-old grandfather, Bob Fadely aka Papa Bob, and his very first art exhibit ~ COLORING IN COLORFUL COLORADO! Megan Tackett, an incredibly talented and enthusiastic writer, captured my grandfather in both a delightful article in The Sopris Sun and live interview on KDNK! After it was all said and done, my most genuine Grandfather shared with me, “Last week was one of the BEST weeks of my life!” “Art (without a doubt) washes away from the soul the dust of everyday life.” – Pablo Picasso

As springtime unfolds the outdoors become artfully alive! Dragonflies always mesmerize with their stealthy speed, shimmery color, intricate detail, and pattern on point. They lead us to our favorite outdoor places and spaces, including rivers, ponds, and lakes. Spring into a simple process upcycling household goods to create a bountiful + beautiful ~ DIY Delightful Dragonfly dreamed up in the HANDMAKERY art studio! Simply take a peek!
(Continue Reading…)

Excited to share with you a project recently dreamed up, designed, created, and of course, constructed in our very own downtown art studio! Take a BIG splash into our ~ DIY Forever Fishbowls! This project was created, carried out, and creatively constructed in several of our mixed age, six-week, after school, hands-on + mixed media, art workshops creating with young artists!
Beyond excited to also announce hands on + mixed media + NEW ART WORKSHOPS START NEXT WEEK for a wide array of ages! Hop on over to ENROLL AT HANDMAKERY.COM as spaces are quickly filling! While visiting, peek at new photos on our site and IG feed!

As you can clearly see, artists used a wide array of mixed media to bring their vision to life! Below, you’ll discover all you need to create your very own ~ DIY Forever Fishbowl. The big + beautiful bonus, you’ll never send a fish into fishy heaven, EVER EVER EVER again. YES, this fishy will truly live F-O-R-E-V-E-R and children LOVE this fact! Like, XOXOXO times a million or LOVE for a lifetime!

(Continue Reading…)

Happy New Year!!! Looking back, one of our most favorite workshops for children included ~ wee Wondrous Weavings on Wooden Looms! Oh my, the possibilities of textile design! These mini-masterpieces were created by 6 – 10-year-old artists! Our NEW ~ 2018 Winter Art Workshop Brochure is hot-of-the-press! Workshops start early January, yes this week and they’re filling up fast, just hop on over to our simple SIGN UP! If you’re looking for hands-on + mixed media + creative expression + an artful highlight to each week + a chance to meet new families and friends JOIN US + ENROLL TODAY! You can also connect with us on Instagram @handmakery to keep an eye on what we’re creating in the studio from special art events to birthday parties, and of course everything in between at our NEW art studio located at 449 Main Street in Carbondale | CO in the heart of the Carbondale Creative District!
WORKSHOPS + CLASSES + CAMPS

(Continue Reading…)

Incredibly excited to share with you our original ~ DIY Papier-mache Figures created in our Mini Makers Workshop with 5 – 10-year-old artists! Our next session of weekly art workshops begins the week of October 16th, YES, next week! We have a workshop for just about every age under the sun! Take a peek at our upcoming schedule filled with weekly workshops, craft nights, holiday camps + events, and celebrations! Excited to announce we’re now hosting birthday parties in our beautiful + NEW art studio on Main Street! Be on the lookout for our first ever ~ Ladies Craft Night coming soon!
 (Continue Reading…)

Warm weather brings childhood memories of an ice cream truck sounding and strolling neighborhood streets. In our recent workshop ~ BEEP BEEP! SWEET TREATS, artists created ~ Ice Cream Truck Sculptures! Love that we still have a few days to celebrate and soak up summer! The workshop week was spectacular and our mini makers were beaming to exhibit their one-of-a-kind creations. Along with an ice cream truck, each artist also created a mini picnic table and handmade sweet treats for imaginative + interactive play! Turn it up and take a peek at our short + sweet clip to an ice cream truck melody, highlighting the wondrous week!

You may have seen our Collaged Ice Cream Cones created with children in our outdoor art studio for a recent downtown event. My friend Bar Rucci, over at Art Bar Blog was a huge inspiration in creating these paper sprinkled + cherry topped cones. Take a look at her fantastic process creating Paper Mache Ice Cream Sundaes and Cardboard Ice Cream Cones! Here’s a little secret, Barbara has a beyond inspiring book coming out this fall which I’ve had the opportunity to preview (cover to cover) and preorder ~ Art Workshop for Children: How to Foster Original Thinking with more than 25 Process Art Experiences. All I can say is reserve your copy today, it’s truly one of the BEST BOOKS for creating with children that’s ever hit the printing press. Personally promise it will be a studio go-to and gem that you’ll open again and again!
On a side note, Handmade Charlotte just shared the cutest + tiniest + tastiest treat, Gingerbread Ice Cream Trucks! Maybe you’ve also seen Hello Wonderful’s DIY Pretend Play Ice Cream Cones using plaster? Just a wee bit in love with both ideas!
Enrollment is currently underway and filling quickly for our 2016/17 School Year {mixed-media + hands-on} Art Workshops. Follow our artful adventure on Instagram and Facebook, would absolutely love to connect, collaborate, and create community through children + creativity!

(Continue Reading…)

Happy Summertime! Hope you’re enjoying some much deserved outdoor time with family and friends venturing in the GREAT outdoors! We’re definitely soaking up and savoring summer and heading into the mountains for camping getaways! Excited to share with you these outdoor + camping + canvas + landscape paintings created in our recent children’s workshop, SPRING IS IN THE AiRTIST! This mixed-media painting was inspired by one of our favorite wanderlust painters, Katie Daisy and her beautiful piece, Let’s Sleep Under the Stars! Take a peek at Katie’s inspiring paintings and our painting process with children! Thank you @katiedaisy for your painterly inspiration, adore your style, whimsical spirit, and passion for the outdoors!
 (Continue Reading…)

Excited to share a peek into our mural making process, creating with 118 youth, start to finish!
(Continue Reading…)